Showing posts with label DIY. Show all posts

Tuesday, June 19, 2007

Video: Using Reflectors for Macro Shots


Here's a short little video clip that demonstrates how easy it is to use reflectors to flesh out a macro shot.

Main point: They are lighting from the back/top, with a top/backlight-based exposure. So they use the reflectors to basically do everything else, except the additional background light.

This video is a demo for a commercial product (the reflector system.) But I think, with some deviously clever engineering, it just might actually be possible to DIY these things out of cardboard, posterboard, aluminum foil, a guy wearing a white T-shirt - whatever.

Call me ambitious, but I think it could be done.
___________________________________

If you shoot (or find) a cool lighting-related video on YouTube, please suggest it through the link at the top of the Video Archive dropdown menu on the sidebar at right.

Tuesday, June 5, 2007

Take the Plunge with This DIY Background Stand

DIYPhotography.net is a site after my own heart. Their latest offering is a Home-Depot-sourced lightweight background stand modeled after the Bogen Autopole system.

How do they safely and temporarily connect it to your ceiling? Well, let's just say that if things ever get really bad around your house, you'll be able to unstop two toilets at once.

From up to 12 feet away.

(Thanks for the Flickr tip, Greg!)

:: Hardware Store Backdrop Stand ::

Wednesday, May 30, 2007

Keep Tabs on Your Gels

Here's a quickie gel mounting idea from reader Rui M. Leal.

Rui is using a flash-head-sized template to cut the sample gels that are available for free from Rosco.

(The samples can be hard to find, tho. Always ask when you place an photo gear order somewhere.)

Rather than extend them with tape and mount them with velcro or rubber bands, Rui trims them in a way that leaves a small tab that fits in the built-in bounce card slot. Creased properly, they should pretty well stay put.

This seems like a pretty clean way to mount your gels if your flash has a built-in bounce card, as many do. You can see bigger pix here.

(Thanks, Rui!)

Friday, May 25, 2007

Two Cool Tips from PopPhoto Flash

I am working on an article on how to overclock your camera's sync speed, (flash at 1/2000th, anyone?) but I have just been handed the following assignments for Saturday by The Sun:

A double-header softball game and an additional single baseball game (three games all together) that are 75 miles away from each other. But at least the traffic between the two on I-95 should be smooth going on Memorial Day weekend...

Yikes. Looks like I'll be finishing the flash sync post after that. But at least I have time today to point you to something interesting.

PopPhoto's new Flash Daily blog (that's flash as in news flash and not as in strobe) is already throwing up some pretty cool tidbits.

This week they show you how to make a cheap background paper stand (at your local Home Depot) and where to find a cheap light stand bag at a sporting goods store.

If you'd like to pad your resume with the name of a big-time magazine and you are interested in doing some photoblogging, PopPhoto Flash is looking for contributors, too.

The pay ain't much, but the potential is there for some pretty cool schwag, I'd think.

Thursday, April 26, 2007

The Coolest Free White Background Ever

Need a super-quick white-ish background to photograph that little thingamajig you are selling on eBay?

(No off-camera flash ia actually needed for this one, but I couldn't resist. It is too good of an idea.)

Just go downstairs to the closet where you keep your Igloo/Coleman/no-name-brand cooler, open it up and turn it on its side. Stick your item in there, put the whole thing in some shady area outside and shoot away.

So goofy, it's genius.

In case you need the whole concept spelled out for you, here's the money shot.

But again, this can be a much more low-rent (no-rent, actually) operation, as this setup would work just fine (better, actually) outside in the shade. The tones should be smoother on the background that way.

Hey, what could be cooler than a cooler?

And it gets better: This post is a two-fer-one special, as the top photo above also shows you how to make a DIY, Two-Headed Clamp Snake. Just slide some rubber tubing around a thick wire and zip-tie it to two small clamps.

The two, self-supporting clamps can be adjusted to hold still just about any two small items still. Gobos, reflectors, etc., when working in a macro environment.

If you have any ideas for those items, please put them in the comments. Because two small, identical items which could be (painfully) clamped by this pink and orange contraption just popped into my head and I cannot get the mental image to go away...

(Thanks to mmikee for the idea.)

Thursday, April 12, 2007

Ideas We Like: Greenie Clamp Mini Stand

You have already seen how to convert these cheapo, 99-cent Home Depot clamps into flash mounts, using your umbrella swivel adapter and another 39 cents worth of hardware.

But Strobist reader Zedin has gone one better and is using $1.98 worth of the greenies (along with an umbrella bracket) to make an impromptu, tiltable flash stand.

These clamps are soooo useful, folks. Just don't screw up and get the $3.99 orange ones by mistake. Get four of the cheapos instead.

Wednesday, April 11, 2007

Another Ringlight How-To

Thanks to Simon J. for the heads up on this combination ringlight/tanning machine. The author foregoes flash in favor of floodlights.

No more freezing-cold, scantily clad models for him. No, sir.

He's made a pretty good how-to page if you want to try it out.

Don't forget to budget for some good quality UV filters for your lenses, should you decide to use it a lot. Because I am pretty sure this thing would burn you your own, personal hole-in-the-ozone-layer right over your studio.

Thursday, March 29, 2007

Light Stand in a Pinch: Your Shoe

This is exactly why I like doing these little exercises. You always learn something new.

Today's smack-my-forehead moment is courtesy of Daniel Berman, who used his sneaker as a makeshift light stand. If you need a quick way to mount a kicker or background flash, and you wear shoes, you're good to go.

Two things to consider:

You might want to just shove the foot of the flash down into the heel of the shoe to friction mount the flash so you can use the tilt/swivel to point it any way you want.

Also, while this makes a sweet little low-level light support, there's no reason you could not put it on a shelf, or on top of a partially opened door.

An added bennie for me: The mere act of removing one of my shoes would tend to quickly clear the room of any meddlesome onlookers.

Thursday, March 22, 2007

And He Doesn't Have to Mow the Yard Any More, Either.

Patrick "I Need a Bigger Trophy Case" Smith, who has lately been kicking butt in some of the college PJ awards, has apparently destroyed a perfectly good lawn mower in the quest for a good remote camera and/or low-angle flash mount.

Looks pretty cool, but I don't wanna be around when the grass starts growing in April...

Tuesday, March 20, 2007

You Had Me at 'Cardboard'

I am a sucker for lighting solutions that involve aluminum foil, cardboard or trashbags. As this baby uses all three, you know it's getting posted.

From Lactose, and Other Unavoidable Evils, (luv that name) the Hobo DIY Softbox. (Luv that name, too.)

Thursday, March 8, 2007

Detailed "How-To" for eBay Remotes Mod

Over at Instructables, Strobist reader David W. Smith posted a detailed run-through showing how to mod on the cheapie eBay remotes with a much better antenna. I know we have mentioned this before, but this is by far the most detailed tutorial yet.

Total cost: Some solder and a small piece of wire.

Illegal? Possibly.

Effective? Given that it might be illegal, I am not gonna comment on the specifics of David's insanely increased range. Because that would be irresponsible.

Those of you who can live with occasionally breaking the law for 1/250th of a second at a time might consider putting your soldergeek skills to work on this very cheap alteration.

Being a fine, upstanding, legal Pocket Wizard user, I completely disavow myself of all knowledge of your actions, of course.

Saturday, February 3, 2007

Hack-e-Flash Heaven

Step right up, all you DIY-ers. Today's post will point to a few fun projects for those of you with more brains than money.

First off, is this cool Vivitar 283 homebrew varipower hack, courtesy Metropolicity. Turns out the formerly $20 now $35 Varipower VP-1, which makes a Vivitar 283 an infinitely controllable manual flash (over a 5-stop range) is just a plain 'ol 100k linear pot in disguise. Click above to find out how to ape one for just a few bucks.

Speaking of 283's, a Big Honcho at Vivitar just told me how to tell the "digicam-safe older 283's" from the "not safe older 283's" that will smoke your expensive little baby. The following 283's are safe, with a low trigger voltage (~6v):

• Ones marked "made in Korea."
• Ones marked "Made in China."
• Ones with a red dot in the battery compartment.

According to Vivitar, the above flashes are safe.

Not so the following:

• Any Vivitar 283 marked as "Made in Japan."

These have a synch voltage of 300 volts. Do not, repeat DO NOT, connect it directly to your digicam via hot shoe or PC cord. Or lick it when it is charged up.


Next up is a little space-saving hack for the umbrella flash bracket. Literally. (He just took a hacksaw to his bracket and played with some bolts and epoxy.)

Click through to see how to tighten up on space and weight the next time you are schlepping your lights up the Andes or something.

And lastly, a neat little project that popped up in a cryptic photo posted in the discussion group. Check out this tutorial on how to build a slave for next to nuthin'.

Here's what I am thinking: With this thingie and the single AA-powered flash from a disposable camera, you could make a little slaved, manual miniflash for accent lights or whatever. You could use the neutral density gels from the free sample packs to control the output, too.

Total cost: Probably under 10 clams.

Saturday, January 6, 2007

Next, They'll be Using Nitro

Not ones to settle for limited performance from the much-talked-about cheapo eBay flash remotes, some Strobist readers are souping them up.

Check out this Flickr Strobist thread for a how-to on swapping power sources (AAA's good, exotic batts bad) and swapping the antenna for a reported extended range of 200 feet.

(!)

One thing to consider: You could be breaking the law by adding a six-inch piece of wire to the cheap remote transmitters. While technically you would only be breaking the law for 1/250th of a second per shot, keep an eye out for the black helicopters.

(I'm just saying.)

Saturday, November 11, 2006

Low-End Theory: One-Gallon Modifier

Flickrite Muzzlehatch has constructed a diffusing reflector (or is that a reflecting diffuser?) from a winshield washer fluid bottle for his macro work. A complete how-to photo set is here. It looks to me like this would work well off-camera, perhaps at the end of a monopod.
By Mike H.

Tuesday, October 17, 2006

DIY Collapsible Softbox

Strobist reader EMarc has posted a tutorial on how to make a DIY, collapsible softbox out of an inexpensive bug shield.

You can get the bug shields at any kitchen store.

This is a very cool use of a scrounged household item, IMO. But if you happen to find yourself at a picnic with EMarc, skip his carrot and raisin salad.

Those might not be raisins.

Monday, October 16, 2006

Free and So Easy: DIY Grid Spots for Your Flash

This is so cool.

I would love to take credit for this idea, but the props go to Strobist reader Gut Mann, who posted a note in the Flickr Strobist threads a ways back.

It sat on my list of (about 20,000) things to do until I saw a piece of thick, corrugated cardboard yesterday. Making these little grid spots really could not be easier. (Heck, the top picture pretty much explains it.) And can be done with things you are likely to already have around the house.

I made a few grid spots for my speedlights. Here's what I used:
• Some corrugated cardboard - the thicker the internal cavity the better, and you won't need much. Just keep your eye out for a biggish box designed to hold something heavy. That tends to be the thick stuff.

• A ruler.

• A box cutter or razor knife.

• Some glue

• A rubber band.

First a little theory.

The grids will give you a very tight spot of light - tighter than a snoot - with nice edge gradients.

The beam width is a function of the thickness of the grid vs the size of the internal spaces of the corrugation. I made a half-inch and a one-inch thick grid for each of my flashes, and they work great.

There are two things you should know about these grids.

One, they will eat some light. But that is not an issue, since they are used with direct flash and generally in pretty close quarters.

Two, they will warm the light up somewhat. This is actually a bennie as far as I am concerned, as they tend to get used to light people and the warm light on skin is quite pleasing.

That said, they are, uh, free, which compares favorably to the ridiculously expensive extruded aluminum models.


Time to Make the Grids

The instructions are to make one grid of each size (1/2 inch an one inch) for a speedlight. Adjust to your needs accordingly.

1) Cut a 1/2-inch wide strip of cardboard about 16 inches long. Cut longer if your cardboard is not the thick, corrugated type.

2) Your strip should be cut so when you look at the long side, you look through the little corrugation tunnels. Be careful not to crush the tunnels when you cut. Use a sharp knife, and not on a surface you can damage.

3) Repeat, making a one-inch wide strip in the same fashion.


4) Cut the long strips into sections a tad wider than your flash head.

5) Stack them without glue to make sure they are wide enough to cover the flash head when stacked.


6) Apply glue to them as shown. The last section will not need to have glue applied, as it will be held by the glue on the next-to-last section.

7) Spread the glue with a finger or piece of paper to get complete coverage on one side of each piece. You do not need to use a ton of glue.


8) Assemble them as shown.

9) While the glue is still wet, align them with a flat surface so they will rest properly on your flash. As long as one side of the stack is straight and even, they will work fine.

10) Let them dry. You can "clamp" them with a rubber band as they dry if you wish. Be careful not to crush the layers.


Attaching And Using Them

You're good to go. Attach to your flash as shown in the top photo. Use a neutral or warm-colored rubber band. You can get fancier with the mount, but this way works fine.

They will give a very tight beam spread. Mine grids approximate about a 300mm lens.


The fall-off is quite smooth, with a nice, hot-spot in the center.

You can put a nice cardboard border on them, like Gut Mann did. But it really isn't necessary to get the job done.

And there is no law saying you need to use cardboard, either. You could use corrugated plastic. But you'll want to use a dark, neutral color (black would be ideal) to keep the light from bleeding out of the edges.

White is going to have a very soft - maybe too soft - gradient at the edges. And a colored version, say red, is going to change the color temperature of the light. The cardboard works in this case because the color shoft is actually beneficial for skin.

I am planning to use these for some assignments soon and will post the results as an On Assignment piece or two. The effect will be similar to that of a snoot, but tighter and with more control. They will also take up less space in your gear bag. Both tools have their own uses, and give slightly different looks.

I wanted to show you what I was playing with so you could try it out for yourself in the interim.

Give it a try. We'll compare results later.

And if you just stumbled onto this place from Makezine or another blog, you see what we are all about here.

Wednesday, October 4, 2006

Easy DIY Lighting Diagrams

Over at FredMiranda.com, Kevin Kertz has created a little "unfinished" Photoshop PSD file that can be used to easily create a professional-looking lighting diagram. I'd be using it here, except Kevin would prefer it be used for personal purposes only.

But if you, personally, are a personal kind of person, you can use it to demonstrate your lighting prowess (after the fact) for your fellow shooter.

Simply download and open the file in Photoshop, drag and drop the various items (they are still live, in different layers) and flatten that sucker into a jpeg.

Beats illegible scribbles on the back of a cocktail napkin any day.

Thanks to trappedlight for the heads up on the Strobist Flickr discussion group.

Saturday, September 30, 2006

Super-Cheap, DIY Ring Flash

UPDATE: Since this post was written, we have also featured a Ring Flash Week, with everything from a resources page to a tutorial on how to make a high-output, DIY ring flash adapter that can overpower sunlight. Ring Flash Week begins here.
__________________________

If you are like me, you want to experiment with specialized lighting techniques. But those "looks" sometimes remain specialized because of the cost associated with the gear.

Ring flash is a good example. The 3-d, shadow-wrapped look is unmistakable. And darn near impossible to duplicate without liberating a few hundred bucks from your wallet for a ring flash.

I'll be danged if Strobist reader Jedrek hasn't circumvented the photo gear mafia industry completely with some plastic bowls, scissors, foil and glue.

So, for just a hour's work (and some mysteriously missing spousal tupperware) you can be getting those edgy photos that look like they came right out of a fashion mag.

There's not much to it, technique-wise. Just stick someone up against a colored wall and nuke away.

The kissy lips are not included in the kit. (And your subject probably will not have a set like these.)

Fire a test shot, adjust your exposure - use the flash on manual for repeatable results - and you are good to go, my friend.

Or, you can always go TTL if you are a noob. (Better yet, click here and learn how to light light a real photographer... )

Click here for a more readable version of these instructions, and you'll be on your way to building one for yourself.

There is also a full discussion on the project on the Strobist Flickr group. (You are a member, right? It's free, you know.)

So make it a weekend project and stick your stuff up in the thread.

Here's a quick lighting hint: While this light looks great with someone plastered up against a wall, you can really amp it up with some added rim light to create three-dimensional lighting tension.

Or an easier tweak: Position the bowl where the strobe is entering from the top. The light is hotter at the entry point, so the vertical portion of the shadow would be more pleasing.

You could also work it against a sunset. Heck, go nuts with it. We are only talking some bowls, foil and glue here, people.

Thanks much to Jedrek for the tutorial!

Thursday, September 21, 2006

DIY Softbox Grid for Under $10.00

Long-time readers of Strobist will know that I am not a big fan of softboxes.

Maybe it is because of all of the light they suck out of my small flashes. (Umbrellas are more efficient.)

Maybe it is their cost, by the time you get them hooked up to a stand and an SB speedlight. (You have to get the box and then go doohickey shopping to connect it to a shoe unit.)

Or maybe it is just that I pretty much used them to death in the 80's and 90's.

But a softbox does offer a good balance of diffusion and control. And I will admit to still owning one.

About two weeks ago, I got an assignment that required reasonably soft light and total spill light control. I was going to photograph two elderly ladies in front of a (DLP) projected historical photo for a play they were doing about Baltimore's famous Cone sisters.

For this, I would need a source that could light them, yet completely avoid light spilling on a white background that was 10-12 feet away. (That wall would be for my continuous light projection surface.)

Sure, I could have used a hard light with a gridspot. But using that hard quality of light is not a real cool thing do to someone of that age.

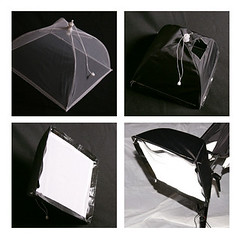
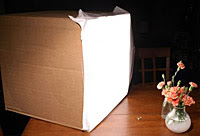
So I dug into my closet and (literally) dusted off my old softbox I used to use ad nauseum with my trusty old White Lightning 600 monobloc. It is a Photoflex model from the '80's, and is about 24 x 30 inches - with some tweaks.

First, it has velcro on the front corners to take either of two, full-sized gels - a window green and a warming gel.

Second, it has black gaffer's tape dividing the front panel into six sections, like the panes of a window. (That makes for much nicer, more natural eye reflections.)

But the softbox needed more spill control, so I went shopping for one of those neat, fabric grid spots.

I am reminded at this point of the old joke wherein a guy gets revenge from a girl by having someone sit next to her for a few minutes at a bar. Then, without warning, they stand up and loudly say, "A hundred a fifty DOLLARS???" Then, they get up and walk away from her.

The implication, of course, being that (a) she is "for sale," and (b) she is quite overpriced at $150.

Well, that's pretty much how I felt about the (very nice looking) fabric grid spots.

So I decided to take some inspiration from my scissors-happy five-year-old and make one myself.

Now, before I go on, I will say that the two items are not exactly equal. Mine is heavier, and designed for not-too-frequent usage. And it is made out of cardboard and tape.

But it cost about 5% of the price of the spiffy store-bought one, and for an infrequent softboxer like myself, it fit the bill.

Put differently, I could almost get another off-camera light, stand, umbrella, etc., for what I saved. No brainer.
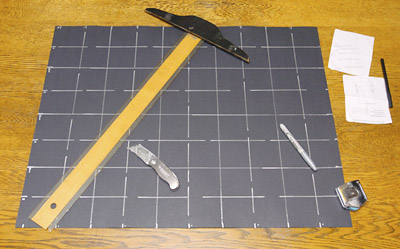

How to Make a DIY Softbox Gridspot

What you'll need:

• For a medium-sized softbox, five or six pieces of thin, black poster board. I barely did it in 5. Get 6 to be safe. Mine were $0.89 each. The board should be at about the size of your softbox.

• Black duct tape. (You won't be removing this, so no need to use more costly gaffer's tape. You can get it for about $3.00 at a craft store, along with the poster board.)

• Silver sharpie (or a white crayon) to mark on the poster. Likely hanging around the house already.

• A straight edge, like a yard (or meter) stick. Will also be used for measuring.

• Scissors (or a razor knife and safe cutting surface.)

• Some 4th-grade math skills.


First, find a common factor for the dimensions of your softbox grid. Aim for something in the area of 4-6 inches.

You will want to make the grid a little smaller than the box, to use a friction mounting system. My box was 24 x 30, so my grid was 22 x 28. I went with a common factor of 5.5 inches. (5.5 x 4 is 22, and 5.5 x 5 is 27.5) I cut my poster board to be this size. (I had to trim 1/2 inch off of one side.)

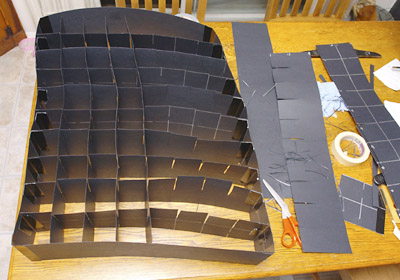
Next, draw a 5.5 x 5.5 (my chosen common factor) grid on each sheet as shown, using solid lines. Then bisect that grid with a 2.25 x 2.25 (half the common factor) set of dashed lines, as shown.

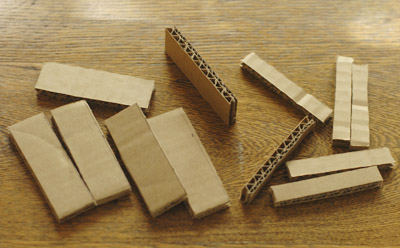
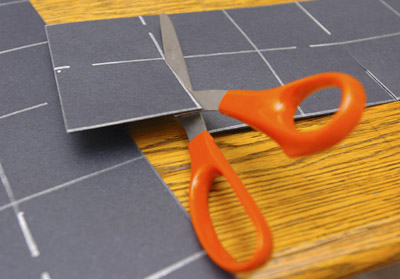
Split the boards into two groups of three sheets each.

Cut one group on the vertical (5.5") lines and one group on the horizontal (5.5"). These will be your strips.

Tape two vertical and two horizontal strips together on edge - with the drawn lines on the inside - to make the perimeter of the gridspot.


Now, cut notches along the 2.25 lines (all of them, including the 5.5 multiples) on one long side of all of the rest of the strips. You will cut to the half-way line on each, that line having been provided by your (dashed) grid drawings, as shown.

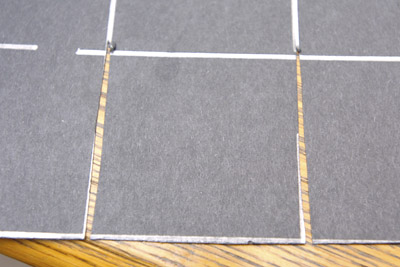
Do not just cut a slice. Cut a shallow "V", to allow the grid to go together much more easily. This is important.

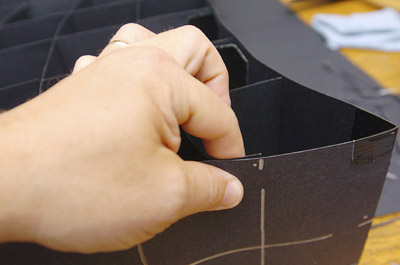
Once you have your vertical and horizontal strips notched, tape your center (or close to center if using an even number) vertical strip into the frame, notches up.

Working on alternate sides, tape the other horizontal strips in, notches up. Your drawn lines will tell you where to tape them for perfect spacing. You do not have to go nuts on the tape, either, You'll be using a lot in total.

Now, work your way through the verticals in the same way - but notches down. If you did not take the time to cut "V notches" your joints will be all squishy and bendy. Go back and cut "V" notches like I suggested.

If you made little "V's," your grid spot will quickly and easily start to come together, causing an almost uncontrollable urge to hit the "make a donation" button on the sidebar of this site.

(Hey, I'm just saying. It happened to me.)

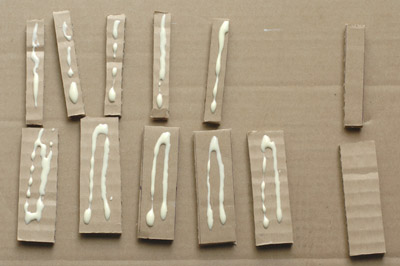
Using small pieces of tape, fasten the edges of the strips to the insides of the frame. You do not have to tape each intersection - just the border areas. You'll finish up pretty quickly from here. I did mine in about 90 minutes total, but I was figuring out how to do it as I went.

Reinforce the corner edges with tape. Reserve any extra poster board to make a light-sealing "skirt" around the edges if you like. You will want it on at least one edge.

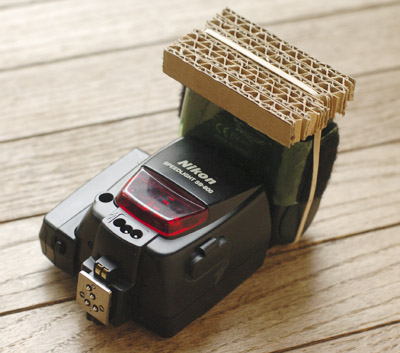
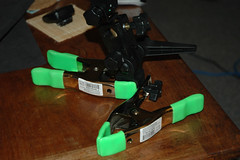
The grid will be heavier than you expected. But it should still hold OK by bending the softbox ribs and wedging them into the four (tape reinforced) corners of the grid spot. It will weigh your box down a little, so adjust the tilt angle of the strobe to compensate.
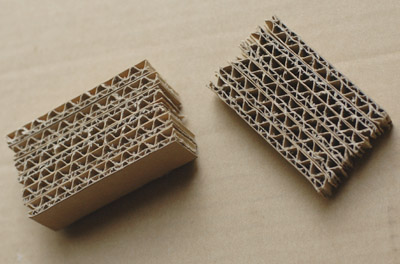
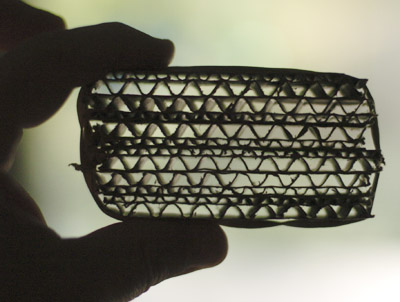
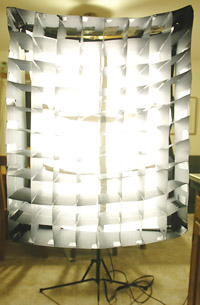

So, How Does it Work?

Pretty darn good, actually.

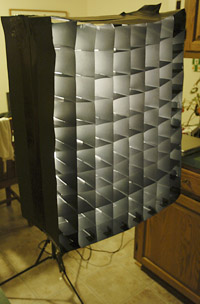
As you can see from this photo, compared to the top one, the light falloff is absolute as you move a little bit away from the front of the box.

This is not a tiny gadget, and not the kind of thing you would travel all of the time with. But it works great to come out of the closet for that infrequent time you might need some serious light spill control. It will collapse on the diagonal an then you can loosely fold it in half.

Next: An On Assignment post detailing the photo that the grid was designed for.

Off Camera Light from On Camera Flash

Is it a snoot, or the worlds smallest softbox?

I don't know either. Thanks to graemo for this cool idea for lighting macro shots.


By Mike H.

Share

Twitter Delicious Facebook Digg Stumbleupon Favorites More