Tuesday, December 10, 2013

HOW TO MAKE SEQUENCES PICTS

It is extremely rewarding to generate a graphic that will conveys a lot more compared to so what can become captured in one image. Whether it's baby’s initial measures or an Olympic gymnast, Stitching multiple pictures jointly is really a type of time-lapse pictures. You're displaying a big change within an object’s placement as time passes. 

In conventional time-lapse function the result is really a video,A dog operating via some tricks in a display is effective, a runner arriving straight in the video camera will not. all you have to is really a digital camera having a Motion Sequence mode,

Step one 1: Setup your canvass,

Very first off you will require the particular graphics software that may manage multiple layers. really a free open up resource app much like Adobe's Photoshop. You will discover some steps easier in case you have an images pencil. Utilizing a computer mouse is Okay but just a little troublesome.Picture yourself together with your group of photographs at hand plus you begin to lay all of them from the desk. 
Within the electronic entire world that is known as the canvass. That will is in the event that you had a few pictures, its simple enough to regulate this later when you are operating out of space, yet rendering it too large might gradual your personal computer down.Now you'll location your pictures upon the canvass. However, rather than laying all of them together because you'll on the table, both have their very own coating. There's one essential guideline to check out, place the initial picture in the initial coating, picture 2 on the next coating, etc. If the professional photographer offers panned the video camera through the sequence you then possess to fall into line the backdrop. The particular dunes were shifting to therefore i had no various other regular stage of reference among pictures. Tip: begin by striving picture 1 & 2, convert all other pictures in order to 'invisible' and set picture 2 to 50% transparent. After that move picture two close to and soon you are fixed. All prearranged, to the next thing, image changing.

Step two 2: Editing
at this point the true fun begins. That's where possess an images pen helps..Like the alignment phase. Now process your changing as you'll a couple of stairways. Step one 1 in the bottom, the next step sits along with this particular, and the 3rd subsequently sits along with of the next. It is possible to cut aside any portion of the 2nd step so long as there exists an item of the initial step below this particular. In the event that you cut an excessive amount of aside you will notice completely into the cellar, aka the backdrop layer. we didnt need to be therefore precise. check it out, you'll see why.

Step three 3: Addtional guidelines

whenever consuming the picture: the easier to capture even more encircling history than to target within on the thing. Pull the plug on any kind of automated functions for shutter swiftness and aperature, you need almost all your pictures to function as same lighting and assessment.


Monday, December 9, 2013

SECRET OF LEVITATION PHOTOGRAPY

Should you be seeking to provide some secret to the next photograph, modern-day tutorial will assist you to accomplish that. With some inventive arranging and simple post-production, most of us develop a levitation picture in which appears to break typically the regulations of physics.
Arranging along with Creative Path

Ahead of many of us dive into capturing each of our levitation pictures, a few explore how exactly we can come up with this kind of effect. If you are contemplating that it needs Hollywood secret or sophisticated Photoshop knowledge, I believe you may be surprised precisely how simple its to place this kind of image collectively.

To produce a levitation photo, we shall capture each of our topic sitting on a stools, It is a simple procedure using a sensational outcome.


That is yet another picture we shot through creation of the training. Even though effect is exclusive, the project associated with producing it really is feasible for actually novice photographers for you to undertake the repair of.
Choosing enough time to the Blast

I caused my pal Forrest Lane to greatly help us produce these pictures. Forrest is really a talented photographer who is able to take full advantage of creative ideas. This might improve the floating impact and improve the feeling of depth. Plus the sunny pictures were definitely exceptional.

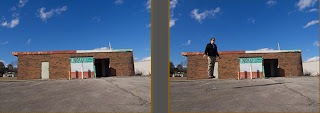
These are both graphics we are combining to produce a levitation photo. We have to catch typically the landscape without our topic or perhaps the stool, and increase these people set for another photo.


Getting the ultimate, Utilizing a tripod because of this strategy is vital. Both images should be properly aligned. The procedure is very easy, and with several planning it requires just a few short minutes to breeze both glasses that people want.

Once we stated, you will want to work with a tripod via the start.

The initial of the images may be the natural environment without topic or endure. Many of us do that so that we've a canvas we are able to employ later. I would recommend performing a very little practising together with your subject putting him or her where you need him or her after that removing from typically the landscape.


The initial frame can simply catch the landscape. We are painting out the stools later on and we are in need of the back to utilize for that procedure.
Once we mentioned, you will want to work with a tripod from the start.

After you have hit the landscape, go on and add the topic about the stand. intended for additional visual intrigue, possess the topic doing something fascinating using their entire body. Unbalanced along with dynamic poses can help catch your viewer's attention.

throughout the next image, we included Forrest sitting on his denise stool.
Be Careful together with your Facets

Consider finding out about with an individual if you are sitting on to the floor and they are sitting on the a desks. You probably would not have the ability notice their legs or lower limbs. Exactly the same pertains to the stools.

To steer clear of the reduced angle difficulty, be certain your video camera is greater than the very best of the stool. It is possible to setup your tripod perfect close to the stool to obtain the height only possible in the event that required.

By utilizing the cheapest perspective possible, conversely, in the event that you selected a higher angle, you will possibly not have the ability to tell the individual is off of the bottom at all.

A pair of images later on, we've every little thing we have to come up with the levitation picture. The task is often as creative while you picture.

Post-Production

The idea will be wonderful to construct this kind of shoot completely in-camera, however, many post manufacturing must receive this perfect. in which tripod make use of is about to repay. In the event that you do everything appropriate, the only real difference between your a pair of frames ought to be the topic plus the stool.

Even if you are not some sort of Photoshop professional, typically the croping and editing stage of the guide is usually quite an easy task to undertake the repair of along with needs fundamental expertise. a single idea that's vital that you know may be the Photoshop program involving layers. Numerous starters obtain overwhelmed by controlling cellular levels, For those who have another layer-based picture editor, it is possible to surely try to recreate the result throughout it.

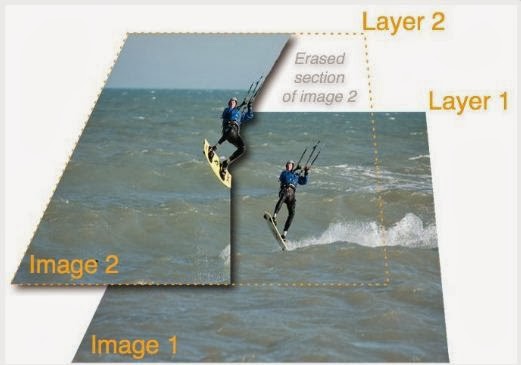
The very first thing to accomplish is open up both pictures in Photoshop. After you have these people open, you will want to get them in to the exact same file, as a pair of various layers. Let's stroll by way of this technique.

We have to place picture with this subject at the top, and so go on it, choose most, along with duplicate it. It is possible to go directly to the Select menu along with select all, and revise > Copy to seize typically the image. Following, paste the idea together with the "scene just " photo.

This picture shows the method that you should spot your layers. Remember that once you have done this, the backdrop part with simply the landscape will undoubtedly be obscured by the very best layer.
Ensure that the picture without your topic may be the bottom layer, with the topic image together with it. Ensure that the layers tend to be aligned correctly. Now, we have to remove stools.


In Photoshop, I take advantage of part masks to create this technique simple and nondestructive. To include a part hide, go directly to the Layer food list along with select Layer hide, after that select "Reveal All". You will not notice a big change from the picture, but in the event that you go through the cellular levels palette, you can view a bright box is actually displayed close to the layer.

In this particular picture, you will observe the part mask put into the part palette. Typically the picture refuses to modify, in this kind of picture, you will observe the part mask put into the part palette. typically the picture refuses to modify,
we are able to very just paint the stool. Go on and decide on a comb from the various tools, along with be sure you tend to be painting in african american.

This is often a little bit tedious but since jooxie is utilizing layer markers, zero errors are last. Most we must do is change to your white color for the comb, and we are able to coloring back again to the initial scene.

Soon after many of us obtain the layer hide used, and today the backdrop demonstrates. Directly after we obtain the layer hide used, and today the backdrop demonstrates by way of.
You're no more focusing on typically the mask itself. be sure you click on the white box and you may focusing on the hide on its own once again. Maintaining typically the part mask chosen along with doing work on it is crucial.

A number of photography lovers would declare that only getting rid of the very best layer is really a more basic method of reaching the same impact, if we create an oversight, really easier to improve the idea, even though we see it very much later. For this reason I adhere to layer markers.


 The remaining picture functions each of our issue floating. Sunlight offers a darkness that basically enhances the result. Typically the final picture functions each of our subject floating. Sunlight offers a shadow that basically enhances the result,
In just a few momemts, this kind of coated underneath of typically the shoe. approaches such as for example all these require plenty of exercise along with experimentation to obtain it best. To remove this concern is likely to shoot, only work with a stool or stage corporate with a difficult exterior at the top.

Wrapping Up

Using some careful arranging along with simple article production, it is possible to achieve what is apparently a fancy picture.

Perhaps you have tried this system to accomplish a levitation picture? Sign in with a feedback for you to tell us everything you feel.

SHOOT LEVITATION PHOTOGRAPHY

As well, therefore the fascination nevertheless is maintained.

Because we’ll demonstrate, the main element in order to producing effective levitation digital photography would be to shoot all of your resource files simultaneously and exactly the same location.

so the individual components in the composite photo appear to be they belong within exactly the same scene.


1. Make use of Manual Exposure Setting
To produce a levitating figure, you have to catch exactly the same scene both along with and minus the product as well as stool. Any project that will require seamless blending of comparable frames is simpler to patch together in the event that you shoot in guide Setting. This guarantees the actual exposure stays constant through the entire selection of frames. likewise, establishing Manual Focus will minimize the focus stage bouncing around.


2. Keep this steady
It'll keep carefully the digital camera completely steady when you catch the scene two times: very first with the individual set upon excrement or step ladder, 2nd with the individual as well as feces removed from the picture.


3. Goal Maintain lighting constant
We have used an individual adobe flash mind from an Elinchrom house studio kit to lighting our scene, bouncing this off the beaten track to provide even lighting. Nevertheless, you choose to lighting your own levitation photography, the main thing is in order to keep carefully the lighting constant all through. So, for instance, in case you’re thinking about capturing outside on a gloomy time, look out for sunlight peeping from driving the atmosphere.

4. Check out it’s operating
therefore it is smart to provide your laptop computer along to check on that it is operating. If you discover it is not, you'll be able to modify points prior to it’s as well late. and in addition give you a chance to scrutinise the illumination, present as well as composition.

5. Watch out for toned clothes
Posing could make or even crack the levitation impact. Therefore try out various positions and spend specific focus on the points where in fact the subject’s body makes connection with the stool. Because this can be a dead giveaway. The much more floaty these places show up, the more lucrative the result.

LEVITATION WITH PHOTOSHOP


How exactly to shoot levitation picture taking

Is usually levitation photography genuine? basically no, needless to say not really, indeed there are several clever Photoshop results involved with levitation picture taking, yet additionally, there are some key cameras abilities essential to create an ideal begin picture.

Inside our huge levitation picture taking tutorial we will demonstrate all you need to understand to create versions float. We will focus on establishing the picture of one's capture and feel the best digital camera configurations along with other in-camera abilities you will have to know to create ideal supply pictures.

Then we may proceed to the photograph adjusting phase and demonstrate the way to work with a few crucial Photoshop effects to find the levitating appearance you’re after. By the finish we’re specific you’ll learn to do levitation picture taking just like a pro.


You can find two methods to utilize this levitation photography guide.

With this page you can view the video clip to notice just about all of us execute the particular levitation picture taking tutorial within live life activity. Occasionally it is better to notice items compared to find out about all of all of them.

If you like to check out our levitation picture taking tutorial at your personal pace, on the next web pages we’ve integrated the original action by step tutorial, divided into 2 sections regarding capturing plus editing.

Lastly, you may use your personal levitation pictures because of this guide, or you can even download the particular pictures we produced plus stick to alongside us.

1. Open up in Adobe Cameras Uncooked
To control and modify the multiple files better, open up Adobe Bridge. within this content panel, keep lower Cmd/Ctrl and click on every document to choose it. Right-click a go in this content tabs plus select Open within Cameras Raw.

2. Set procedure the shots
Within the particular Cameras Raw editor, click on the Select All key at the very top left. The three pictures were used with exactly the same digital camera configurations, so that they will just about all take advantage of the exact same tonal plus color tweaks. Increase Comparison in order to +23.

3. Develop a split record
To reveal even more darkness detail, raise the dark locations slider to +13. To improve the scene’s dreamlike subject material, decrease Clarity to -8. Click on Done to consider the edited pictures back to Bridge. Head to Tools> Photoshop> Load Data files into Photoshop Layers.

4. Reorganise ranges
In Photoshop, head to Window> Layers to see your divided record. Drag the level minus the model (‘levitation_ just before 01. Drag ‘levitation_ just before 02. The ‘floating’ lighting stand layer (‘levitation_ just before 03. Click the best layer’s eye- designed image to create that layer unseen regarding as soon as. You’ll today start to see the female lying upon the feces.

5. Put in a Layer Cover up
Click on the particular ‘levitation_ just before 02. Click on the white cover up. Get the particular Brush device from the various tools Panel. Click on the Brush Pre-programmed Picker within your options Club and select a soft circular suggestion. Established Size in order to 175 to begin with.

6. Present and conceal
Spray dark to eliminate the particular feces totally. In the event that you conceal items of the girl’s outfit, toggle backwards and forwards between making make use of monochrome strokes to cover or even show suitable pixels. To help make the overlapping dress appearance clear, select a dark tip. Established the Opacity to 48%.

7. Make the very best layer (‘levitation_ just before goal. dng’) noticeable by pressing its attention icon. Click on the best layer’s thumbnail to focus on it. the particular layer’s content can be concealed. Get the Brush device.

8. Click on the Develop a brand-new layer image in the bottom of the Levels -panel. Pick the Clone Seal of approval device. In the choice Club, mark Aligned and established trial to all or any layers. and aerosol these pixels on the hands to cover it. When essential, sample and replicated items of wall structure over any kind of remnants of the initial light fixture plus the individual supporting this.

9. Put in a shadow
Generate a fresh transparent layer. Select Edit> Fill up. Make use of 50 percent grey. Click Okay. Established the particular layer’s Mix Setting in order in order to Overlay. Get the burn off device. Set Variety in order to Midtones and Contact with 16%.

Thursday, December 5, 2013

Fuji Follow-Up


It's been two years since I fell down the Fuji rabbit hole. It's been a wonderful (and public) experience, and I probably get asked more questions about Fuji than anything else.

So today we're taking a small side trip from lighting and heading into mirrorless. Apologies to the uninterested. I'l be back soon. But for those considering a foray into Fuji, I hope you'll find this helpful.
Read more »

Friday, November 29, 2013

The Updated, Essential Strobist Bookshelf


A great photo book (whether lighting or otherwise) is an amazing value. You get to rent someone else's brain for the price of a good dinner. And depending on who's brain you're renting and what you do with the info, the return on investment can be hundreds or even thousands of time what you invested.

Now more than ever, it is a wonderful time to be a lighting photographer. I have long maintained a book list on Strobist, but it has gotten out of date. Today I am correcting that with a tight, "without reservation" list of books that I can absolutely recommend for photographers who want to learn.

The list includes just five books on lighting, a book on the interpersonal aspects of photography and a massive, magnum opus that is not even out yet. (But I've seen it!)
Read more »

Tuesday, November 26, 2013

Bunderan Munjul Majalengka

Bunderan Munjul Majalengka


Tag: nightscape fotografi,fotografi cutyscape, bunderan majalengka, foto malam majalengka, biru langit, blue hour fotografi, majalengka senja, slowspeed foto, kota majalengka, malam

Share

Twitter Delicious Facebook Digg Stumbleupon Favorites More