Friday, March 31, 2006

Lighting 101: Snoots and Gobos and Grids


Now that you are getting comfortable with the idea of shooting a light into an umbrella or ceiling, creating the lighting ratio and being color correct, it's time to start stretching a little.

Sometimes what makes a photo sing is not so much where the light is, but where it isn't. And, given that you already have a basic, off-camera strobe setup, you can make the gear you will need to restrict light for just a few pennies.

Remember when we talked about putting the Velcro on the sides of your flash head? It holds gels fine, but you can also use it to attach lighting mods to your flash. (You don't have to permanently attach Velcro to your flash, either. There are removable Velcro "grippers" for mounting things.)

One of my favorites is called a "gobo." Gobo is short for "goes between optics," as in something that goes between the light and your lens. Some people also call them cutters, or flags. Whatever you call them, they are there to partially block light.
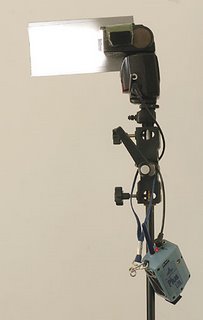
To make a useful-sized GoBo, Cut a piece of still cardboard to make a rectangle about 4x8 inches. Stick some Velcro (the "hooks" side) at one end and at about a third of the way from the other end. This will allow you to attach it to the side of your flash either way so that you can choose how far it sticks out.

I also cover mine with a layer of gaffer's tape. This is the cloth-backed tape that is widely used in the photo industry. It holds great and does not leave any residue. It is not duct tape. Not even close. They are not interchangeable.

Now, you have a sort of "barn door" (really, that's what it's called) that can block the light from your flash in the direction that you choose.

Say you are using your flash to side/backlight something. Your flash, being small and not-too-powerful, is just out of the camera frame. The Gobo could be stuck on the side of the strobe closest to you to keep light from flaring into your lens.

You can also use one on each side of the flash to make light that spreads vertically, but not horizontally (or vice versa.) You can keep light off of a background this way, as you may be lighting it from another source.

You can make them out of cardboard or you are into the DIY look. They just slide into the lid or back pocket of a Domke bag and weigh almost nothing. No brainer.
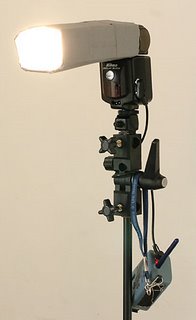
If you want to restrict the light even more, you'll want a snoot. It is nothing more than a sort of tunnel for the light to go through that will restrict it is all directions except for the exact direction the strobe is pointed.

Just shape the cardboard into a rectangular-shaped tube that will slide over your flash head. Make a few - 6", 8", 12" - the longer the tube, the tighter the beam of light. Now cover it in gaffer's tape to make it more durable and light-tight.

(By the way, when you shoot with a snoot, set your flash on its most telephoto setting. No sense in wasting power by sending a wide beam of light just to block it with the snoot.)

How much do snoots restrict the light? Let's do a test:
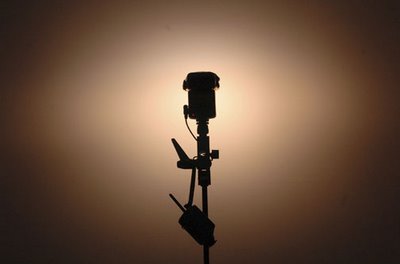

This is a flash fired against the wall (4 feet away) at the "85mm" zoom setting. Note the pattern of the light.
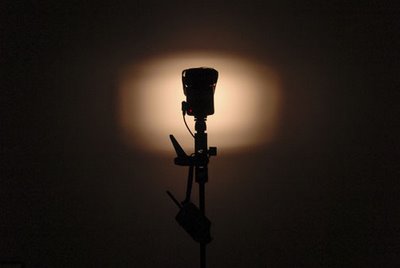

This is the same setup, with an 5" snoot on the flash.

When doing a portrait, the aim of the snooted flash is obviously a bit critical. How can you tell where the beam will hit without a modeling lamp on your flash?

Easy. You ask your subject, "Can you see the front of my flash through the tube from where you are sitting?" If they can, the light will be falling on their face. Do a test and tweak it as necessary using the back of your camera's display as a guide.
__________

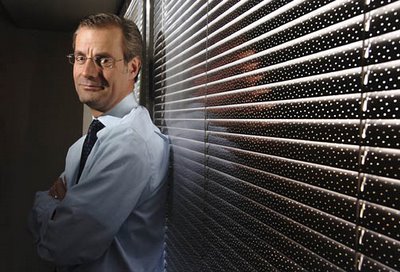
In the frame at the top of this page, I used a snoot to light the face of the CEO of Ciena, a digital fiber optics company. I liked the holes and the daylight that streamed through.

But the blinds were light grey, and thus no contrast for the light holes if my main light hit the blinds. So I restricted it with a snoot. (You can read more about creating that particular shot here, where there's an example shot without the snoot, too.)

On disadvantage to a snoot is that the fall-off area of the light's beam is not very elegant. It's kinda of abrupt. If you want a more elegant, gradient fall-off to the light beam, you'll want to use a grid spot instead of a snoot. Here's an example:
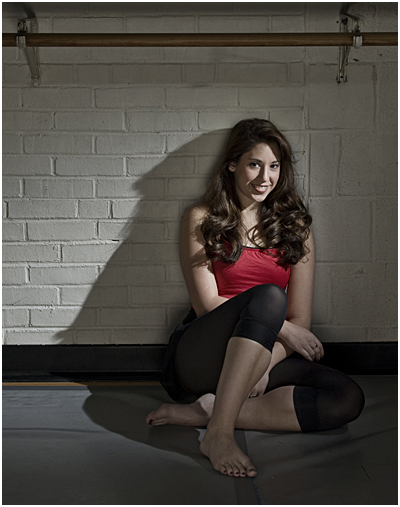


Remember our dancer shot from a few posts ago? The umbrella was on the ground, acting like a fill (or secondary) light. The key (or "primary") light was a flash with a grid spot. In this case it was a Honl Speed Grid (in the 1/8" size).

Grids are a little more expensive than snoots, and generally not worth DIY'ing. But they give beautiful gradients at the edges of the light.

You can see how the edges of the key light gradate very nicely above.
__________

So, restricted light. The takeaway from this page is that now we can have more precise light that we can sculpt. You know that cool shaft of light you like to exploit when you see it coming from a window or something? Now you can make it any time.

This is a very useful style of light for cool portraits, but you have to be aware of your ambient level. Crank up the shutter speed for more drama, or open it up for more detail in the unlit areas. The choice—and control—is yours.

For many beginners, this is a new technique that will open up loads of possibilities. Spend an evening experimenting with it at home to start to understand what it can do.


Next: Textural Lighting for Detail Shots

Lighting 101: Using Gels to Correct Light

(Photo by Strobist reader Siddarth Siva)

Some you may be starting to realize already, but I'll say it aloud:

When lighting a photo it is not about absolute light levels. It's about relative levels. You can adjust for just about any overall light level you have by simply changing the overall exposure on your camera. So that zeroes the "absolutes" out.

It is the relative light levels that define the look of your photos. And for shorthand, we call this a "lighting ratio." I.e., what is the ratio of brightness between the highlights and the shadows?

Guess what? Lighting color sort of works the same way. Only instead of adjusting the exposure, we can instead adjust the camera's white balance to zero out the color of a light source.

For instance, if you were in a fluorescent room, you might balance on the "FL" white balance to make ambient light photos. Since FL lights are in fact green (mostly, but pretty variable these days) your camera would compensate by shifting the color balance about 30CC units of magenta. (That's the complimentary color of green.

So if you used flash in that environment, and was "mixing" the balance with the ambient, your flash would appear … too magenta. Your camera is balanced for FL, and there is a daylight-colored light source. Your flash. So that light would react to the color shift in a not great way.

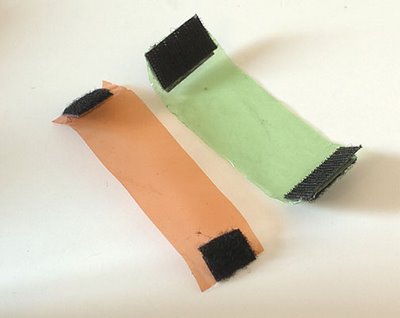
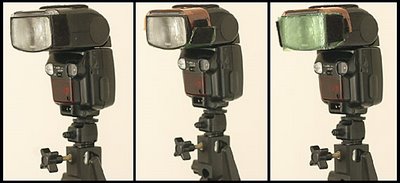
How do you fix this? You turn the flash's light green, like a fluorescent. And you do it with the special green "gel" (AKA "window green" pictured below:


What about those orange-tented tungsten (AKA, "incadescent") lights? What gel would they get?

Hint: It's the other gel in the photo above…

You get the picture—orange tungsten ambient light, you compensate in the camera by going to tungsten WB. And the camera adds blue to the image. So you need to make your flash orange to match.

And you do that with a tungsten gel, also known as a CTO gel. (Color temperature orange.) They can also go the other direction (physically converting a tungsten source into daylight) by using a CTB (color temperature blue) gel.

Simple to mount, you just tape or velcro them to the flash. Leave a little space to vent the heat from the tube:


Heck there are even commercial versions, complete with commonly used gels.

But, as far as being able to make your light pretty much any color you want? Or multiple lights a mixture of colors? Are you starting to see lighting possibilities yet?
__________


Oh, and Check This Out

It appears as though the photo up top brings our last two topics right into perfect example. It was shot by my friend Sid Siva in Dubai. He balanced his exposure by shooting wide open at a high ISO (to get a good shutter speed) and exposing for the street lights. Which looked extra cool when out of focus.

Then he added a little light into the directors face with a small off-camera flash to bring his face back out of the shadows.

But those lights in the back included tungstens, so he did the white balance swap-and-gel, too. Camera on TUNG WB, CTO gel on the flash. Bingo. Is it starting to make sense yet?

Oh, and to get the cool, limited spot of light on filmmaker Mahmooud Kaabour's face, he used a small snoot to restrict the light.

What's a snoot?

Oh, that's just one of several different types of lighting restrictors, which we'll be talking about next. (See? These cliffhangers are worse than Lost, right?)
__________


Next: Cereal Box Snoots and GoBos

Tuesday, March 28, 2006

Lighting 101:Balancing Flash With Ambient, Pt 2

(Photo by Strobist reader Brent Williamson)

Okay, now let's get out of the shade (or the indoors) and do battle against full sun with our off-camera flashes...

When last we met, we talked about the idea of balancing flash with ambient. We were using the flash as a main light and the ambient as fill, but you do not always have to do it that way.

Straight fill flash is very simple these days, with TTL flashes doing the heavy lifting (i.e., thinking) for you automatically. But doing it the easy way usually means keeping the light on the camera.

The goal here is to start to replace the blah concept of 'fill flash' with that of 'balancing light.' And, more important, to separate the idea of fill flash fill/balance from the rote use of on-camera flash.

The process of using flash to augment (which is a better concept than fill) sunlight is very straightforward. First you are going to start at your camera's highest synch speed, because that'll get you the most flash-friendly aperture. And thus, the most flexibility from your small flash. While you're at it, dial your ASA down as low as it will go to get better quality, too.

Now think about your lighting direction and angle. As opposed to the idea of fill flashing, on-camera, from any angle outside without regard to the sun's direction, using a strobe on a stand effectively gives you two lights to play with. You can balance. You can cross light, You can do both. You'll have more flexible (and consistent) results using this approach.

When you just fill flash from on-camera, true, it does bring up the shadows. But while the flash adds detail it really misses out on the opportunity to improve the depth and quality of the light. So why not do both at the same time?

Step one: Think of the sun as your main light source, and your strobe as a secondary light. You are not just getting rid of raccoon eyes now. You are working with two lights. You have flexibility. You might even have style.

Choose your angle of attack. Maybe you have the sun behind you (on the left side) at a ~45-degree angle. Why would you have your fill on on camera when it might look better lighting from the upper right? On-camera flash limits you. Avoid it if you can.

Maybe you turn the angle around and shoot the subject in profile. Say he is facing to your right. You could have him looking into the sun, which is angled to come from slightly behind his face to provide rim light that is nice, but way too contrasty as is. Just move your strobe over to the left side, elevate it a little, and you have a cool-looking, two-light setup.

That's exactly what I did for this quick portrait of the son of the exiled Shah of Iran, made for The Baltimore Sun:


Whatever the angle, the technique for balancing is the same. We are basing the exposure on the ambient this time, and bringing the flash up to fill shadows and/or provide light from another direction.

Assuming a sunny ambient light level to balance, set your camera at the highest synch speed (i.e. lowest aperture) to provide a lower aperture and ease the burden on your flash. Now, get your base (ambient) exposure. We'll call it a 250th at f/11 at ASA 200 for the sake of argument.

Now, with your strobe on manual and on a stand, set it to somewhere around a quarter to half power if you are working close. Maybe half to full power if the flash is further away. If you are not lighting a large area (and you usually are not) zoom the flash to a 70mm or 85mm lens angle to make it even more powerful.

Pop a test frame and eyeball it. If your flash-lit area is too bright, dial the flash down or move it back. If it is too dark, dial it up or move it forward.

The thought process is the same whether you are balancing sunlight or starlight. (And when you think about it, sunlight is starlight, isn't it?) Just start with a good ambient exposure — in this case, exposing the stars — add a little flash to give detail where you want. In this case, the underside of a natural arch:


(Photo by Strobist reader Joe Stylos)

Since we are not exactly swimming in ambient light here, the starting point will be a little different. Instead of 1/250th of a sec (or 1/200th, whatever) to control the sun, we'd probably wanna start with our lens wide open and choose a pretty high ISO to get the fastest reasonable shutter speed for the night sky.

Solve your most pressing variable first, then go from there. The process is the same.
__________


The important thing to remember (and why I told you the angle stuff first) is that this is now a starting point to turn your outside "fill" strobe into a true, useful second light source. Experiment.

I used to practice my outdoor lighting skills any time I was assigned to shoot a simple headshot, AKA a mugshot, for the paper. What you have to remember is that they don't know you could do a perfectly good job by just sticking them in the shade for 30 seconds and bolting. Muah-ha-ha, you are now my lighting model for 15 minutes...

Outside? Play with fill light and angles. (You might want to grab something safe in the shade first just in case.)

Inside? Set up a quick umbrella in a corner where one wall is your background and another is your fill card.

I'd turn a mug shot into a head shot, which is just a more professional way to do it. I would get some good (low-pressure) experience with my lighting. And they'd look better in the paper. It's a win-win.

And, contrary to what you might think, most people will be secretly flattered by the effort you are putting in to making a better photo of them.

And one more thing. For you newspaper photogs, stop thinking of them as mug shots from this point forward. A reporter trained monkey can do a mug shot. Start shooting head shots. You'll improve your quality and get into a habit of using light effectively.

Next: Using Gels to Correct Light

Monday, March 27, 2006

Lighting 101: Balancing Flash and Ambient, Pt 1


Editor's note: To understand balancing flash and ambient, you should have a good, basic understanding of f/stops and shutter speed. That stuff can be found in lots of places (Google it) so I am not going to totally restate it here.
__________


F/stop, Shutter Speed and Flash

While f/stop and shutter speed both control exposure, for our purposes it is important to know how they do so differently. Shutter is a time-based control. F/stop is a diameter-of-the-lens-hole based control.

Since the light from your flash is pretty much instantaneous, it really does not care about the shutter—as long as you are at or below your camera's top "sync" speed. Which for most cameras is either 1/250th or 1/200th of a second.

Note that there are fancy, flash-pulsing methods which will allow you to sync at higher shutter speeds such as 1/1000th of a second. But (a) they have their drawbacks, and (b) getting into that now would be needlessly complex. So just set that aside.


Two Exposures Happen at the Same Time

Every time you take a flash photo, you are making two exposures simultaneously. You are making an exposure of the ambient light, and an exposure of the flash's light. Whether you take this into account or not, it is happening every time.

The ambient exposure is controlled by the f/stop and the shutter speed. The flash, being instantaneous, is controlled by the aperture.

The photo up top is a good visualization of the fact that two images are being made at once. The shot of Robert, a soldier in the U.S. Army, was made with a slow shutter speed. But I also included a flash, which happened instantaneously and froze Robert irregardless of the shutter speed:

Think of it as two overlaid exposures: Frozen, instantaneous flash exposure, mixed with a slow-shutter-speed ambient exposure. Both are made at once, and both light sources are additive to the exposure.

So you have two exposures to consider in every flash-lit picture: the ambient and the flash. I like to find my ambient exposure first—nothing fancy, just trial and error. Once I have that exposure (in which, remember, the shutter speed must be at or below my camera's sync speed) I have a starting point for my final, lit image.

Next, I'll "dial down" my ambient exposure. This means nothing more than changing my camera's settings to underexpose the ambient. How much? That's your choice. And it will determine the contrast range in your final, lit picture.

Remember, when you move your flash off camera, the difference in location produces shadows in your image. That's what makes your subject look all cool and 3-D. And the depth of your shadows—your contrast range; your drama— is determined by the underlying ambient exposure.


Let's Give This a Test Drive

Below is a portrait I shot of Jessie, a local social media entrepreneur. We are going to use a second flash here, to light the background. But the light balancing principles are exactly the same. They work whether you use one flash, two flashes or a hundred flashes.

Okay then. Let's get her in some shade first, because it's much easier to balance a small flash indoors or in shade rather than competing with the full sun. (But we'll get to that next post.)

Here she is, exposed for normal ambient light in shade:


The exposure here is f/5.0 at a 1/160th of a second. For the record, we are at ISO 200 on the camera's overall sensitivity setting.

It's okay, but kinda "meh," right?

So before we even add any flash, let's crank her down a little bit and create some "drama" in our final image. I am going to close down my aperture and drop her by a little over 2 f/stops. So I am going from f/5.0 to f/11. Nothing else has changed:


Exactly what you'd expect, right? Everything is darker. But there is still legibility everywhere - no big black areas. This legibility is important in the final image. Also, notice that since we closed down the aperture we now have more depth of field and the wall in back is now more in focus.

We have created a "safety net" of darkened ambient exposure. When we add flash, no part of this image will get any darker. So we'll end up with drama PLUS legibility.

Now, let's bring in our flash. (Flashes, actually.) We work with manual flash—for predictability and repeatability. One less variable to screw up. And because of this, adding the right amount of flash exposure to a photo is simple and straightforward.


I'll bring in a flash, on manual power, in an umbrella positioned out of the frame and from camera right. Take a test shot. If the flash is too dim, I'll turn up the power. Say it was at quarter power (on manual, as nearly always) when I made my first frame. If too dark I might turn it up to half power. Or vice versa if it was originally too light.

Also, I am going to do the same thing with a second flash back on the wall. Just to make the wall pop a little bit. And here is the result:


Wow, right? Same exact spot as the first shot above, which was properly exposed open shade. Then we dropped down that exposure to get the sort of "safety-net" ambient-only exposure. Then we lit Jessie (and the back wall.)

This is balancing and flash, in a nutshell. If you don't understand it, re-read the above. But be aware that it may not really make sense until you get out there and actually do it.

When working this way, I like to think of my flash as a main (or "key") light and the ambient as my supporting (or "fill") light.


The Process:

1. Get a full ambient exposure.

2. Drop it down to create some "drama." How much, is up to you.

3. Bring your subject back up to full exposure by adding flash.


It's Almost Not Fair

How often have you heard this, usually with a tone of superiority:

"I am a purist, I only shoot available light."

(Translation: I am scared shitless of flash.)

As an ambient light photographer, you only have one "correct" exposure. Maybe a little wiggle room if you are being interpretive.

But as a lighting photographer, we control everything in the frame, independently of the other areas, by how and where we expose and add light.

I have been doing this for almost three decades, and I still think that is the coolest thing ever. If you want more detail on the Jessie shoot, it is laid out in more detail (but also assuming a little more knowledge) in the On Assignment section, here.

Otherwise, let's flip the process and use flash to control the harsh shadows created by directional ambient light. Same process, just backwards.
__________


Next: Balancing Flash Intensity With Ambient, Part 2

Lighting 101: Hard Light


So, we have spent a decent amount of time on soft light modifiers. Soft light generally comes from physically large sources or modifiers—think umbrellas, walls, overhead clouds, etc. But hard lights—which come from small sources—can look really cool, too. It's just that hard flash gets a bad rap because of how mad it looks when mounted right on top of your camera.


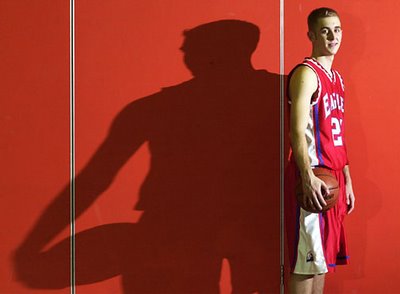
Take the quickie portrait I did of the basketball player, above, done for my newspaper. I have the flash off of the camera, way over to the right. This creates a shadow that I then used as a graphic element in the photo. Still just the one flash, just in a different location.

Mind you, this photo would have looked pretty bad if my flash were mounted on the camera. But it would not have been the hardness of the light, but rather the location that did the damage.

After 25+ years as a lighting photographer, hard light is to me far more interesting than soft light. Especially when you are able to use multiple hard light sources. Take this product shot for instance:


(Photo by Strobist reader Danny Bird)

This product shot looks completely different (and, to my eye, more interesting) for having been shot with hard light sources. They sculpt the jacket and reveal form and texture. Let's look at another:


(Photo by Strobist reader Christopher Tan)

And just as in the photo up top, this photo uses a subject and a wall, but more than one hard light. (For details, click the photo.) The hard lights combine to partially reveal and sculpt the subject. And they are far more appropriate than would be a soft, portrait-looking umbrella or the like.

Often the key to success with your hard light images is to control the lighting ratio (i.e., relative levels of brightness) between the lights and shadows. Think of that hard shadow created by the hard light in the photo up top. It is harsh and abrupt, but not completely black. I can still see detail in the shadows, such as in the wall and on the shadow side of his face.

I like to think of a hard shadow as the equivalent of the light abruptly falling off of a ledge. To briefly press the ledge analogy: The depth of that ledge you just fell off of is the difference an interesting experience and, well, a fatal one. It's not about the ledge. It's about the depth.

If you want to dip your toe in the hard light water, try balancing your flash close to the ambient (i.e., normal continuous) light level. The fact that the hard shadows will have good detail in them will lessen the chances of getting a bad result with hard light. But the edgy effect will still be there.
__________


Okay, so we have looked at soft light (umbrellas, wall-bouncing, etc.) and hard light. But there are all kinds of ways you can modify and shape the light. Up next, two of my very favorite ways to do that...


Next: Two Cool Light Mods

Lighting 101: Bare-Bulb Lighting

(Photo by Strobist reader Janaka Rodrigue

As you have already seen, we can the hard light of your bare flash and soften it with an umbrella. We can further soften it by bouncing it off of a wall or ceiling. But we can also turn it into a 360-degree glowing light source.

The old-school term for this is "bare bulb" lighting. That's because older flashes (and most current large studio flashes) have the ability to totally expose the flash tube, allowing the light to radiate in all directions.

Your speedlight can't do that as is, because the grain-of-rice-sized flash tube is permanently housed in its internal reflector an covered with a plastic fresnel lens at front. But we can diffuse the light after it leaves your flash to create omnidirectional, bare-bulb style lighting.

That's just what Strobist reader Janaka Rodrigue did above, using an inexpensive lamp globe from a hardware store. By sticking the speedlight inside, the harsh light turned into a soft, glowing orb. Which made for a beautiful, ethereal portrait.

Many flashes come with a small, white dome (sometimes called a Sto-Fen) that will convert the flashlight-stlye light into a into a bare bulb-style light. It is omnidirectional, but is it still small and harsh. But it will absolutely make your flash act like a bare light bulb. In fact, I used that same technique here—that's a speedlight in the tiki hut, not a light bulb:


See how the light illuminates the inside of the tiki hut and spills in a natural gradient across the ground? I made that happen by using a small dome on the flash to imitate a bare light bulb. I made the photo of my parents to celebrate their 50th anniversary. You can read in more detail how it was made, here.

Also, bare-bulb modifiers can actually give you softer light—as long as you are near walls and/or a ceiling for that omnidirectional light to bounce off of. That's the secret behind commercially produced larger dome diffusers like the LightSphere.

They work well in small rooms with nearby walls, but they are not well-suited for open spaces. Just saying that so you know what they can and can't do. Plus, next time you see a wedding photographer using one outside (and they do that a lot) you can feel just a little bit superior.

Not to say they are not useful. But you don't have to spend $100 on one, either. You can get one for under $5 at your local Chinese takeout—and they come full of hot-and-sour soup as well:

Just wash it out (or not, whatever, I'm a guy after all) and cut a little "X" in the lid with an X-acto knife. Then it'll slide right onto your flash for a friction fit.

These are great to experiment with. Need light to fill a room in all directions? Bare bulb is your mod.

Gonna light the inside of a fridge to simulate that "late-night-snack" glow? Made sure you've already ordered the hot-and-sour soup first.

There are tons of different ways to modify lights, and many have DIY versions you can try for next to nothing. Heck, we're just getting warmed up here.

But for the moment, let's take everything away and play with that harsh bare flash that has previously been the reason all of your flash pictures looked like, well, flash pictures…
__________


Next: Lighting 101: Hard Light

Thursday, March 23, 2006

Lighting 101: Bouncing off of Walls and Ceilings


I am thinking many of you already use your on-camera flashes creatively by bouncing them off of a ceiling or wall. This is a great technique, and one of the most common ways to get a taste of creating good light with your flash.


(Photo by Strobist reader Leon Tolner)

So why bother to take your light off of the camera when you are just going to bounce it off of a wall/ceiling anyway?

• Because you move around when you shoot, which changes where the light hits/comes from in a room.

• Because lighting on manual from a set location gives you consistency in exposure, light direction and hard/soft quality.

• Because it is a quick technique to half-way set up and begin shooting while you decide what you really want to do with cooler light.

• Because working with the light off camera is a good habit/ethic to get into, whether you are just bouncing off of a wall/ceiling, or using a plastic diffuser with a half tungsten gel through an office-plant cookie (explained here) to make a slick, layered quickie portrait in an otherwise drab, flourescent office.

This technique is easy, heavy-use, bread-and-butter stuff. And, you will notice, we are talking pure technique at this point and not hitting you up for yet another piece of hardware. 'Bout time, huh?

OK, then. So this gives broad, room-filling light and is good for setting up a forgiving zone of directional light. Smooth and flat, but crisp, too. This is the strobist's version of quick and dirty.

Things to remember?

First, watch your wall color. It'll color cast your light.

You can frequently use it to advantage, as in the warm light the wall kicked back in this artist portrait.

Use the lens angle adjustment on your strobe to control the size of the patch of light illuminating your subject. Just pop the flash and eyeball the hotspot on your bounce surface. The above photo of the county sheriff had the flash set on 85mm, bounced off of the ceiling near the subject. Note the fall-off through the back of the frame.

Conversely, this shot of a midnight Harry Potter fanatic was lit up into the ceiling behind me with the strobe set to 24mm. So this just casts a wide, soft swath of light.


Next: Bare-Bulb Style Lighting

Lighting 101: Using Umbrellas


Okay, now is where things start to get a little more interesting. Let's talk about your first "light modifier."

An umbrella will almost certainly be your first light mod. (It is included in the jump starter kit, if you presently have one on the way to you.) Think of your flash as a very brief-but-powerful flashlight. And like a flashlight the business end of your flash is only about two square inches in area.

Thus, while it gives out a lot of light instantaneously, that light is very harsh. To some degree, that may be why you previously have been unhappy with your flash photos.

An umbrella takes your harsh flashlight and essentially turns it into a window. Except we are talking nice, soft window light that you can position and control—in intensity, in location, in angle, even in the color of the light itself.

Photo umbrellas are cheap, portable and super useful. Which is why you'll want want an umbrella as your first soft light source.

There are two general kinds -- the reflected umbrella and the optical white shoot-through umbrella. I strongly prefer the white (shoot-through) version as it is more versatile. In particular, because you can bring it right up next to someone's face for both power and softness.

If you are going with the compact light stands, you'll probably want a 43" shoot-through umbrella, which is pictured above. It folds down to about 14" so it transports very easily along with your compact stand. You can ball-bungee it to your strapped stand and have a nice, transportable light kit.

They are cheap (less than $20) small and easy to transport. Because of the telescoping shaft, they can be a little fragile. But use care, and they will last.

I used to use the reflected umbrellas (they have a white or silver lining and a black backing) but I almost never do any more. I pretty much stick to the shoot-thru's 99% of the time, which is why we chose the white shoot-through model for your starter kit.
__________

Now, let's look at how to use them. (Ahh, the new gear finally begins to transition into technique—and results!)

Shoot your harsh flash through an umbrella and you get softness and control. Stick it in close and you get light that is tailor-made for portraiture.

This is a very simple way to make your mugshots look more like they were shot by a professional and not by someone from the Department of Motor Vehicles. With a short telephoto, and umbrella'd strobe and awareness of your ambient light, you can make any headshot look more like a cover shot.

Back it up a little bit, and your new "portable window" can also light some of the environment:


It is safe, classic-looking light that is easy to tote around. Total no-brainer in the bang-for-the-buck department.

In the photos above, the umbrella is being used from what can be considered to be a "classic" position -- 45 degrees up and over to one side. There's nothing wrong with this, and it is probably how you will start out using the light source.

The danger is, you don't move past that and your photos start to all look alike. That is the blessing and curse of an umbrella -- it is easy to look good with it, and it is a very safe light source.


But, as seen above, umbrellas also can be used to create more unusual and dramatic light. And that's where I like to hang out now.

The portrait of cellist Caleb Jones is a great example. (Click here to have that assignment -- including a behind-the-scenes video -- pop up in a new window.) We were flying the umbrella just over and behind his head. By doing that, we created a light that was less predictable, and more ethereal.


An umbrella on a small light stand is light and portable enough to be flown over someone by using an assistant as a "voice activated light stand". This gives you all kinds of opportunities for different lighting directions.

Work the angle. Try different orientations. Get out of the 45-degree rut. You'll be surprised at what an umbrella can do.


Take this portrait of Pat Morrissey, above, shot in Edinburgh.

By flying the umbrella out over him (but, unlike the cellist, slightly in front) we create a more mysterious "character" light. You can see the location of the light by looking at the reflection in Pat's eyes.

Again, atypical position for an umbrella light. But, I think, more interesting than the standard "45."


For Dancer Kassi Mattera, above, we took an opposite tack. The umbrella is being used not as a key light, but as a "fill" light. (Don't worry, you'll learn more about multi-light setups soon enough.) The umbrella is coming from below. It is actually positioned on the ground in front of her:


Not typical, but interesting. That umbrella is filling at about two stops under the main exposure level. Kassi is being lit by another, hard light source at upper right.

The umbrella, on the floor, is bathing Kassi in soft, "bottom light" and keeping all of the hard light's shadows from going to black. (Click here to see a full run-thru of this shoot in a new window.)

Long story short, umbrellas are a great choice for a first soft light modifier. But even better—and if you allow yourself—you can grow with them and get into far more interesting light.
__________


Next: Bouncing off of Walls and Ceilings

Wednesday, March 22, 2006

On Assignment: Real Estate Developer


This shot of a commercial real estate developer shot in Baltimore's Inner Harbor is a good example of how to easily overpower daylight with a small, AA-powered strobe.

Most high-end shoe-mount strobes these days are designed to calculate and provide the "right" fill flash values while sitting on your camera (or at arm's length with a TTL cord.) But I rarely use that feature unless I am working in a fluid situation where I am following a moving subject.

I still like the control (and choice of lighting angle) I get working in manual mode with the light off camera on a stand if my subject gives me that luxury.

First, who's to say what your TTL flash in going to think is the right amount of fill? Even with the compensation buttons, the camera is really driving, not you.

And second, I like having the ability to put my flash anywhere I want, while working wirelessly. (Yeesh, say that three times fast.)

So, in this case the ambient light is coming from behind the buildings but is going in an out of the clouds. So I exposed for the blue sky and set the flash to 1/2 power, which still gave me a very good working distance.

Remember to start out working at your maximum synch speed to give your strobe the most flexibility in a bright-light situation.

There was actually a stop of power still to burn here. I could have made the sky a stop darker for a more ominous look by cranking the strobe to full power and dropping the working aperture a stop. But I wanted to save some detail in the buildings (as it was I brought them up a little in Photoshop) so I struck the balance between the sky and building exposure.

Again, plenty of working light from the strobe in the middle of the day. These little strobes are far more useful than just automatic, TTL fill-flash-o-trons.

This photo brings up another point. I was following this guy around for the morning, shooting mostly available light. But I knew I wanted a lit portrait I could use as lead if I wanted, so I carried the little "light-stand-on-a-strap" on my shoulder with me all morning as I worked.

Those little guys really are not that much to carry around, provided you are working light on gear to begin with.


Next: Blind Snoot Portrait

Tuesday, March 21, 2006

Lighting 101: Synching Your Flash


When your flash is connected to your camera, it syncs automatically. When it is off camera, you have to take care of this yourself. And there are several ways to do it.

In the photo above, I synched everyone else's flash to my camera to to get "one of those lucky moments." Except it wasn't luck. I made it happen over and over again for this shot. More on that in a minute.


The Wire

If you are a beginner (and presumably on a budget) you'll want to sync your camera with a simple wire, also known as a sync cord. You'll sometimes hear it called a "PC cord," from the old PC jacks. But you'll want to go with the cheaper audio patch cord version.


As we said before, using a universal translator on both your camera and your flash will allow you to sync it with a simple audio cord. The translator will add the ⅛-inch jack to both your camera and your flash.

(If you are using an LP160 flash, you already have the jack on your flash and will not need the second translator.)

This is about as cheap and simple as it gets. No batteries, no sometimes-fickle wireless radio issues. But you are limited in range to 20 feet or so, depending on the length of your cord. Still, go this way first while you are learning.

For the record, I always have a sync cord with me at a shoot as a backup, even when I am using wireless remotes, as we'll talk about below. Cheap, and very reliable.


Sync With a Slave

If you have more than one flash, you can sync the extra flashes to your original off-camera flash with optical slaves. (If you'll remember, an optical slave fires your flash at the exact instant it sees the light from another flash.)

Which is why, from this day forward, you should not buy a flash that does not have a built-in optical slave. It's that simple -- just don't do it. You are shooting yourself in the foot if you do.

In the photo at top, I used a wireless remote (more on that in just a minute) but slaved all of the other peoples' flashes to my flash. Thus, every time I fired my camera all of their flashes fired, too.

Was it a coincidence they just happened to all be in position to create glamorous light for my two subjects? No it was not. I positioned them exactly how I wanted. It was for a live "shootout" in front of a crowd in Dubai in the UAE. You can see a full post -- with video -- on that here. (Opens in a new window to preserve your L101 post thread.)

Suffice to say, having flashes with built-in slaves makes all kinds of cool things possible. I would never buy another flash that did not have a built-in slave.


Wireless Sync Via Radio

Another popular method of syncing is via radio remotes. This is not cheap, but if you get into lighting to any real degree this is where you'll end up.

For instance, a sync cord would have made it pretty difficult for me to get this shot:


(You can read all about how that photo was made, here.)

Here's the thing. You can get cheap remotes, or you can get good remotes. Cheap remotes, which run about $100 for a set, are not (IMO) nearly as reliable as the inexpensive sync cord kit you probably already have on the way to you now.

The Gold Standard for standard remotes are the PocketWizard Plus series. The entry level model, which I depend on every day, is pictured below. If I am not mistaken, it's the 7th generation of remote trigger for PocketWizard. I have been using Pocket Wizards for over 20 years, as do the majority of working pros I know. The latest models are far better (and cheaper) than the ones I started with in the early 1990s.


And here's the kicker: these things are still compatible with the PocketWizard remotes from way back when I started out. I love that. (Conversely, I loathe "forced upgrade via planned obsolescence.")

You'll need a PocketWizard on your camera and one on your flash. And they are $99.99 each. Given that, I'd still suggest you start with a sync cord (and slaved flashes if going multi-flash.) As you grow into it, wireless remotes will likely make sense for you. And if they do, do yourself a favor and invest in a good one.

There is little more frustrating than a fickle remote trigger, which is why the pros usually end up at PocketWizard. You can spend more (including more advance models of PocketWizard) but a PW Plus X is IMO the very best value in the world. It balances price, quality, reliability and non-obsolescence.

Think of it this way: You'll swap out your camera probably ten times in the lifetime of service you'll get from a good quality remote. Choose wisely, and with the long run in mind.
__________


Okay, we are almost done with the basic gear. Sorry to hit you with all toys and no technique, but it is good to be getting an understanding of the stuff you have coming so when it arrives you can be ready to roll.

So let's talk next for a minute about your very first light modifier…


Next: Lighting 101: Umbrellas

Lighting 101: Umbrella Swivel Adapters


To attach your flash to a light stand, you'll need an umbrella swivel adapter. They are also called umbrella adapters, or just "swivels."

This pretty straightforward. These are rugged and cheap at about ($15). Top to bottom, here's how they work.


A. The Cold Shoe

Unlike a hot shoe, this has no electrical connections. It just holds a flash. (Or, in many cases the Universal Translator that would give your flash a sync jack.) Then you put the flash on top of that.

This cold shoe (on the LP633) has an expanding/locking clamp, which makes it sturdy and also lets it fit the foot of some weird flashes whose feet are slightly oversized.


B. The Umbrella Mount

This is a hole and clamp which holds the optical umbrella (more on that in a bit) which you will use to soften your flash's light. Even if you are not using an umbrella (which you will not do all of the time) you need this to attach a flash to a light stand, or anything els that is tipped with a 5/8" male stud.

You put the umbrella shaft into the hole and clamp down the screw. Pretty simple. If you are doing it right (i.e., not backwards) the umbrella shaft should point about ten degrees up (instead of down) to offset the fact that the flash is a little off-center due to the mount.


C. The Tilting Mechanism

I'll bet you can figure this out by yourself. You loosen it, tilt the flash and/or flash/umbrella combo, and tighten it back to lock in place. This model has a toothed grip for an added margin of no-slip safety.


D. The Light Stand Mount

This is the female receptacle and locking knob that holds the whole assembly to the top of your light stand. Or anything else with a male, 5/8" stud.


E. The Extra Stud

Some swivels ship with an extra stud. (The LP633 does.) This has a female, threaded ¼" x 20 hole at one end and a 3/8" hole at the other. With a little ingenuity and a bolt of the right size, you can figure out all kinds of positioning devices and/or brackets that might support a flash in a tight or unusual spot.

This stud will marry your frankenstein lighting creation to the swivel and allow you to connect it all together. Go nuts.
__________


Next: Synching Your Flash to Your Camera

On Assignment: Star Gazer


We all have our crutches go-to techniques, and one of mine is using a single flash as a backlight in an otherwise ambient-lit scene. I like the effect because it provides depth, color and separation, which really helps if your image is going to be printed on Charmin newsprint.

Didn't need much flash here. One quarter power (on manual) and the coverage angle on the flash set to 24mm for a nice, wide throw.

The flash is directly behind the guy. If you look closely, you can see the feet of my stand peeking out. In retrospect, I could have easily glopped some snow in front of the feet to hide them. Oh, well. Next time.

Again, the flash is doing double duty by separating the guy with a rimlight and lighting the snow for a good contrast against the twilight sky. But it is also providing fill for the guy's face by bouncing up off of the snow, which is a very efficient reflector.

It was getting pretty dark at the time, so I had the flash on the light stand backwards (with the head turned back around towards me) so the ready light would be visible. This told me that (a) the flash was charged and (b) where, exactly, the flash was so I could position myself to hide it behind the guy while working in dim light.


Next: Real Estate Developer

On Assignment: Cicada

I almost always use light when shooting with a macro lens. In addition to adding to the quality and direction of light, it provides a smaller working aperture, with is important for scrounging some much-needed extra depth of field for close-ups.

And this little guy, who was one of about a gazillion cicadas that invaded the mid-east Atlantic area as part of the 17-year "Brood-X" cycle, was no exception.

This is a very easy thing to do, provided you have a strobe/stand setup.

I just pop the strobe onto the stand, set it to manual power (1/32 or 1/64 - really doesn't take much) and position it before shooting a test shot at the camera's highest synch speed. Use the best guess on the aperture, and then adjust by checking out the image on the back of the camera.

Once you have a good working aperture (the background will likely still be very dark) just dial down your shutter speed until the overall ambient exposure is reading 1 1/2 to 2 stops underexposed. This will create a good lighting ratio.

Once you are familiar with the process, the total time is about 30 seconds (if that) from the point that you plunk the flash down.


Next: Star Gazer

Monday, March 20, 2006

On Assignment: Archeologists

While driving back from an assignment in Western Maryland I noticed some archeologists digging near a zoning sign for a new intersection.

One of my favorite things about being a photojournalist is the "license to be curious" that comes with the job. So I stopped, got out, and ended up with a fairly interesting story.

The light was typical mid-day light for autumn, and it was coming from back right, which was the wrong direction. So I set up a strobe (pointed back at the sun) on the left, set it to full power and zeroed out my exposure at my camera's fastest synch speed (1/250, or 1/500, can't remember what body I was using.)

Then it was just a matter of moving the strobe forward or backward until I got a good balance with the sunlight, which acted as an opposing light in a cross light setup with the strobe.

I often do this rather than meter or dial down the strobe. Setting the camera to its high synch speed lets me use the least amount of strobe possible. Setting the strobe to full power (and moving it back until it balances) then gives me the greatest possible working distance.

One light, working against the sun, can give good shape and shadow detail to a whole scene if you shoot from the 45-degree angles from either the sun or the strobe.


Next: Cicada

On Assignment: Wind Tunnel


While shooting a story on the wind tunnel at the University of Maryland's Clark School of Engineering, I wanted to grab a photo of the giant fan that creates the 100mph+ winds for studying airflow around objects.

The available light was depressingly crappy - about 1/10th of a sec at f/2.8 (ASA 400) with typical institutional sodium vapor as the color temperature. At normal exposure, it looked a lot like something you'd find in a diaper. But dropped down a stop and a half, it actually took on an intense orange color. Which ... looks kinda cool, thankyouverymuch.

So, now we have some cool tech-y ambient light. Next, let's create some tension and direction to it, using a single speedlight.

To separate the blades and draw the viewer into the frame, I stuck a Nikon SB-800 on a small light stand and set it to 1/4 power. Remembering that the shadows always point to the light source, the flash is obviously behind the bottom blade. The flash is pointed directly at the camera, but hidden by the blade.

(I do that a lot, actually. In a dark situation, mount the flash backwards on the stand then turn the head back around towards the camera. The ready light will act as a guide to help you keep something between you and a backlighting flash in a darkened room.)

So while the sodium vapors looked pretty bad at the correct exposure, they gave a neat, warm color cast when underexposed by about a stop and a half. Always consider altering the ambient portion of the exposure when faced with a light color you cannot easily balance for in camera. What looks terrible at the proper exposure might look cool and dramatic when over or under exposed.

So, now shooting at 1/30th at 2.8 (wide open and getting a saturated ambient color) I adjusted the output of the strobe by trial and error and arrived at 1/4 power as the best look on the backlight.

Note that the strobe light is not technically what you would call "properly exposed," but rather 1.5 to 2 stops overexposed. But it looks good, which is what really matters.

The beam angle adjustment of the strobe was set to 24mm to get a nice wide throw of light in the cramped area.

I like this solution because the one small back light is accomplishing a lot of things. It is providing a hotspot to lead the eye into the photo. It is separating the person walking toward the fan. It is providing a nice spray of leading-line shadows coming from the fan blades, the braces and the guy. It is lighting the floor, which shows up reflected in the bottom of the motor housing.

And most important, it is providing another light color and level on which to base my exposure. Which in turn allowed me to underexpose the sodium vapors to use the ambient light's color to my advantage.

Here's a thought: This is not a "properly exposed" photo ... at all. The ambient is underexposed by ~1.5 stops. The flash is overexposed by at least as much.

We're breaking some rules here. But together, they create the dynamic tension that makes the photo.
__________

Camera: Nikon D1h
Lens: Nikkor 17-35 zoom @17mm; 1/30 at f/2.8
Flash; Nikon SB-800; 1/4 power; 24mm throw
Sync: Pocket Wizard remotes

Next: Abstract Concrete

On Assignment


Welcome to the On Assignment archive, where we translate the skills you learned in Lighting 101 to the real world. These posts include many of my own assignments from the last ten years, and you'll see my lighting skills growing right along with your own.

Each On Assignment post links to the next. So if you want, you can eat 'em like peanuts. Enjoy.

-DH


Wind Tunnel
Abstract Concrete
Archeologists
Cicada
Star Gazer
Real Estate Developer
Blind Snoot Portrait
Conference Room Quickie
Lighting Prep Basketball
Taming Harsh Sunlight
Big Gym, Little Lights
Light the Little Stuff
Thinking Outside of The Box
Designing a Backdrop
Lighting for Detail
Guy on a Boat
Dealing with TV's and CRT's
Simple Wall/Snoot Portrait
Make the Ambient Work For You
Use a Second Light to Create Tension
Womens Lacrosse Cover
Lacrosse Cover, v2.0
Free Custom Backdrops: Using Flash into a Sunset
Ant Upton: Soccer Preview Shot
Robert McNary: Shoot Your Kid
Developing an Idea, Part 1: Compact Fluorescent Bulb
Developing an Idea, Part 2: Compact Fluorescent Bulb
5-Minute Test Shot
Shiny, Pretty Things
Pool Portrait
Strobe on a Rope
Tupperware and Trash Bags, Pt. 1 of 3
Tupperware and Trash Bags, Pt. 2 of 3
Tupperware and Trash Bags, Pt. 3 of 3
Soup Up Your $10 DIY Macro Studio
How To Light A Comet
Test Driving the DIY Softbox Grid Spot
Medical Illustrator
Fourth and Long? Punt With a Plant
Shade is Your Friend
Sometimes it's Not the Photo, it's the Process
Zebra Fish and Zygotes
David X. Tejada: Kicking Butt with Small Flashes
Stainless Steel and Cookies
How to Photograph Christmas Lights
Hit for Average
Always Look for a Detail
Book Club Illustration
Lighting a Large Interior
Found Backdrops, Pt. 1
Macaroni and Cheese
Speedlighting a College Gym
Special Q&A: Speedlighting a Gym
Flavored Vodkas
Light the Details
Spring Arts Guide
Munchies
Hero Fan
Spring Desserts
Group Shot: 2 Speedlights, 34 People
Michael in Paris
Eke in Paris
Steve at Google
Nest Egg
Peter Yang: Admiral William Fallon
Golf Feature
Controlling Daylight, Pt. 1
Night Chopper, Pt. 1
Night Chopper, Pt. 2
Fifty Years
One-Light Real Estate Shoot
Reluctant Poet
WiMAX
Manil Suri
Monteverde Institute
Planes and Arrows
Prep Quarterback
Shooting for Social Media
STB: John McIntyre
Climber Hands
Glass Menagerie
Trip Jennings
STB: Gus Sentementes
Earth Treks Pt. 1
Earth Treks Pt. 2
Earth Treks Pt. 3
Gas Station Tacos
Nathan Carlisle
The Soprano
STB: Sian Meades
Guitarist Mark Edwards
Betty Allison
Cellist Caleb Jones
STB: J.D. Roth
Nataniel Welch, Men's Journal
Bionic Arm
Summer Reading
Stink Bugs
Radio Silence
Newspaper Man
David Tejada
Bullet-Proof Glass
HoCoPoLitSo
Frickin' Lasers
Brian England
Inside the Black Box
Plain and Simple Light
Martin Prihoda for Cosmo
Miller Mobley: Chaplain
Finn O'Hara: Mixing Light
John Keatley: Best in Show
Chris Crisman: Self-Investment
Brad Trent: Ocean Master Pt. 1
Brad Trent: Ocean Master Pt. 2
Concert Pianist
Hi-Def Asparagus
Mathieu Young, Moonlighting
Inside the Soft Box
Open Air Studio
Tweaking Dusk
Stephanie Barnes
Theresa Daytner Pt. 1
Theresa Daytner Pt. 2
Soccer Through Sunset
Inside the Box
Caleb Vaughn-Jones
Night Soprano Pt. 1
Night Soprano Pt. 2
Trattoria
Reed Quintet
Hiding Your Flash
Samantha McEwen
Tenor Luke Grooms
On Axis, On Budget
Antonio Beverly
Greg Funnell: Joe Wright
Mathieu Young's Harvest
Smokin' Joe
Toufic Araman's Sunset Resort
ATM Man
Man on a Mission
86-Second Portrait
MarchFourth Marching Band
Light That Isn't There
Hide Key w/Fill
Cheap Portable Studio Pt. 1
Cheap Portable Studio Pt. 2
Cafeteria Lunches
Bluebirds and Stink Bugs
Rebecca Hargrove Pt. 1
Pianist Duo
Martin Prihoda: Priyanka Copra
Flute Duo
Hall Studio
Rebecca Hargrove Pt. 2
Evoking Expression
Scout and a Shoot, Pt. 1
Scout and a Shoot, Pt. 2
Saving Florida's Springs

Lighting 101 - Ball Bungees

OK, can I tell you how much I am starting to like these things?

Being a guy, I realize I am genetically predisposed to liking bungee cords. But the thing about the ball bungees is that they have no metal hooks to scrape up your gear. Sweet.

Fellow Baltimore Sun photographer Karl Ferron turned me on to using bungees to secure a flash to a variety of things. On the rare occasion when I am caught without a light stand, these (and a little placement creativity) will get the job done in a pinch.

You just stretch it around whatever you want to fasten you flash to, aim the head, and start shooting. You can double them up for fastening flashes to thicker items, too.

They do double duty by holding my umbrella to my light stand when I am packing gear. They weigh next to nothing. They cost next to nothing - I paid $1.93 for a four-pack of 8" Ball Bungees (which is a very useful length) at WalMart. So get plenty.

They are good for fastening Pocket Wizards (we'll get to those soon) to a strobe, too.

Next: Umbrella Stand Adapters

Share

Twitter Delicious Facebook Digg Stumbleupon Favorites More