Tuesday, September 30, 2008

Lighting 101: Strobe/Ambient Balance — A Shorthand Way of Thinking


Okay, so by now you should have a decent understanding of how you can balance flash flash with ambient light. In this segment, we'll give that process a little shorthand language to help you understand other photographers when they talk about the way the lit a photo.

Here, I want to accomplish two things:

1. To set you up with a way of quickly understanding and/or communicating how a given photo was balanced, and

2. To not have to repeat full, detailed number-by-number walk-throughs on this process every time we mix flash and ambient. Which is just about every lit photo we shoot.
__________


First, a little confession. Lots of times when I am explaining to someone how a photo was lit, they will want to know everything -- shutter speed, ISO, aperture, flash power settings, etc.

I have to be honest with you -- most of the time I have no idea what those numbers were. It is not that I forgot them. It's just that I didn't care enough about them when I was making the photo to remember them, so they never registered.

No kidding, if you ask a professional PJ, "What's your favorite F/stop?" He or she will know you are talking about the amateurs that sidle up to us at a football game. We are really not that numbers oriented.

Truth be told, I don't think in terms of absolute F/stops and shutter speeds. They are not what is important. It's the relationship between the different light levels that is important.

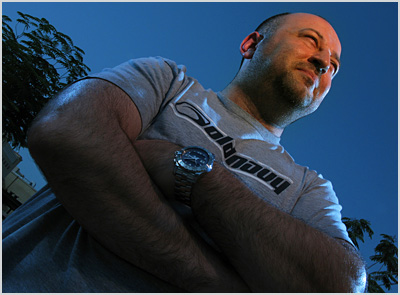
Take the photo of my friend Shadi, above. It was shot on a hazy, colorless afternoon in Dubai. Here was the process to make this photo:


1. Find the exposure for the ambient. (That's easy - just grab a shot on auto or zero out a manual exposure.)

2. On manual mode, set the camera to underexpose the scene by two stops.

3. Set the camera to tungsten WB, to shift everything from dark grey to dark blue.

4. Light Shadi from the front with a flash with a CTO gel (plus an additional 1/4 CTO gel for extra warmth.)

5. Rim light him (from behind, low) with two ungelled flashes, at about two stops down compared to the main flash. That is the actual relative exposure level hitting Shadi, already accounting for the fact that that the flashes were ungelled. (The gel eats light from the key flash. So the rims might have actually been set 3 to 3 1/2 stops down in terms of absolute power settings.)
__________


If I were talking to another pro about this photo, I would likely just say this:

"We dropped the ambient two stops, shot on tungsten, CTO'd the key light (plus an extra quarter cut) and left the rim lights ungelled, about two stops below the main."

That sentence tells me everything I need to know, because it starts with an assumed reference: They properly exposed key light.

What were the exposure settings? Can't remember, and don't care. It's just not that important.

What is important is the relationship between the flash exposure and the ambient exposure: About two stops. And, just to make things more complex, the fact that we did the tungsten-ambient shift, overgelled the key and left the rims straight.

Understanding this shorthand way of thinking drills into your head that it is the relationships between the lights that matter -- not the absolute settings.

There are two power ratios to think about here: The relationship between the key light and the ambient, and the relationship between the key light and the fill (and/or background) flashes.

Given that our first example was a little complex, lets walk through some familiar photos, thinking and talking in shorthand about the balance.


"Sodium vapor ambient. Shot on daylight, underexposed the wind tunnel by 1 2/3 stops, bare flash behind the fan blades about a stop hot."

So, this tells us that the reference point for the exposure was actually between the exposures for the flash and the ambient. This photo is underexposed by 1 2/3 stops for the ambient, and the flashed area is one stop overexposed.

My ambient is 1 2/3 stops down -- on the wrong color balance -- and my flash is a stop overexposed. This photo should really suck, right?

Honestly, if one area of the frame were "correctly" exposed, it would not be as interesting. The important thing is that I chose these relative brightness levels, without being chained to my camera's ambient meter or the "proper value" of some incident flash meter.

(You can read more about this photo, including those unimportant f/stops and shutter speeds, here.)
__________


Let's try it again:


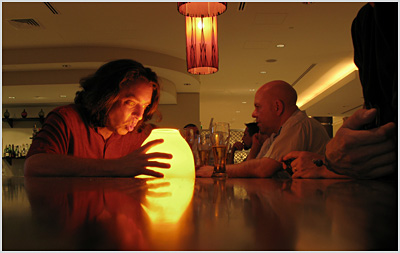
"Shot on daylight setting in a tungsten room. Exposed for the flash under the orange bowl on Chris' face and dropped the room by a stop and a half."

What's my reference point? The flash's exposure on Chris's face. I put the flash under the bowl on low power, shot a couple of frames until I got the aperture right. (Easier than adjusting that flash.) And then dialed in the shutter to set the ambient to a stop-and-a-half down.

Technically, I supposed I should have shot in tungsten, but why get rid of all of that surreal color? Besides, have you seen Chris Hurtt's natural skin tone at midnight in a bar in a Dubai hotel?

I'm just sayin'.

Thinking about your flash and ambient in terms of their relative (as opposed to absolute) values not only makes you quicker at reverse engineering photos, but makes you quicker at pre-visualizing and creating them, too.
__________


Sometimes you are working so far above the ambient that it is not a component of the exposure at all. Yes, you need to communicate that. But given that you are far enough above the ambient for it not to be an issue it really doesn't matter if you are five stops over, or twelve:


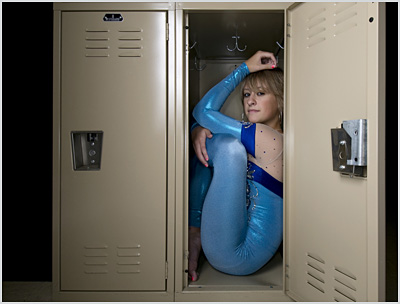
"We killed the ambient; umbrella at camera left, gobo'd to control the reflection on the locker; ring light fill about two stops down."

What was the ISO? The f/stop? The shutter speed? The flash's power settings?

Don't remember, don't care. Because all you need to know to reproduce that look is in the short description above. And if you start thinking about your photos this way, you'll find that the lighting design comes easier and easier.

(More on this assignment here.)
__________


Okay, one more:


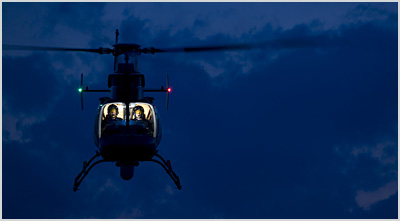
"Exposed for flashes in chopper -- one in front cabin, two in back -- and dropped the ambient by three stops."

That is all there is to it, and tells you everything you need to know about lighting and exposing photo.

Again, the absolute settings do not really matter, from a reverse-engineering point of view. They are yours to choose based on what depth of field (or rotor-stopping shutter speed) you want.

(More on this assignment here.)
__________


So, does this stuff make sense? It had better, because you are going to be seeing a lot more of this lingo in the future around here.

Don't worry, it is not like the posts are going to be three sentences long from here on out. (You wish...) There is still a lot of stuff to think about when you are creating and lighting a photo. It's just that we do not really need to re-invent that wheel any more.

Instead, I'll just give you the info in a way that helps you to think on your feet better and link to this page for the newbs.

I realize that the vast majority of the people who read this site are amateurs. But as many times as we'll be going through this process, we should start talking and thinking like pros. And if you just dropped in and this is all Greek to you, definitely give the Balancing Flash and Ambient posts another read...


Next: Reverse Engineering Other Shooters' Light

LA, LA, LA...

If you are going to one of the L.A. lighting seminars this weekend, make sure you check in on the L.A. seminar discussion thread for the latest info.

Also, there is one seat that just became available, info here. (Filled.)

-30-

Sunday, September 28, 2008

Lighting 102 - 7.3: Time in a Bottle Discussion

Here we are, on the very last of the Lighting 102 assignments. This series has been more than a year in the making, and it is almost time to put this one in the books.

But first, we take a look at your "Time in a Bottle" assignment shots from earlier this month. As I recall, you were to shoot a photo using flash and some kind of time-controlled variable. There was also a set of DVDs in play, just to make it interesting.

Your photos, inside.

Leading off is this shot of a tunnel, by Noah Bennett. It was lit during a time exposure by "~270 flash pops," which not only showed up in the frame but also lit the length of the tunnel.

Not sure how he controlled the flare in this one, but apparently he figured that problem out.


Next is Michael Foy's shot of a scratching post, which was done over time with lots and lots of flash pops from just about everywhere.

The final effect is sort of a subtle, surreal ring light look -- except for Molly the ghost cat, who apparently caught one of the pops.


This foosball table's starting lineup was shot by thatmushroom, using a single, tightly snooted 285HV. He lit the players individually during a series of exposures and combined them in Photoshop using the lighten mode in layers.

Picking one shot for the DVDs was not easy. All the more so because the first winning photo I picked turned out to have been shot over a week before the assignment was made. (Grrr... had the whole post written, too.) Sorry, but no brownie points for being psychic.


And The DVDs Go To:

I am not sure exactly what message Cesar T. Sanchez (aka The Light Whisperer) was trying to send with this photo.

Was it, "Don't drink and drive?"

Or maybe, "If you are going to drink and drive, drive a Ford?"

Who knows. But that focus-shift effect is pretty cool. He used the time component to allow himself to shift focus from the macro, flash-lit keys to the booze three feet away for the ambient burn-in period. He details the process further, here.

Congrats, Cesar. If you will Flickrmail me your snail-mail address, I will get the DVDs out ASAP. Just follow the link on my comment under your photo.
_____________


In addition to Cesar, congrats also to all of the people who contributed such good stuff throughout all of the Lighting 102 assignments. You all put a lot of work into them, and it shows. The entire Lighting 102 series has been archived with internal link chains. You can take a look at the entire long and winding road by starting here.

Thus closes Lighting 102. This may be the last post in this series, but there is more participatory stuff coming. Stay tuned for more on that soon.

Act Fast: Best Buy Liquidating Nikon SB-800s

If we were looking for a sign that the Best Li'l Speedlight ever made has been put out to pasture, this is probably it.

Sadly, it looks like Nikon is clearing SB-800s off of the shelves to make space for the newer, bigger, faster, more 'spensiver SB-900.

Hit the jump for just how cheap they are, and your best game plan to get one.

Normally, I am not a huge fan of Best Buy. But this is one instance where it may be worth it to put up with them. From the Strobist Flickr threads varying reports of deep discounted SB-800s available at Best Buys across the country.

Best Buy Online for $399.95 (puh-lease -- they are $319.95 everywhere else) is "sold out" but the bricks-and-mortar stores are cutting them loose (new and demos) for way less. I have see everything down to $159.95. That's a steal.

Call your local Best Buy and see if they have any in stock. They can also look up other local stores, check stock and quote prices. Different stores will have different prices. Example: Gatihersburg, MD had two for $279.95, but nearby Pentagon City (Washington, D.C.) had two in stock for $199.95.

Word to the wise: These will not last long. Better that we get them than those Photo.net guys.

And if you hear of other national chains doing the same, please hit us in the comments. As soon as you finish skimming your local stores, of course.


RELATED:

:: Why the SB-800 Rocks ::

Thursday, September 25, 2008

Lighting Q and A, 09-26-08

Christine, in Virginia (USA), asks:

"Is it possible for a specular highlight to be anything other than blown out? If so, how do you meter and control its intensity?"

Yes it is, Christine.

Keep reading for how to control specular intensity -- and for your second question, which I liked even better...

Christine's question went into more detail, and was asking about the process of using one light as both a key light and as a background element via the light's specular reflection.

The short answer is yes, the specular can be just about any tone you choose. It depends on two things: The reflective efficiency of the object creating the reflection and the intensity of the light source, on a per-square-inch basis.

The more efficiently your object reflects, the brighter your specular will be. But you might not have much control over the object, so you can also control the specular intensity by increasing the size of the light source.

Let's say you have two lights, each set to illuminate your subject to, say, f/5.6. One is a hard light, and the other is a big, soft shoot-through umbrella.

They will both correctly expose the subject at f/5.6. But in addition to creating very different qualities of light on the subject, they also will create very different specular highlights whatever is reflecting the specular -- your subject and/or your background.

The specular of the hard light will be tiny and very bright -- and almost certainly blown out. This is because the light is very small -- and very intense over those few square inches of light size.

The specular of the big, soft light will be large and manageable. The size of the light source is a determining factor in the intensity of the specular. And that highlight could be a variety of tones based on how close the light is to is to the subject and background.

This is because, while both light sources are putting out the same amount of light, they look very different when you measure them on an intensity-per-square-inch basis. And since a specular is basically a reflection of the light source, the intensity of each of those square inches is the main factor in the brightness of the specular.

As for metering those highlights, you can use a flashmeter in reflective mode to check how bright a specular is (vs. your shooting aperture.) Or simply zoom into only the specular highlight and shoot a photo. Then look at your image and histogram on the back. The spike will tell you the tone where the specular is, as compared to medium grey.


Now, Christine is Thinking:

She goes on to describe a second setup:

"Possible Scenario 2: The specular is caused by a light placed for the sole purpose of adding a specular--i.e. a rim light on the edge of someone's face or a background light on a shiny wall--and changing the power and position of that light will not affect the overall exposure."

Absolutely, but I would do it in a slightly different way. Why not position the light so that it is very easy to line up the specular highlight? And yes, you could squeeze some double-duty out of it, too.

And that is exactly what we did in the photo at left. This was one of a recent series of photos for a software company. My assistant Patrick Smith and I were working very quickly in a hotel conference room to do eight full-page portraits in just two hours.

My main light is coming from camera left, a few feet out of the frame and pretty close to my subject. It is warmed up with a 1/4 CTO and is lighting his face with soft light via a shoot-through Westcott double-fold.

The second flash is also firing through an umbrella, but that flash is directly behind me and a tad high.

That is basically a "buy one, get one free" flash, as it not only provides the perfect angle to create a soft specular on the dark wood background, but also serves as soft, on-axis fill for my subject.

As mentioned in the SB-III post, on-axis fill is something I am using more and more, and in several different ways. More to come on that soon.
______________


:: Read More: Using Specular Highlights ::

Tuesday, September 23, 2008

By Request: The LumiQuest Softbox III

UPDATE: Lotsa good questions coming up on this in the comments. Doing my best to keep up with the answers.

Those of you who follow my Flickr stream already know that I have been playing with the new LumiQuest Softbox III for a few months now.

It was created in direct response to Strobist reader input, and is one of several upcoming lights and light mods that have been designed for us. (Oh, yeah -- there's some cool stuff coming. I'd tell you more, but I'd have to kill you.)

More details, pics, and how this look was created, inside.


Working Without Stands

One of the advantages of using speedlights is that you can combine good lighting with portability. And you can create pretty sophisticated light without a light stand, too. Which not only makes you more mobile, but also can avoid the need for permits when shooting in a city.

Permits weren't really a issue on our recent camping trip up to the Catoctin Mountains in Maryland where I got a chance to play with the new SB-III. LumiQuest had sent me a pre-production model to test drive.

It's about 8x9 inches on the front, and has an area of double diffusion that is designed to compensate for the hot spot in the center. It folds flat, and will fit perfectly in the back pocket of a Domke F-2 bag, the standard PJ bag over the last 20 years or so.

The SB-III attaches to your flash with the included velcro straps, or better yet, a speed strap. It is about as big a thing as you would want to attach to a flash. So my preference is to use either a second speed strap on the outside, an extra-long single (DIY'd) strap to make another trip around the outside of the mount, or a ball bungee. I am a little anal about that kind of thing -- I like stuff tight.

Whether you are using an off-camera flash cord, remotes or using CLS /eTTL, the flash/SB-III combo makes for a very easy setup to hand hold. If you use it on a stand, you'll want to bring it in close to your subject. You can always move the camera back and shoot with a longer portrait lens, but a light this size excels at close distances.

Why? Several reasons.

One is power: You can nuke the sun very easily in close, and a light that is running 8x9 inches looks a lot better than a bare flash.

Second, bringing it in close (~2 feet from someone's face) really does turn an 8x9" source into a softer source. And last, getting the light in close kills its penetration past your subject, allowing your BG to be controlled separately with ambient or a second light. Also, you can see that it falls off nicely as the light travels down Ben's torso. I like the natural vignetting.


Lighting Ben

The photo of Ben up top was done completely handheld, and very quickly. I shot him with a 50mm lens. I held the Softbox III/SB-800 off to camera left, with a 1/4 CTO on the flash to warm it up. I underexposed the (backlit) ambient scene by about a stop and a half, and set the SB-III flash to run at straight TTL -- using Nikon's CLS wireless flash system. (Pause as DWBell rubs his hands in glee...)

This turned the sun (coming from back camera right) into a separation light, which gives the portrait some nice, 3-D shape. As a little kicker, I let the on-camera (CLS master) flash contribute some fill.

On-axis fill is something I have really been trying to learn more about, and you'll be reading much more on that here soon. The on-camera fill was between 2 and 3 stops below straight TTL.

If this sounds complex, it is not. There are only two decisions to make here. First, how far are you gonna drop the ambient light? And second, how far are you gonna drop the on-axis fill?

The result is a crisp, 3-D look that can be made just about anywhere you have directional ambient light. For something done in full-auto TTL (for the flashes, at least) I think it looks pretty slick -- especially when you consider that you are completely handheld and mobile with the light.

It's a good look to pull out of your bag of tricks during the ugly light portion of the day -- just stick the sun in the back on the opposite side as your key light from the front. This photo was shot in early afternoon on a bright, sunny day. It's the knd of light I used to hate to have for an outdoor portrait.

But with this little softbox, I'd be happy to sked someone at 1:00 p.m. The crappier the ambient light, the better.


Without the On-Camera Fill

Here is an example of pushing the SB-III (no gel) against the ambient in a front-left / back-right crosslight scheme without the on-axis fill. Straight CLS/TTL with underexposed ambient. Looks a little less polished, but fine nonetheless.

I am guessing this would be preferable to some of you, who will not like the double highlights in the on-axis fill version. (They do not bother me at all.)


SB-III, On-Axis Fill with No Sun

Wanting to experiment with on on-camera/off-camera light without a directional ambient source, I shot my daughter Emily using the same technique as in the top photo above. The only difference was there is no ambient rim light on her shoulder, as it was a cloudy day.

Instead of an on-camera master flash, I used the D300's pop-up flash both to trigger the SB-III main light and fire as a fill light - I think the pop-up was set at -2 2/3 stops from straight TTL. The idea would be to see how this setup would work in flat light.

You can see the soft shadow of the SB-III on the bottom right of her nose. But it is being filled exactly as much as I want it to be filled by the pop-up flash, with is even closer to on-axis light than a shoe-mount flash so it leaves a hard, very close-in shadow of its own. I think I prefer the pop-up flash as an on-camera fill.

This is a sweet little technique for anyone with an SB-600, -800 or -900 and a pop-up flash camera that can act as a commander. Which is just about any recent Nikon pop-up model.


One to the Face at Point-Blank Range

LumiQuest chose the top photo of Ben for the ad for the SB-III, which means I'll be buying a big yacht soon. At least that is what I am telling the missus. But they also wanted a shot of me, showing the SB-III, to go along with it. The rest of the family was away for the weekend, so I pulled a Strobist Flickr Pool Special and did a tripod self-portrait.

I setup an on-camera flash in manual and bounced it off of the ceiling. After adjusting the flash's power level so my photo looked good at f/2.8, I closed down three stops to turn that strobe into my fill. Then I lit myself to my new working aperture with the SB-III at camera left. (1/4 CTO included, to help my cadaverous skin.) There was no ambient in the photo at all.

If any of you work at the Ford Agency, or maybe at Elite, you can reach me by leaving a comment beneath the post. I am doing my best to avoid that "underweight heroin" supermodel look, too.

____________

LumiQuest Softbox III's will be hitting shelves over the next few months, but they are already available at MPEX and direct from LumiQuest.

Supermodel not included.

Monday, September 22, 2008

Dean Collins - Live at Brooks Institute

Without a doubt, my biggest influence when I was first learning how to light was Dean Collins. He passed away suddenly at far too young an age, but we are very fortunate in that much of his material was preserved on video.

Cruising through YouTube the other day, I found a 6-minute excerpt from and old VHS tape of one of his presentations at Brooks. A similar Brooks presentation has since been released on DVD, the sales of which benefit Collins' family.

He was a wonderful educator. If this is your first taste of his techniques, you are in for a treat.

Video and links, after the jump.


This clip is from an older VHS version of Live at Brooks Institute of Photography, one of two Dean Collins DVD courses still in print. (From the comments, this clip is not from the talk used to make the LaBI DVD, but the content is very similar.)

Most of Collins' library of material is from the 80's, so you have to translate the film ideas to digital. (Not to mention the hairstyles and wide-collared shirts.) But his concepts and techniques are timeless.

I highly recommend his Best of Dean Collins on Lighting (full review) as well as his Live at Brooks Institute of Photography.

Got a few more mins? There is clip from the LaBI DVD at the Software Cinema site.
__________

Related Posts:

:: Full Review: Best of Dean Collins on Lighting ::
:: Channel Your Historical Mentors ::
:: Where to Rent LiBI Online ::

Thursday, September 18, 2008

Lighting Q and A, 9/19/2008

Looking through the questions that have come in so far, at least a dozen people have asked about the process of shooting manual flash without a flashmeter. So we are going to hit that one in depth today.

Like a lot of pros, I have made the switch from shooting with an incident meter to winging it and chimping off of the TFT screen on the back of the camera. Hit the jump for the how -- and the why.

The condensed version is, it comes down to working by numbers vs. working by feel. Or rather, by sight.

People who work in studios -- or photographers who want highly accurate and repeatable lighting schemes -- tend to like the comfort of f/stops displayed numerically. Measured right down to a tenth of a stop, they offer precision and repeatability.

And, truth be told, if I were going to set up 27 catalog product shots in a day I would probably let the meter do the driving. It is a different kind of shooting, and a meter is very well suited to repetitive and/or studio work.

But as someone who tends to be more of a location shooter, my first thought is always what I am going to do with the ambient. So the ambient exposure makes a much more logical starting point for me than does some magic f/stop revealed by a meter after I pop my flash.

I cannot remember the last photo I made where I did not take the ambient into account. Even if I wanted to nuke it, I needed to know where it was before I knew where to expose my photo to be safely above the ambient light level.

So, what I usually do is to make a frame on aperture priority, at an f/stop that would be a good working aperture for my final photo, in daylight white balance. This gives me two things: An ambient exposure reference point and a light color temperature reference point. For example, fluorescent lights will look appropriately green on daylight WB. I want to know exactly what ambient I have to work with.

Then I chimp my exposure and see how far, if any, I want to drop the ambient down before adding my flash.

My next step is to move to a faster shutter speed and see what that does to my photo. It's just like the Nick Turpin walk-through last week -- the ambient is not there to be an end-all "proper" exposure so much as to establish the floor to my final lit, balanced exposure. The further I drop the ambient component (before I add flash) the more range and depth my photo is going to have after I light it.

So, as I drop my ambient exposure and chimp the results, I am looking at both the histogram and the image on the back of the camera. The histogram tells me if I am crashing into full-on black anywhere.


I may want to, I may not -- but the histogram tells me when it does happen by bunching a spike up on the left-hand side of the graph. In the photo above, the histogram tells me that the chopper is gonna go to a sillo, and that is fine. I am more concerned with keeping my sky in the lower half of the tonal range.

The right-hand side of the histogram tells me where my brightest highlight is. And that combination gives me the range of the ambient component of my photo.

But I am also looking at the image on the back, too. I am scoping that out to get an idea of the "feel" of the environment I am creating for my final photo. I also may shoot a frame on an incandescent balance, for example, just to see how the shifted ambient looks. Experiment. You are creating an environment for your lit photo.

Once I get my ambient tamed the way that I want it, I add the light. Chimping again, I can see how my lit subject fits in with the ambient I have laid down. Did I blow out any highlights with my added flash? The histogram will tell me -- and I would drop my flash's power or increase the flash-to-subject distance. (Or, close down my aperture and open my shutter to compensate for the ambient shift.)

In the chopper photo, I had pre-tested my flashes to look good at my shooting aperture before the helicopter lifted off. So all of my adjustments would likely come from tweaking the shutter and checking out the back of the camera. (More on that shoot here.)

Back to the process. If my highlights are okay, I am pretty much done with my histogram. In fact, in the photo above, the lit area is so small I am not even getting enough data to use the histogram to judge the lighting. I would judge it by camera screen alone.

I have chosen my ambient level, so now it is all about the image on the screen. It's just a matter of eyeballing the screen to see the relative range of tones between the lit and unlit parts of the photo.

Flash meters are all about numbers and precision. Going with the camera's display is all about feel and relative tonal values. And building your photo with the above steps is a quick and easy way to get right to the exposure balance that you want without wandering around your scene popping a Minolta meter. Just be sure to keep that histogram contained in the normal range. Unless you have decided you want it to fall off one of the edges for effect.

If you have some kind of a rigid recipe you are following, a flashmeter makes sense. But I get much more enjoyment and creativity out of "adding salt to taste," if you will. And that practice has made me a much more fluid photographer, too.

Instead of being married to f/stops and ratios, I now spend my time thinking about the feel of the photo's chosen ambient exposure level, and how I am going to shape and color my added light when I create my final look.
____________


Got a lighting question? Ask it here.

Tuesday, September 16, 2008

Betcha Can't Watch it Just Once


I always enjoy a good photo shoot video. You know, a little chance to see behind the scenes, the studio banter, some cool finished stills at the end. Nice way to spend a few minutes.

Several months ago, Chase Jarvis did a promo still/video shoot for the Kung Fu HD network. For various reasons, he has not been able to publish it until now. But I got an early sneak peak, and I thought it was killer.

So I watched it again. And again. And again.

How many times? I have no friggin' idea. I only know that I was watching the full, 1080p version via his server. So every time I hit the "play" button, it cost him about 35 megs worth of bandwidth.

Suffice to say, I owe Chase a beer next time I see him. An imported beer.

Fortunately, it's on YouTube now, so I can watch it without the guilt. It's cool as a moose, and I know at least 94 percent of you are gonna like it too. Oh, and yeah -- that song is in heavy rotation on my iPod now.

Enjoy. And head over to Chez Chase to read more and see the stills if you liked it.

(Credits, Superfad team: Will Hyde (Superfad Founder, CD) Dade Orgeron (Concept + Director) Rob Sanborn (Exec Prod) Stephen McGehee (DOP) David Viau and Luke Allen (Designers) Phiphat Pinyosophon (Sim Artist) Ryan Haug (Editor) Nate Barr (Producer) Kung Fu Master: Paul Gutierrez.

-30-

Monday, September 15, 2008

Ghetto Studio: Compact Garage Background Support

I love it when a great idea just drops in out of the blue. This one is from Ray Dobbins, a bicycle collector who likes to take photos of his prized objects in his garage.

He is totally frugal on the light, using a pair of cheapo worklights as main sources. Brownie points for that, obviously. But it's the two small metal brackets he made that will certainly find their way to my garage.

When I get a garage, that is.

More pics, and a a couple of ways for Ray to kick his light up a notch, inside.


More for Less

Ray is wonderfully low-end on his whole setup, having just upgraded to a 4MP Kodak EasyShare camera. He is bouncing the two worklights off of the ceiling, and putting the bikes on seamless white, including a sweep to fill on the bottom. Further he fills with white flats on the sides to smooth out the light even more.


The genius in his setup is this small bracket, which he uses to attach white seamless paper to his garage shelving. What a great idea. Since he is shooting bikes, he does not even need to run the shelving up to the ceiling to get full height -- which is exactly what I would do.

He holds the paper roll in with to (retractable) bolts. What could be simpler?

I am almost certainly gonna have a neater garage (one day) because of this idea. Ray, my wife thanks you.


And since one good turn deserves another, let's take a few minutes to help Ray pimp out his lighting and image management -- while staying on his super-tight budget. (Not that Ray is a tightwad, either. He just likes to spend money on bikes, rather than lights...)

First, you are really going in the right direction with the white flats. Big, creamy highlights on the sides and floor make your bike's form come to life. Let's continue down that path a little more.

I would suggest using small pieces of black cardboard between the worklights and the bike in your current setup. This will kill any hard, direct light. So all of your light will be creamy bounce light. The net affect will be to kill small, hot-spot reflections in the tubing. As a bonus, it'll also kill hard shadows behind the bike.

Second, I see that at least one of your lights is a double worklight. Sweet. You can do all of your ceiling bounce with just one double light. Place it in the center of the garage and aim the two lights toward the respective sides of the ceiling. You just scrounged yourself a second light source to use for free.

This next idea is gonna sound a little fancy-pants, but it'll make those bike tubes come to life in a killer way: Get an old sheet. Queen sized would be ideal. Stretch it on a cord, so it hangs, clothesline style, across the garage just behind your tripod/camera position.

Stick your second work light a ways back, behind the sheet and aiming at it. You just made yourself a huge, on-axis ring light / soft box. Combined with the bounce light on the ceiling and flats, this light will sculpt your bike's form very nicely, with no glaring hot spots, either. Make sure to fill the sheet with light -- back the light up.

This will make your white background much easier to tame and keep smooth, too.

And, assuming you'd rather spend $600 on some obscure Campy seat post than a new copy of Photoshop, you can now do pretty decent image post processing online for free with Photoshop Express and/or Picasa.

Thanks to Ray for the background bracket idea, and to Jean for the heads-up about the lnk. And if anyone else has any good garage-studio ideas to share, hit us in the comments with words and/or URLs.

:: Ray's Bike Photo Setup ::

Time to Give Away Some Pocketwizards

I am slammed today, editing from a corporate shoot last night. So rather than do a full post on who won the August round of the Going Wireless contest, I am sending you over to the PW Blog.

Congrats to [find out who won]!

-30-

Thursday, September 11, 2008

Lighting Q and A, 09-12-08

This week's questions are all about gels. Hit the jump for the light-sucking, color-shifting details...


James, who would tell us where he lives but then he would have to kill us, asks:

"If you gel a flash, say a full CTO for instance, does the power output of the flash alter the color thrown? (I didnt know if it had the same effect as say dimming a tungsten bulb where there is a dramatic color shift between full and almost completely dimmed.)"


James, the color of the gelled flash will remain consistent. The only thing that is actually changing as you dial down a speedlight is the amount of energy that is being discharged through the tube. The tube always flashes at (almost) exactly the same color.

For those who have not yet discovered the color shift in incandescent bulbs, take note: If you are trying to balance tungsten ambient up with a CTO'd flash, crank those ambient lights up. They only balance well at full power.

But if you want a deep, ambient red (for effect, say, in a candle-lit room) dim the lights down as far as you can stand it. Awesome colors that way. You can eyeball it, too, as you get close to low power.
__________


Cheryl, from Toronto, Canada asks a related question:

"How much light does my CTO filter soak up? I would like to know how much to raise the power on my flash to compensate."


Excellent question, Cheryl, and if you memorize a couple numbers, you can really help yourself.

A full CTO gel costs you 1.1 stops of light. For all practical purposes, I think of it as one stop.

Which is to say that if your flash (at 1/4 power) is giving you the proper exposure at a given distance, and you slap on a CTO gel on there, you'll either need to open up a stop or move up to 1/2 power. The partial CTOs follow the trend: 1/2 CTO costs a half stop, 1/4 CTO costs 1/4 stop, etc.

The CTBs are a little less efficient, and weirdly nonlinear: Full CTB = ~1.5 stops, 1/2 CTB = ~1 stop. And a typical fluorescent (green) conversion gels cost about 1/2 stop of light loss.

For the most part, if you remember that CTO fractions equate to lost f/stops and FL greens cost half a stop, your flash workflow will be much more intuitive. A basic familiarity with light loss numbers will help to save you lots of exposure chimping during a shoot.

You can get full light-sucking information on all of the gels made by Rosco on their site. The RoscoSun numbers, for instance, are here.

If you do not know your CTOs from your CTBs, you can get more info in the gel sections of L101 and L102.
__________


Tim B., also apparently from no fixed address, asks:

"About bouncing strobes off the ceiling - I did this at a recent wedding reception and the light was nice. But the ceiling was somewhat yellow. I wonder if there is a way to set custom white balance on the camera to match the color of the bounced light. Have you ever done this?"


That depends upon a couple of things, Tim. First, how much is the ambient contributing to the photo? If you are nuking the room by bouncing several big flashes into the ceilings, you can shift the whole scene easily in post-processing to compensate. This, of course, assumes your ceiling is at least reasonably close to neutral. If it is chartreuse, your screwed.

If you are shooting RAW (which for a wedding you should be) grab a bounce light shot of a grey card, white sheet of paper, bride's dress, etc. Correct that item to white in your RAW importer and use that color setting for all of the pix in that scene when you import.

But if you are mixing in ambient with the flash (which is done by your chosen shutter speed, of course) then you got problems, my friend. Because when you shift the picture to fix the off-color bounce light, you'll move your ambient color in the opposite direction, too.

Here's the best fix I can offer: Keep a full set of Rosco sample gels in your bag for each flash. Grab the color the most closely complements the color shift of the ceiling. For instance, if the ceiling was a slight yellow, you might blue your flashes just a tad. Maybe a 1/8 CTB. Then your flashes will help to compensate for the ceiling color somewhat and you will not have to correct nearly as far.

This is not en exact science. But you can set your camera on daylight and do a quick test pop or two with your flash and see how much you are helping yourself with the gels.

_________


Thanks for the questions. Please keep them coming in the comments of this post, or here.

Sunday, September 7, 2008

Today's Special: Gourmet Speedlights Al Fresco

UPDATE: Nick was kind enough to drop by and answer some of your questions in comments. (Thanks, Nick!)

I love letting the new submissions to the Strobist Flickr Pool build up for a few days, so I can spend a few hours looking through the thousand or so photos that have dropped in since the last edit.

That's a lot of images to look at in one sitting. But every now and then a photo really jumps out and grabs you. Such was the case with UK-based photographer Nick Turpin's series of portraits of thriller writers, shot for Arena Magazine.

They are sophisticated, stylish and bathed in pools restricted light. And they were done entirely with a few SB-800s and voice-activated light stands.

More, including Nick's video and links, after the jump.
___________


I hope you enjoy this movie as much as I did -- I probably watched it half a dozen times. Take a look, and then keep reading for some of the thought process behind street shooting with multiple SB's as light sources.


Nick says that began as a pure street photographer, and then started evolving his look to include small flashes. The street has since become his impromptu studio, and he is free to choose his settings on a moment's notice. He is now shooting magazine work and advertising campaigns, using gear that would be right at home at a Strobist meetup.

My guess is that he often is able to work without location permits because he is not setting up stands or tripods. And from the look of this video, this series was shot over the course of a single day.


When shooting outdoors in the daytime and using small flashes, there are three things to consider: Ambient level, balance and lighting direction(s).

It is helpful, though not mandatory, to work in shade. This keeps the ambient light at a manageable level. Still you'll want to start out at you highest normal sync speed speed, to give yourself a reasonable aperture.

Take a "properly exposed" photo and look at your frame. It will probably look okay. But likely a little boring, too.

Next, keep your shutter speed where it is, and start to underexpose your ambient light by dialing down your aperture and chimping the back of the camera. This will set the mood and contrast range of your photo. What you are doing is basically setting an ambient "floor" on your overall exposure via your chosen aperture.

How far down should you go? One stop? Two stops? Five stops? That is entirely up to you and depends on the look you are trying to achieve.

Now, bring in your lights. You will have to dial them up to a power level sufficient to properly expose your subject at the aperture you have chosen in the last step. Nick is using multiple SB-800's, snooted and aimed (via the VAL's) to create multi-directional pools of light on his subjects.

This is where it gets more difficult. Nick's eye for narrative (and humor, if you look at some of his other work) is what defines where he places his subjects and his lights. Sometimes he motivates the light with objects on the set (i.e., the lamp post) and sometimes he goes for pure, seemingly random whimsy. Your photos probably will not look like Nick's because you will bring an entirely different eye to your settings, body attitude and light placement.

But however you do it, cool things start to happen when you balance multiple hard lights against soft fill. It is as if your subject wandered into an area of interesting, mixed light. Texture happens. Depth happens. Interestingness happens. Sure, the light from the strobes is hard, but the shadows are only as deep as you set them with your baseline ambient exposure. So it is all under control.

What are your thoughts? Were you as surprised as I was to find the photos were done with speedlights and VALs? I found myself thinking back to Gregory Crewdson, mostly because of the sense of place defined by those pools of light.

Pretty amazing, when you think of the comparative amounts of gear being brought to bear on the shoots.

I love that VAL street lamp boom. To be honest, I love all of the photos in this series. It's amazing how he can be at once both sophisticated and mobile.

You can the whole series of portraits of thriller writers at Turpin's website. (More projects, and another video, here.)

Speedlnks: Sept. 8, 2008

Quickie batch of bonus speedlinks for Monday morning, after the jump:
________


• PDN ran a piece on Tim Kent's amazing car photography, thus justifying Ken Brown's subscription for the next ten years. Don't miss the companion OA-style sidebar, too.

• If you live in eastern Canada and are a fan of Martin Prihoda, you may wish to check out a big-lights seminar he'll be doing in Toronto later this month.

• My bet is most of us get a steady stream of requests to shoot photos of friends and family. This is how you might do it if you were contributing SI shooter (and current cover boy) David Bergman. If that SI thing does not work out, Dave, you would make a heckuva yearbook photographer...

• If you are willing to give up your email address -- and can read German -- California Sunbounce is giving away 450 day passes to Photokina.

• Finally, in case you haven't seen it yet: Vincent Laforet takes a video stroll through Pocket Wizard heaven at the finish line of the 100m sprint at the Olympics. (Patrick Smith, if you are reading this from a public computer, you might want to put a pillow over your lap before you watch it...)

Los Angeles Lighting Seminar Registration Opens

UPDATE: Both seminars, Saturday and Sunday, are sold out. You can jump straight to the discussion thread, here. Please check that thread periodically, as the latest info will be there.

-DH

________

Registration for the October 4th and 5th lighting seminars is now open sold out. Continue reading after the jump for details on the seminars.


LOCATION:

We will be at the Culver City Courtyard by Marriott, at 6333 Bristol Parkway in Culver City, CA. You can get a Google map of the location here.


WHAT WE'RE ABOUT:

With these seminars, my goal is threefold: To refine your approach to creating light, to fill you with as many ideas as possible in a day's time and to have fun doing it. We'll start with a roadmap for the day, which I will do my best to keep us on. But each session will take on somewhat of a life of its own. Which is a good thing.


Our Anticipated Schedule

Morning check-in/setup: 9:00 a.m. - 9:30 a.m.

Please plan to arrive between these times, as we will still be setting up before then and still waiting for the caffeine to kick in.


Morning session: 9:30 a.m. until approximately 12:30 p.m.

We'll talk about gear (I'll have a good gear selection there for a petting zoo) and take an extended, integrated look at what is essentially the Lighting 102 material in it's entirety. If you have seen the lighting DVDs, this is the roadmap we will follow for the day. There have been some new example photos added (I am always trying to evolve the material) but the general course structure is the same. Afternoon shoots are always improvised, so they are always different.

The focus will be on taking all of the things we talk about on the site in a day-to-day sense and integrating them to gain more of a holistic approach to lighting. Everything really is interrelated.


Lunch Break

On your own, approx. one hour, and we'll be looking for your nearby suggestions in the Flickr discussion thread related to this seminar.

We get a special all-day parking rate of $6.00, but no in-and-out privileges. There are several nearby restaurants listed here, including some within easy walking distance. The hotel has the typical hotel restaurant onsite.


Afternoon Session:

~1:30 p.m. - 5:00 p.m.

Assuming we have finished the theory stuff, we'll move into the practical/demo session. (Sometimes we go into a little overtime on the theory.) We'll get into some real-world lighting exercises photographing some models I will have cleverly hidden around the room disguised as ordinary attendees.

This is basically a lighting version of "Whose Line is it, Anyway?" with a focus on improvisational lighting based on available gear, the room, found objects, lighting mods, etc. I never know what ideas we will come up with, which is what keeps me equal parts interested in and petrified of the afternoon session. It's a good thing.

Shortly after each shoot, we will view each setup and discuss the results onscreen. This instant feedback in a group environment is a wonderfully efficient way to drive home the thought and technique process. We can read and write all we want. But for photographers there is nothing better than "monkey see, money do."

The goal will be to incorporate lighting theory, room environment, assignment constraints and our available gear to create a photo that seeks to produce an photograph that is an appropriate response to our situation.

Working within that framework will allow us to concentrate on better freeing ourselves in the other areas: Creativity and subject/photographer interaction.

The entire day will be a nonstop flow of ideas and techniques, punctuated by spur-of-the-moment Q-and-A. I want you to bring lots of questions, and to feel free to voice the ones that pop into your head throughout the day. In fact, if you do not ask me enough questions, I will start throwing some questions at you.

You might want to bring a notebook and pen. (I will have a URL to download the presentation, so you don't have to spend all day scribbling.) And please bring a camera if you want to shoot the setups as a visual reference. And dress is exceedingly casual, so you won't feel out of place if I show up in shorts.

I travel with cameras, projector, lights, stands, mods and clothing, which pretty much maxes out my baggage allowance. So if you happen to have a collapsible-type of background, feel free to bring it with you. More options is always better.

As with my philosophy for the website there will be no secrets and no posturing. This stuff is not rocket science. It's light. And the first step in learning to light is to realize that anyone can get very good at it.

We will plan to wrap up at about 5:00. But if we are still going (and they don't kick us out) who knows. Normally, a fair number of people come back to the hotel bar after dinner, where we discuss lights, darks, ambers -- whatever. Always fun.

If, for some reason, you require a cancellation after booking, refunds will be granted up until September 25. After that time, you would be responsible for transferring your seat to another attendee.

Very Important: If, through events beyond my control, I am unable to present this seminar, refunds will be limited to the ticket price. As I already have airfare, hotel room and our venue rental paid in advance, I do not anticipate this happening. But I just wanted to cover all of the bases, in case I get run over by a bus tomorrow, or one of those Big Macs finally catches up to me.

Bases covered, I would note that I am very much looking forward to this trip and especially to meeting many of you. As I do more of these seminars, I find that each session develops a vibe of its own. You put a few dozen photographers who are all eager to learn in a room, and what starts out as a simple stack of talking points turns into a rich, organic discussion that ends with everyone - including me - having a head swimming with new ideas.


Feedback from Previous Seminars

London:
Post-seminar thread | Extended report

Seattle:
Post-seminar thread | Extended report

Paris:
Post-seminar thread | Extended report

Northern California:

Extended report I | Extended report II

__________________________


Registration Details

The cost for either seminar is $159.00. The two seminars cover the same material, so you would register for either day, but not both.

To register for either seminar (with any major credit card) please click on the link at the bottom of the post, which will take you to PayPal. A PayPal account is not required to register.

VERY IMPORTANT: If you are in the process of registering and the seminar sells out, your fee will be refunded by the end of the day -- usually within the hour.

Please leave your name and phone number (and a working email if different from the PayPal address) in the info box on the PayPal page, in case I should need to contact you.

I look forward to seeing you there. The discussion thread for this seminar is here. Please save either your PayPal receipt or your confirmation email and bring a printout on the day of your seminar.


UPDATE: Both seminars are sold out.

Thursday, September 4, 2008

Strobist Lighting Seminar: Los Angeles - Oct. 4th and 5th

Just a quick note that I am finally getting out to L.A. Just scheduled myself for a nose job (and a quick Botox touch-up) to better fit in with the locals next month at the Oct. 4th and 5th lighting seminars in Los Angeles.

We will follow the same setup as in this previous seminar in Phoenix. So read through that if you want more info, links to reviews, etc. Registration opens on Sunday at 8:00 a.m. local (LA) time -- watch this space. We'll be at a hotel (TBA) near LAX.

More details and full registration info then.

-30-

Wednesday, September 3, 2008

TTD Video: How They Roll in Belgium


Thanks to Didier Jouret, who sent me a link to this video from a Pieter Van Impe "Trash the Dress" -type shoot.

This one is not so much about lighting, but it does include all of the typical stuff: Beach, sunset, trippy beats, happy couple, some champagne, a little nipple pinching, a kite-mounted Canon G9 for overheads, ... wait, WHAT?

Dude, I so want that G9 kite mount. He uses the G9 on a monster light stand, too.

Related links:
:: Pieter Van Impe ::
:: Tom Museeuw ::
:: Bridseye Kite Aerial Photography ::
:: Didier Jouret :: (Videographer)

Monday, September 1, 2008

Dustin Snipes on Quality and Quantity

Quick, what's the first image that would pop into your mind if you were assigned to go to a basketball camp and shoot seventy portraits in two days?

Picture day in seventh grade? I Love Lucy at the cake factory?

L.A.-based shooter Dustin Snipes shows not only that it can be done, but it can be done with quality and style. Check out his blog post for the details. And dig around for several more OA-style posts he has for you, too.
(Thanks, WSP! | Photo ©2008 Dustin Snipes)

-30-

Lighting 102 - 7.2: Time in a Bottle

Before we get to the assignment for this last unit in Lighting 102, I have one more technique for you to consider when using time as a variable for your flash photos. It's very useful, because it acts as a gear multiplier for those of you who may not have as many strobes as you'd like.

Given that a flash can record it's subject in an instant -- even if the exposure is spread out over a long time -- there are several ways to stretch a flash into looking several light sources when shooting a static object.

You'll remember Jonathan Boeke's cool shot from July in which he ran around during a time exposure popping his green-gelled flash from behind several trees to create this photo. It's a great idea, and you can easily see how it can make one flash look like a whole bag full of lights.

But you'll need a very dark environment and a long shutter to have time to make all of your locations for popping the flash. And if you screw up one pop, your whole photo is shot.

Another way to approach this is to use your camera's multi-exposure setting, if it has one. Some do, some don't. If your camera is so equipped, this gives you great flexibility and time to spare when you are lining up your various light locations.

If you do not have three PW's (one to manually trigger, one on the camera in relay mode and one on the flash) you'll want to wrangle a button-pushing friend to help. The camera, obviously, should be on a tripod.

If you'll remember, we set up a tag cloud for others who wanted to try this technique. You can see their resulting photos here.


For my take on Jonathan's night woods shot, I chose the multiple exposure route because it allowed me to control the ambient light. There was still plenty of twilight when this photo was taken, but since I shot each multi-exposure pop at a 250th of a sec, I could totally control my ambient.

I could even have chosen to lay down a, say, three-stop-underexposed ambient frame to flesh out the rest of the photo if I wanted. But I liked it better on black.

I tried the straight multiple exposure method about ten times (all pretty time consuming, too) and never got one I liked. So I decided to cheat. I use that term loosely, as there are no real "rules" for this kind of shot.

As far as I am concerned, any tool you have is fair game. So I decided to do this multi-exposure on separate frames and combine them in Photoshop. I shot each frame separately, and added each new photo a layer at a time, and combined them using the lighten mode. This simply compares the two layers, pixel by pixel, and the lightest pixel in a given location wins.

Which means it pretty much works like a multi-exposure -- except you can tweak each layer / flash pop before you add it to the final photo. You can shift the color, exposure, etc. It's a fantastic trick for shooting large scenes with one speedlight. I used my single loaner SB-900 for this one. (It turned back into a pumpkin last week and had to go back to Nikon.)

Thanks much to Photoshop Honcho Ben Willmore for the heads-up on the lighten technique.


The best way I can explain the advantage of being able to build this exposure around the totally controlled ambient is to say that I shot the photo at left almost an hour after the multi-pop photo. I think that kind of control is pretty cool, when you consider you are getting it with just one speedlight.

The soft look in this photo came from the fact that I used a plastic Holga lens (more on that here) on my D3. Kind of ironic, really - a $50 Holga lens on a D3. But I love the look, when combined with hard strobe.

And that's exactly what I did here -- camera on tripod, ambient underexposed a stop or two and a 30-second exposure. Just tripped the shutter and walked up to the side of the tree (out of the frame, tho) and popped the flash manually.

My choice of shutter for the multi-exposure shot above turned day into night, and the long shutter for this one turned night into day. Understanding flash / ambient control lets you do some cool stuff.


Speaking of Doing Cool Stuff

Now, it's your turn. You have just about everything I have to give on time manipulation of your flash photography. So for this, our last L102 assignment, your job is to shoot a still life. Your photo should contain a combination of flash and some form of time-based manipulation.

That's pretty wide open, I know. I wanted it to be that way because I thought we would make this one a little more interesting.

At the close of this assignment I will choose one shot, and the winner gets a set of Lighting Seminar DVDs, shipped anywhere in the world. Hopefully that will add a little layer of fun to the last assignment.


The Details

The deadline for this assignment is midnight, local, September 20th. Please make sure your photos are in Flickr and tagged before then. If you are a newb to Flickr, go ahead and sign up now (it is fast and free) and drop some photos in so you can get through the week-or-so waiting period before they let your tagged photos show up.


Here are your tags:

Strobist
Lighting102 (Note: no spaces)
Assignment
TimeInABottle (Note: no spaces)

and for your best shot, include the tag:

Final

You can see all of the take here. You can see the final edits here. Discussion is here.

Judging will be by a committee of one (yours truly). I will choose based on technique, creativity, how badly I wish I would have taken it myself, my general disposition at the time, what I may have had for breakfast in the morning, etc.

PLEASE NOTE: Please do not enter pre-existing photos into the running for the DVDs. I would like to award them to the best photo shot specifically for this assignment. We are doing this one on the honor system, but make sure your EXIF can back you up...

Best of luck to all, and I am looking forward to seeing what you come up with!

Share

Twitter Delicious Facebook Digg Stumbleupon Favorites More