Saturday, March 31, 2007

It's in Our Teams' Hands Now

(Photo by Phillip Moore.)

As the semifinal games begin, a few things to mention:

First, the basketball photos are really starting to come in. If yours does not show up in the above search (which will happen for many new members) please leave a URL that points to your photo's Flickr page in the comments section for this post. We do not want to miss you.

Second, remember that you have until Monday, noon (EST) to submit your photo, (either via Flickr w/strobistfinalfour tag or a URL that points to your individual photo's page on Flickr.)

Third, many thanks to the Sportsshooter photogs who have answered the challenge. We cannot wait to see your stuff. I hope my trash-talking bait was sufficient to bring many of you to the party.

And finally, to all people who still have some skin in the game, either via alma mater, favorite school or brackets in the office pool, good luck this weekend and Monday.

Monday afternoon, I will post the "Starting Five" from this site. As previously mentioned, I will submit a photo and choose four others. (I am sticking to this even though I am not sure that my effort would legitimately make the top five.)

I am sure Brad or Grover will post the link to their stuff over on Sportsshooter, and I will point to it. Hopefully, we will all pick up some new lighting tricks. I know I already have.

These of course will be quickly forgotten due to the effects of the pre-final-game Happy Hours.

Friday, March 30, 2007

Elinchrom Skyport Review

If you are a Pocket Wizard/Skyport fence-sitter, BlewBMX.com has posted a review that should help you choose. Or, maybe plunge you even further into indecision.

From what I see, the Skyports will not knock off the PW's, but seem to be a very good gap filler between the Gold Standard PW's and the Ghetto Infinity remotes.

(Thanks to BlewBMX for the timely info.)

Sportsshooters, Talkin' Smack:

UPDATE: In all seriousness, I am very much looking forward to seeing what everyone - from both sites - comes up with. Smack aside, the idea is to take a mundane, simple subject and stretch yourself with it.
__________________________

The SS guys seem to be oozing confidence today about our little FinalFour challenge.

A small sampling of the comments:

Knocking the out-of-towners:

"I think we my have already won. the Strobist group doesn't seem to know what a basketball is..."


Just like Ohio State wrote off UF before the football championship:

"One thing I learned after all those years of playing sports - if you're going to talk trash, you better be able to back it up. After browsing through 20 pages of the strobist flickr page, ummmmm, I sure hope he was just ribbing us."


Damning with faint praise, after a blanket putdown:

"Many of the photographers that visit strobist know what they are doing."


Looking forward to Monday. And remember, the ball should be the primary subject of the photo. There are several with minor supporting elements already posted, which is fine.

But try to keep it simple, lest the Can o' Worms gets opened...

Thursday, March 29, 2007

Great Find: Umbrella Swivel/PC Adapter

Lessee....

All metal: Check.

Low profile: Check.

Keeps the flash on axis with the umbrella: Check.

Built-in PC adapter: Check.

Schweet.

These things are popping up on eBay, but I sure would like to see this guy - whoever he turns out to be - make a real production run so we could all get one. Or two...

Hey, eBay guy, if you are reading this please call Midwest Photo at the phone number on top of this page and ask for Moishe. He will want to talk to you.

Great find courtesy Geesbert, discussion thread here.

Light Stand in a Pinch: Your Shoe

This is exactly why I like doing these little exercises. You always learn something new.

Today's smack-my-forehead moment is courtesy of Daniel Berman, who used his sneaker as a makeshift light stand. If you need a quick way to mount a kicker or background flash, and you wear shoes, you're good to go.

Two things to consider:

You might want to just shove the foot of the flash down into the heel of the shoe to friction mount the flash so you can use the tilt/swivel to point it any way you want.

Also, while this makes a sweet little low-level light support, there's no reason you could not put it on a shelf, or on top of a partially opened door.

An added bennie for me: The mere act of removing one of my shoes would tend to quickly clear the room of any meddlesome onlookers.

Wednesday, March 28, 2007

Video: 2-D Art Copy Photography

First of all, is that an awesome quilt or what?

Ditto the copy shot. Getting something like this to translate to a digital file is no small feat. It takes even lighting and attention to detail that borders on obsessive-compulsive behavior.

Ever wonder what goes into a large-scale, high-quality copy shot? Strobist reader Ben Peoples has posted a time-lapse YouTube video of his copy photography process. He clearly shoots a lot of 2-D objects for people. Or Peoples, if he is doing it for himself.

The basic techniques is even-field lighting with a pair of Alien Bees, But he also uses a speedlight on a nearby stand to direct a little kiss of light wherever he wants, for emphasis or texture. Nice.

If you wanna know more, watch the video. But whatever you do, check out the quilt at hi-res. It's awesome, as are Ben's copy art skills.

FinalFour Day 2: Sportsshooter Responds

Even though we are but a tiny blip on the radar for the wildly popular Sportsshooter.com, some of them have noticed our little challenge.

Some are mildly amused. Others see it as the fun, skillset-stretching challenge it was intended to be. Still others, I suspect, are busy wondering just how far away you have to get from a basketball to shoot a close-up with a 400/2.8.

Quietly, the Dark Overlords at Sportsshooter have begun to marshall their considerable resources:

"I'll even sweeten the pot by giving a special prize/gift to any SS.com member who is selected as one of the Top 5 from our site. (Trust me, I'll make it worth your effort.)"

But I have seen the stuff you guys are already doing, and, well, I think we can take them. I've noticed several very worthy efforts, including one that has been done by a reader and not posted yet. And I have a photo of my own in the can, ready to go.

Still nothing from the Sportsshooters yet.

One thought to consider: If you do something really hot, maybe you wait till late Sunday night to stick it in the pool, if you know what I mean. Can't be too careful with the OpSec.

I'm just sayin'...

(Evil action figure photo by silent_(e), via Flickr.)

The name's Jarvis. Chase Jarvis


It's almost right out of Q's workshop in a James Bond flick, but this one is real. And better yet, all of the stuff is off-the-shelf.

What is it? It's advertising shooter Chase Jarvis' kickin' laptop "location shoot" case, and it has everything but missile launchers.

Chase, you are one high-energy dude. I am feeling pretty slothful by comparison. Time to caffeine up with another Diet Mourtain Dew.

Tuesday, March 27, 2007

Talkin' Smack and Expectin' Some Back

The basketball pix are already starting to come in, and some are already looking pretty good.

Like the one at left by Dave Hoffmann, with a setup photo here.

I am not going to put mine up until I post the group results on Monday afternoon, (note the extra two days) before that night's NCAA championship game.

But I will say that I already shot one I kinda like. The idea for which was sufficiently interesting to get me up out of bed at 11:45 Monday night to run down to the basement to shoot it.

[Harmless, good-natured ribbing__ON]

That said, it occurred to me last night that this little project might be wasted on the the mere competition-based-on-favorite-school thing, and more suited to a little inter-website throwdown.

I mean, this is technically a sports assignment, right?

Granted, it's a bit peripheral. But it's the kind of thing a sports photographer might get asked to do for a promo, or a special section cover, right?

You know - someone who is seen as specializing in sports. Like, say, a sports shooter, for lack of a more imaginative term.

You listening, SportsShooter.com photographers?

What I am saying is that I would put the Strobist readers' two-strobe-max basketball pix up against the SportShooter readers' pix on this little challenge without a second thought.

You see, here at Strobist (Motto: "Less Gear, More Brain, Better Light') we like to think of ourselves as proactive photographers. Conceptual photographers.

Thinking photographers.

Whereas, over at Sportsshooter (Motto: "Eight FPS and Hope for the Best") they probably think of themselves as finely honed, reactive photographers.

You know, like when a highly paid, super-fit, near-perfect specimen of a human being does something absolutely amazing in front of their camera, they can make a photo.


Yo, SportsShooter Photogs:


Here's the deal.

If those Strobist readers who are members of Sportsshooter.com would be so kind as to throw a message up on that site informing them that they have been given a friendly little challenge, we could see just what they can do with the basketball group assignment. We could compare results on Monday afternoon before the Big Game.

That is, if they have the ball to compete.

So, whether you are a Strobist reader, or a Sportshooter reader, you make an iconic photo of a basketball using just two small flashes. (And available light, if you wish.)

As this is a simple little lighting project, we are not talking photo-of-Michael-Jordan-skying-over-the-Chicago-skyline stuff, either. Just shoot a basketball with modest lighting gear and make it interesting.

For you international readers on both sites, if you do not have a basketball, feel free to play with a soccer ball. (We know you have a soccer ball.)

Put the result in Flickr and tag it as STROBISTFINALFOUR. Maybe someone at Sportshooter could create a gallery for their stuff. Or just stick a URL to your photo in the comments of this post. We're not trying to make this hard.

If you guys wanna play, that is.

If you are a Strobist reader and a Sportsshooter reader, you will have to declare a side for the purposes of this little matchup. Just note it as an additional STROBIST (or a SPORTSSHOOTER) tag on your Flickr'd photo (or your URL'd comment below.)

What I am saying is that I will submit one photo and pick four more from this group's entries and put it up against their best five from Sportsshooter, any day. Well, on Monday, at least.

And to be fair, no one at Sportsshooter has any idea this is coming (heh, heh.) I tried to reach my fellow 1989 Eddie Adams alum (and Sportsshooter bigwig) Grover S., but he was off hiding out at some big industry conference on the Left Coast.

So let's just throw it out and see if anyone from Sportsshooter will bite.

[Harmless, good-natured ribbing__OFF]

Oh, and to the readers of this site: I'm counting on you.
______________________________________________________

Two discussions ongoing:

:: Sportshooter ::
:: Flickr/Strobist ::

To All Readers:

Please disregard this accidental post in the Flickr Strobist discussion threads.

(I love this group.)

Monday, March 26, 2007

Adobe Photoshop CS3 Pricing: If You Have to Ask...

Amazon has apparently leaked the pricing scheme for the Adobe CS3 family of ne-plus-ultra graphics programs.

I cannot even bring myself to type the numbers on a site dedicated to cheapskate low financial impact lighting. But Gizmodo has the gory details.

Sunday, March 25, 2007

Group Assignment: Shoot Some Basketball

As the defending NCAA basketball champion (*cough* and football champion *cough*) University of Florida Gators play their way into their rightful spot in the Final Four this weekend, I am offering the following group project.

If you have a basketball - and please, do not go out and buy a basketball for this - I challenge you to see what you can do with it as a subject using just one or two small flashes.

Here's the deal. Find a clean background, like a wall in your house. Set the ball on a table and shoot it. Nothing else, just the ball. What we are doing is a simple exercise in lighting a spherical form with one or two small lights.

I say "we" because I am going to do this one, too. Sort of an "On Assignment," but for anyone who wants to participate.

Think of this not as a contest, but as a learning exercise. I am going to start with simple bounce flash, using one light, and work from there and see what I can come up with. Start simple, then stretch yourself.

To keep things easy, consistent and about the light, let's limit it to just the ball and the background. (Or just a close-up, partial view of the ball, if you like.)

As for lighting gear, please use no more than two small flashes, and whatever lightstands or modifiers that you like. You may use the ambient as an additional light source, which will give many more options to those of you who are working with just one light.

The idea is to start simple and mundane and stretch your creativity within the constraints of the assignment.

Stick your favorite result(s) up on Flickr with the following tag:


StrobistFinalFour


Please note that this is all one word.

Next Saturday Monday, just before the championship game, I'll throw up mine. Using the tags, I will also link to a Flickr search showcasing what you have done as a group.

Tight contraints, small subject, simple lights and photogs from all over the world shooting the same thing. Should be fun. I hope you will join us.

And again, this is not a competition. I say this especially to any Georgetown, Ohio State or UCLA fans who may be feeling justifiably intimidated by the Gators. Please do not feel that you need to uphold the honor of your school.

Remember, it was a great accomplishment just to make it to the Final Four and be a part of the Gators' repeat. Oh, did I happen to mention that UF is my alma mater?

And if you have any ideas, questions or slightly differing opinions, please sound off in the comments.

I have started a discussion thread here.

UPDATE: I was asked in the comments section if it would be okay to substitute a football, which I presume means a soccer ball. (Sure, why not.)

Right Back Atcha

Nice, huh?

Click on the pic to see some of the hot shots submitted by members of the Strobist Flickr group in the last few days.

Amazingly, only about two percent of the people who read the site are members of the Flickr group. To you other ninety-eight percent: Register and show us your stuff!

Saturday, March 24, 2007

Why Pocket Wizards are Worth the Money

Sure, they are rock solid on the flash-synching thing. But being able to do remotes is another bennie that gives you photos that are impossible to get otherwise.

SportShooter Academy has a set of Quicktime videos by Getty's Donald Miralle on some great stuff you (well, he) can do with remote cameras and PW's.

Flashback: When are You Gonna Learn?

One of my earlier posts (from May 06) has again been making the rounds on the internet, so I thought I would exhume it for the benefit of the new folks.

If it makes you think a little bit, I'd love to hear about it in that post's comments section.

Friday, March 23, 2007

Cool Little Sports/Lighting Site

Cincinnati-based sports photographer Thomas E. Witte has put together a website that goes far beyond the typical portfolio-and-phone-number stuff.

He has a nice tips page with all kinds of ideas. This includes sports lighting, both with the high-powered stuff and with speedlights.

Flashy Videographers, Take Note

Calling all YouTube hounds out there - if you are doing videos of any of your off-camera lighting shoots or DIY flash stuff, please stick a YouTube URL in the comments section of this post. If it rocks, we all wanna see it.

Photographers, obviously, are very visual people. And monkey-see-monkey-do is the way we learn the fastest.

On a related note, if you are local to the Baltimore/Washington area and might have some free time on Sundays and Mondays in July, we have a pretty neat video project in the works. I will have several opportunites for photogs and/or video people who might want to be involved.

If you are local and looking for internship credit stuff (or just a chance to be involved in a very hands-on, small-group lighting project) this could be a cool summer project that would be fairly low impact on your summer schedule. The shooting sessions would be modular, and variable. You would not need to be present on all days.

More info later, but just a heads-up now for long-term planning purposes. If you want to leave your name and contact info in the comments, I can hold onto it for later. Your contact info will not be published.

Thursday, March 22, 2007

And He Doesn't Have to Mow the Yard Any More, Either.

Patrick "I Need a Bigger Trophy Case" Smith, who has lately been kicking butt in some of the college PJ awards, has apparently destroyed a perfectly good lawn mower in the quest for a good remote camera and/or low-angle flash mount.

Looks pretty cool, but I don't wanna be around when the grass starts growing in April...

London Updates Now On Flickr Threads

From here forward, the London seminar updates will be on the Flickr threads, here.

Note the "Latest Info" link near the top of the sidebar, at right. If you are attending in London, you should periodically check in for any new info (or to ask any questions.)

Thanks to the other 999,936 of you who were so patient through these last few days.

-D

My Mom Would Be So Impressed

Well, she would if she knew about YouTube:


Luv the music, too. (Thanks, Johan!)

I swear, of all of the things I have written about, I never knew the DIY Macro Box would be the thing to go viral.

FWIW, I am wall-to-wall for The Sun again today. So it looks like it'll be another laaaate night processing the remaining London/Sunday folks. If you are high up on the wait list, it looks like there may be a couple of slots opening up.

Must be your good karma.

I will have all of the Mountain Of Email answered before bedtime, too. Hang on, Sloopy.

Wednesday, March 21, 2007

London Roster Firms Up

First, for the non-London folks, thanks much for your patience as I plowed through the surprisingly time-consuming administrative work surrounding booking the London attendees.

We will be back to lighting, soon. I promise.

Here's where we are on London:

Saturday is sold out, and registration URL's have been sent to the earliest people on the Sunday wait list. If you were on the Sunday list and were early enough for a slot, the notice should be in your in-box by now.

I have kept, in order, the other wait list contacts and will give you a heads up if anyone does not sign up, or has to cancel for some reason. I expect we will get a few cancellations. Things happen.

Those who have already made their payments via PayPal are on the roster. I will post a full list in a couple of days (so the wait listers can have time to sign up) and you can check to make sure there are no mistakes.

I will post first name, last initial and the domain (only) portion of your email addy. That should be sufficiant to check for an accurate list without compromising anyone or feeding the spambots.

And again, thanks for your patience.

Reader Photos Link Now on Sidebar

First off, check out this portrait, by Strobist reader Jure Verc.

His lighting gear? A slide projector on the right and a Nikon SB-80dx in a shoebox-softbox. Awesome.

I threw it up as an excuse to tell you that I am now using a link on the sidebar to point to my Faves Page on Flickr, which I am basically turning into a rotating reader gallery.

Please stop by whenever you feel like looking at some great work.

London Registration Update

UPDATE: The London seminars are sold out, and the waiting list is, well, very lengthy. No plans on future dates yet, but I will be back to London again at some point in the future.

If you have signed up on the waiting list, I have your contact info. The waiting list is pretty long - far longer than will likely be able to be accomodated.

But you never know. Maybe 20 or 30 attendees will come down with strep throat or something.

I will go to the list, in order of signup, should any cancellations be made. I will post the first portion of the list when the class roster is posted, so those near the top will at least know their position.

Thanks,
David

Tuesday, March 20, 2007

London Seminar Registration

The classes are to be held on Saturday, May 12th and Sunday, May 13th in Room 3-D at the University of London Union, which is on Malet Street in the Bloomsbury section of London. (See map.) As the map shows, the location is an easy walk from the Russell Square tube station.

The Sunday seminar will be a repeat of Saturday's session, to accommodate those photographers who are likely to be booked on Saturdays in May. Registration is on a first-come, first-served basis. If you would like to have your choice of days, I would suggest booking early. The last seminar sold out in six days.

If, for some reason, a cancellation is required after booking, refunds will be granted up until April 20th. After that time, you would be responsible for transferring your seat to another attendee.

Please note: If, through events beyond my control, I am unable to travel to London, refunds will be limited to the ticket price. As I already have airfare and venue rental paid in advance, I do not anticipate this happening. But I just wanted to cover all of the bases, in case I get run over by a bus tomorrow.

Bases covered, I have to say that I am very much looking forward to this trip and especially to meeting many of the site's UK readers. As I do more of these seminars, I find that each session develops a vibe of its own. You put a few dozen photographers who are all eager to learn in a room, and what starts out as a simple stack of talking points turns into a rich, organic discussion that ends with everyone - including me - having a head swimming with new ideas.

My goal is threefold: To refine your approach to creating light, to fill you with as many ideas as possible in a day's time and to have fun doing it.

We'll start with a roadmap for the day, which I will do my best to keep us on. But each session will take on somewhat of a life of its own. Which is a good thing.


Our Anticipated Schedule


Morning check-in/setup 9a - 9:30a


Morning Session:


1. Understanding Light.

Attendees should already be familiar with the basic concepts of Lighting 101 to allow for more efficient use of our classroom time.

Initially, we'll be steering away from specific techniques in favor of gaining better insight into the factors and variables that are at play when designing light.

We'll introduce different light sources and modifiers within the context the discussion. With light, every variable is a give-and-take situation. Every technique yields specific pluses and minuses. We'll concentrate on how to allocate your light - and technique - to best advantage. The goal will be to help you develop a much more intuitive understanding of light.

2. A World of Possibilities

Every room, setting or environment comes with its own unique set of opportunities not only for adding light, but for controlling the relationship between the added and the pre-existing light. We will use our classroom as a example to teach the process of brainstorming (or "roomstorming," if you will) a wide range of potential lighting solutions for any environment.

This process will reinforce the principles discussed earlier in the morning. Throughout the day, we'll be continually studying the room, exploring ideas for both lighting and photo design.


LUNCH BREAK

(On your own, with several options in the building.)


Afternoon Session:


3. Having discussed both general lighting theory and the specific environmental opportunities and challenges of our classroom, we'll design and shoot a variety of photos using inexpensive, highly portable lighting gear. We'll be basing the solutions on specific, theoretical assignments generated by group discussion.

As we shoot, we will view and discuss the photos as they appear on a TV screen. This instant feedback in a group environment is an amazingly efficient way to drive home the thought and technique process. We can read and write all we want, but for photographers there is nothing better than "monkey see, money do."

The goal will be to incorporate lighting theory, room environment, assignment constraints and our available gear to create a photo that seeks to produce an photograph that is an appropriate response to our situation.

Working within that framework will allow us to concentrate on better freeing ourselves in the other areas: Creativity and subject/photographer interaction.

The entire day will be a continuous flow of ideas and techniques, punctuated by spur-of-the-moment Q-and-A. I want you to bring lots of questions, and to feel free to voice the ones that pop into your head throughout the day.

Other than that, you might want to bring a notebook and pencils. And dress very casually, so you won't feel out of place when I show up in shorts. If I wear anything at all.

As with my philosophy for the website there will be no secrets and no posturing. This stuff is not rocket science. It's light.

The first step in learning to light is to realize that anyone can get very good at it.

We will finish each day at approximately 5:00pm (1700 hours.)


Registration Details


The cost for either seminar is £100.00

To register for either seminar (with any major credit card) please click on the appropriate link at the bottom of the post, which will take you to PayPal. A PayPal account is not required to register. You will be returned to this site after successfully registering.

Please leave your name and phone number (and a working email if different from the PayPal address) in the info box on the PayPal page, in case I should need to contact you. And please make sure to click on the correct day.

Please post any questions in the comments section. I look forward to seeing you there.

_______________________________________________

UPDATE: Please note that the sign-up links have been removed, as Saturday sold out (within a few hours.) Sunday's remaining few seats are now on allocation by waiting list. See this update post for details.

You Had Me at 'Cardboard'

I am a sucker for lighting solutions that involve aluminum foil, cardboard or trashbags. As this baby uses all three, you know it's getting posted.

From Lactose, and Other Unavoidable Evils, (luv that name) the Hobo DIY Softbox. (Luv that name, too.)

Stretching the Canvas

From the outside you might not notice it. But in the newspaper world things are moving toward multimedia at a lightning pace.

Photographers at my paper, The Baltimore Sun, are routinely taking expanded edits from shoots and creating A/V packages for the web from their daily assignments. We are not talking Big Special Projects, either. This is day-to-day stuff.

For a couple of recent examples, check out Barbara Haddock Taylor's behind the scenes look at the canine stars of the touring Broadway show, Annie.


Or André Chung's package from an afternoon with a group of steppers.

This stuff is quickly becoming the norm.

For all of our recent A/V presentations, you can click here. We are significantly upping our video content, too. Things are moving fast.

If you are thinking about moving into the world of photojournalism, you want to be learning this stuff. With Soundslides, Audacity, and an Olympus DS-2 recorder, you can be totally equipped to start playing in this sandbox for about $125 US.

When you get serious, the full pro package (high-end sound recorders and Final Cut Express) will set you back about $1,000.00. Not much for a whole new world of opportunity, IMO.

This stuff is not going away. The days of news being delivered on dead trees are numbered. Do not think of yourself as a "print" photographer, or you will miss the train.

Monday, March 19, 2007

London Lighting Seminar Registration Opens Weds., March 21st

Just a heads-up for anyone who does not want to miss registration for the May 12th or May 13th London lighting seminar. Registration will open up for either day on this Wednesday morning, London time. Sunday is a repeat of Saturday, so please only register for one session.

Each class is limited to 32 participants and a staff assistant. (People already have been chosen for both assistant slots.) The January seminar sold out in just a few days, so I wanted to give a little prior notice for these sessions.

Full details and an outline of what we'll be covering will be posted along with the registration info.

IMPORTANT NOTE: I have created a "thank you for registering page," backdated to March 1st, which is showing up in the archives and on the RSS feeds. Registration does not open until Wednesday, and that page will be the "return" page after successful registration. The RSS thing never crossed my feeble mind. Sorry for any confusion.

-DH

Sunday, March 18, 2007

Apply for the Eddie Adams Workshop

Each fall, one hundred promising young photographers from around the world are invited to come to a farm in upstate New York, where they are treated to four days of intense training and shooting. The teachers and staff are some of the best photographers and picture editors in the world.

Throughout the four days, the attendees will get almost zero sleep. There's just too much you'd rather be doing. It's awesome.

It's called, "Barnstorm," and this year will be Barnstorm XX, which is the 20th edition.

I was a student at the second Barnstorm, back in 1989. I can honestly say that, photographically speaking, it was far and away the best week of my life. Ask anyone else who has been lucky enough to attend, and they'll likely tell you the same thing.

Oh, and the workshop is free.

The only catch is that you have to be chosen - by portfolio, application and recommendation - to attend. You must be a college student, military photographer or a pro with three years (or less) experience.

The deadline to apply is May 14th. To anyone who is eligible, I would strongly recommend applying. If you are a Barnstorm alum, please leave a comment, along with your year and and what you thought of the experience.

(Photo by EAW Alum and fellow Baltimore shooter Matt Roth. Click the photo for more of Matt's EAW pix.)

Friday, March 16, 2007

On Assignment: Flavored Vodkas

They run a regular drinks column at The Sun, which means that I get plenty of chances to shoot ... beer. Just in the last few months, I have shot illustrations for Octoberfest, wheat beers, beer glasses, etc.

So I was relieved to hear that we would be doing vodka shots this time. And shooting pictures, too! (Ba-dump, ping...)

No, no. We didn't drink any of the vodka. As far as you can prove, anyway.

We have a nice photo/design groove going with features right now. Which means that ideas and comps are being preconceived, but with enough flexibility left in the process to call an audible at the last minute.

Example: A couple of weeks ago we shot this tightly comped tableau-style "Live!" cover on how to break into the big leagues as a rock star. At the end of the shoot I shot a throwaway-type of a detail, and the designer swapped it out for the cover shot and ran the original shot inside as a lede. It never occurred to me that it would have been a cover when I shot it, but it looked great in the end.

It's a positive vicious cycle, really, when you get a little synergy going between departments. People are willing to experiment, take chances, change ideas, leave the door open for someone else to make a last-minute change - whatever.

It just comes down to what looks best on the page. Leave the bruised egos at the door and be open to a new idea from anywhere.

It is in this spirit that the designer had loosely comped the idea for flavored vodkas. She wanted to have the "flavor" items in the vodka-filled glasses, but left it open from there. She also had some neat, tall shot glasses (from Crate and Barrel) that were the exact sort of thing I would have gone for, given the opportunity.

I knew I wanted to backlight the glasses to create a strong, repetitive pattern and include a partial reflection to have the repetition created on a second axis. I also knew this meant I would have to light the shot on two different planes, to have lighting control just on the contents of the glasses.

So, we're talking about a basic, two-speedlight deal: One on the subject and one on the background.

I stretched the setup out, shooting with an 80-200 lens (at about 200mm) at the glasses, which were about 10 feet away from the camera. The background was another 8 feet away.

This meant that I could position the "food" light close in and not affect the background, and vice versa.

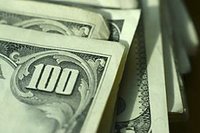
I put the glasses on a sheet of white acrylic and lit a sheet of white seamless paper behind them to create a silhouette, as shown here:

Why white acrylic? Because that's what we had. I would have preferred black, as it would have reflected the background just fine and not contaminated my glasses reflection a little as did the white.

But this ain't Madison Avenue. So we use what we have, we work quick and we improvise when needed.

I liked the graphic quality of the photo, but I did not like how high the horizon (the curvy, refracted back edge of the acrylic mid-way up) ended up in the glasses. This problem was solved by moving the glasses closer to the back of the acrylic, which brought that curvy line down some.

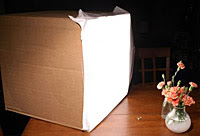
Next, I built a little "room with a skylight" for the glasses out of a Boise Cascade copy paper box. These things are darn-near ubiquitous in any office. And right in my price range.

Here is the setup from the back, which shows the whole, massively complicated lighting scheme.

Rule Number One, for reverse engineering: Always assume "simple," until proven otherwise. It's like reading a mystery. Until it is shown that the butler could not have done it, assume he probably did it.

My skylight-soft-box was simply a box with a hole cut in the top, covered by a sheet of paper. This way, I could have made the "food light" any shape - strip light, square, oval, whatever.

Heck, I could have even put a sheet of black paper on the white paper with holes cut out for each glass - a set of mini soft boxes, if you will. I then could have made each light brighter or darker, (by adding more layers of paper over the individual holes) for custom control over individual-glass lighting for the darker-themed glasses.

The point is, I had total control, right down to the square inch. As it was, I snooted the flash, to avoid spilling light past the box onto the front of the acrylic. I also moved the "hot spot" around the paper until I liked the effect on the food.

Now I have complete control, not only between the background and foreground, but down to the micro level of the foreground. Not bad for a couple of speedlights and some throwaway office supplies.

Speaking of the speedlights, they were on manual. If I remember correctly, they were both on 1/8 power, but that should not matter to you.

The light-tuning process goes like this:

1. Adjust the power of the background light until you get a reasonable aperture for the tone you want. Which for me was about 2 stops over middle grey. Nothing fancy. Just chimped it.

2. Bring the second light in on your foreground objects. Working at your pre-determined aperture, adjust the light until your foreground stuff is as bright as you want it.

If this sounds complicated to you, it's not. Just try it. The key is having your subject and background far enough apart to where you can light them on separate planes.

Next, we moved on to the mechanics of the shot. You never know where your curve balls are gonna come from. This time the toughest parts of the shoot were (a) getting the glasses filled to (nearly) exactly the same levels, and (b) getting the internal spacing as close to exact as possible.

Shown here is the designer, (who I assure you has a perfectly normally shaped head and only two eyes) using a funnel to rough in the glasses. We used an eyedropper to fine tune.

Funny thing - we had to use real vodka and not water. The latter has a completely different viscosity and would have looked totally different at the edge of the glasses and around the food.

What is neat about this shot is how different it looks, given that the background light is blocked from reaching the background. This shows that (absent the designer being there) the background light - and its reflection - sets the tone for the whole photo.

When she moves away, we are right back to glasses floating on a sea of light tone. Same lighting scheme, but a totally different look because of a light modifier (the designer.)

Just something to stick in the back of your mind for later.

Here's a photo with the box included, straight on. I just cut the sides out to make a little pass-through tunnel for the shot. Total cost: Free, with a bonus (also free) customizable soft box in the ceiling.

Here's the fancy-pants mini soft box from the top, with paper. I use printer paper on almost every small product shot I do.

As Velvet Jones would have said, "What could be simpler dan dat?"

And for those of you, say, recovering from surgery in a hospital somewhere, still under the hazy influence of some really good pain pills, here's the patent-pending, $500 Micro Vodka Studio topless. Just to be as clear as possible.

Before I tear down, photo in hand, I always try something different.

Here, I dropped my aperture a couple of stops to see if I liked it with more of a grey theme. If I would have liked it, it would have been a simple matter to dial my front flash up a couple of stops to bring the food back up to the right exposure.

Those raspberries would have popped, lit against the grey. But I liked the white theme better, so I went with it.

So, were you close on the reverse engineer? My guess is if you missed it, you missed it by over-complicating it.


NEXT: Light the Details

Thursday, March 15, 2007

You Rock.

You wanna know why I can't do "Pictures of the Week" any more?

Okay, I'll tell you.

It's because as a group you have just blown past my ability to edit down a week's worth of your photos to two or three. Let alone one.

You guys are totally kickin'.

Every week, brand new people come in and get sucked into this lighting vortex thing and start throwing up even better stuff. I cruise through and fave the stuff that I really like, along with some gear pix that make me think of some future article subjects and a few other odds and ends.

It's amazing. I am both inspired and intimidated by my "favorites" page on Flickr. Take a look and see what I mean.

Like I tell people at the seminars, you learn how to control light and then your imagination becomes your only limit. Can you think of anything in photography that would be more interesting than to go there?

Harrington's RI Party Cam

John Harrington has posted an article about the monster photo booth setup he had in his villa hotel suite this past weekend.

A few thousand watt-seconds of light, a few hundred bottles of beer, a few dozen well-lubricated photographers and one self-portrait cable release.

(GodPleaseLetHimHaveEditedOutTheWorstStuff.)

:: Harrington's Complete Setup ::
:: The Results ::

Wednesday, March 14, 2007

Three Well-Spent Minutes

Looking for a little lot of creative inspiration in three short minutes? I first saw this after it was posted by my buds over at Photojojo.com, and have since showed it to everyone in the photo department at The Sun.

It is the flash-based, three-minute portfolio of photos shot by George Lange. (Link is to Lange's website. Direct link to flash portfolio is at the bottom of this post.)

Mind you, this is just what he did in 2006. The guy blows through a year's worth of famous people, nobodies and family with equally wonderful skill and vision.

As a bonus, he flips through multiple photos from several of his shoots, which gives you an idea of how a high-end, hard-working photographer develops an idea while shooting an assignment.

When he lights, it is simple. What is not simple is the creative and dynamic ways in which he interacts with his subjects.

Sit down and look over Lange's shoulder for a few minutes. It'll charge your batteries:

:: George Lange's 2006 Portfolio ::
:: Yak About it on Strobist Flickr ::

Tuesday, March 13, 2007

Reverse Engineering: Flavored Vodkas

Next up in the On Assignment queue is a shot I did last month for The Sun on flavored vodkas.

I did lots of setup and process shots, and am working on a long-form piece for later this week. But I thought this might be another good opportunity to throw a photo out for reverse engineering before the article goes up.

The story was on the rise in popularity of flavored vodkas, with a fairly straightforward illustration of six of the most popular flavors. As far as gear, this shot was done with two bare speedlights. The light modifiers consisted of a cardboard box and a sheet of typing paper.

Setting aside for the moment that you might have chosen to illustrate the concept in a completely different manner, try to work out the lighting for this photo using just the basic equipment listed. FWIW, the two biggest problems that we had to solve were (a) the glasses reflect everything, and (b) the objects in the glasses had to be lit separately from the environment to compress the tonal range.

If you are sufficiently brave, please feel free to stick your results in the comment thread on the photo's Flickr page. (I am turning off the comments on this post to keep all of the thoughts in one place, and to save myself the tsunami of moderation work.)

:: larger version ::

Monday, March 12, 2007

Temptation Getting the Better of Me

It's almost midnite, and I'm the only one awake in the house. Ever notice how gear lust seems to hit late at night? I swear, it's like a seven-year itch for me.

Not that I would ever, ever experience the real thing. (Hi, honey!)

Anyone here own a Canon G7? (For the unfamiliar, here is DPReview's take.)

I played with one up in Rhode Island, right in full view of the Nikon guys across the aisle. Felt guilty, but I did it anyway. Oooh, it was nice.

Ten megapixels, feels kinda like a Leica (or at least a Contax - couple of nicely clicking dials up top...) vibration reduction, hot shoe (for my PW's of course) huge screen, 35/2.8 equiv that zooms to a 200 and a real nice chip.

Getting woozy just thinking about it.

Anyone here using one of these things? They are less than $500 street, and I am thinking about pulling the trigger. I'd have to have it shipped to the office of course.

Somebody talk me out of (or into) it in the comments...

Saturday, March 10, 2007

Seminar Attendees Shot in Rhode Island

Things are wrapping up here at the Northern Short Course in Rhode Island. Between teaching the lighting seminars, soaking up the other speakers and the two-night event that was Suite 632, I am ready to go back to work to get some rest. But first, I thought I'd throw up a photo from each day's seminar with a quick recap of the way we did it.

Leading off is the audience victim model from the first day's class. We spent almost all of Thursday's three-hour session in discussion mode, then took a few minutes to analyze the room for various background and lighting opportunities.

Having blinded this poor guy 30 minutes earlier with a full-power flash to the eyes at point-blank range, (long story, and I was not technically the trigger man) I thought I'd pile on a little bit by putting him on the spot to model in front of the rest of the class.

We created the scenario of our having to quickly shoot some tech guru between sessions at a hotel conference, thus explaining our conference room as the environment. The fictional assignment would be to shoot him for a biz tab cover story on his bringing a new, high-tech venture to the Providence area.

So we needed something simple (but a little graphic) that looked more ethereal and less "hotel conference room." Having just brainstormed the room, we gave this shot the additional restriction of our having to use only found objects in the room as light modifiers.

For a soft, directional light source, we tipped a table (with a white tablecloth) up on its end and bounced a speedlight off of it. Granted, this was kind of a "stone soup" approach to lighting. But the point was to be able to go with whatcha got. We were just stretching the idea to prove a point.

The background light is just a bare flash, with a tungsten-to-daylight conversion gel, shot through some of the hotel's water glasses.

This wide, in-focus shot shows the "bent light" pattern created by the harsh flash through the glasses. In the final photo, the wall was significantly out of focus. This transformed the light pattern into a more subtle abstraction.

Again, we were pretty much creating this on the fly over the period of about ten minutes at the end of the session. It is always interesting to me to see the way these seminars morph into an organic exchange of ideas. Several of the attendees saw possibilities in the room which I would have missed.

You learn something new every day.

For the next day's (shorter) session, I decided to spend less time talking about the stuff that people could find on the website. So after about 45 minutes of dissecting the lighting on a series of photos, we bailed out into the hall to make a few photos of our own.

Oddly, the pace we kept on the three situations out in the hall was pretty close to how I would have worked on a typical assignment, with the small exception of the 80 people looking over my shoulder as I shot. It was like being in one of those Verizon commercials where the whole network follows the guy with the geeky glasses.

Here is one of the three situations we did out in the hallway, before heading back to the room to show the process shots up on the big screen.

The lighting for this shot really couldn't be simpler, as we got double duty out of a white satin umbrella and an SB-26 flash. The background was a darkish wood panel, with a semi-gloss finish. Those surface qualities lend themselves to the two-for-one effect we got from the soft light.

In front, the subject is obviously being lit by an umbrella over my right shoulder. But the wood panel is throwing back two distinctly different tones. At the edges, you see the true tonality of the wood (a little dark, actually, as it is further away from the light than is the subject.)

The hot spot in the background is an intentionally placed reflection from the the umbrella. The finish of the wood softens it up enough to make it a little abstract. Since we are not using modeling lights, it was just a matter of chimping the camera to make sure the reflection was in the right place to separate the shadow side of the face.

This is a super-easy, one-light technique that you can get from any dark, moderately reflective surface. It's a good trick to keep in your back pocket to make one light look like two lights.

As usual, click on any of the photos to see bigger versions.

Thanks much to everyone who attended the NSC, and especially to the student volunteers who made the trains run on time. It was a great weekend in which I got to see many old friends and make many new ones.

OT: I Want One of These

Depending on how long you have been shooting as a pro, you may or may not remember how the high-end 35mm film cameras used to have removable prisms. This feature was so helpful for low-angle shots (as in that wideangle-on-the-ground view) and for Hail Mary shots in crowds in media scrums.

Sadly, while many amateur digital cameras have this feature, the pro digicams do not. Until now.

Argraph (I've never heard of them either) has introduced the Zigview, which is basically an mini auxilliary video camera that grabs what you would see in the optical viewfinder and ports it to a TFT monitor. A tiltable, rotatable TFT monitor.

The upgrade model, the Zigview S2 (same page as above) has a screen that is removable.

The ultrawide ground shot is back, ready to be mercilessly overused yet again. Heck, with the S2 and a Pocket Wizard (or even just a remote shutter cord) you could pole-cam your DSLR on a monopod and nail your aim every time.

Not off-camera flash, but cool beans.

(Via Slashgear, which also has a neat little feature diagram on the Zigview.)

Friday, March 9, 2007

More on the Elinchrom Skyport Remotes

Well heck. It's apparently Gizmodo Day here at Strobist.

I am sitting on the floor in a conference room in Rhode Island listening to David Leeson preach the Gospel of Video and New Media for still photojournalists.

But ADD'er that I am, I am also cruising the web and just came across Gizmodo's first-hand post on the new Elinchrom Skyports.

Definitely worth a look-see, if you are interested them.

The New Canon Uzi

UPDATE: I just got my grubby little hands on one of these. Wow.

Impressions:

Light, tight, super fast. HUGE screen on the back. I told the guy they should have a media viewer built in, so you could watch videos on the camera between assignments. Canon shooters will be popping woodies over this thing for a year.

But I'll never switch.


From Gizmodo, a video clip of Canon's new photo-spraying machine, the EOS-1D Mark III. I am pretty sure my flash recharge rate could not match this.

The best part: Chuck Westfall's evil laugh at the end...

Rhode Island Hijinks and DG28

We're still up in Rhode Island at the Northern Short Course until the end of the weekend.

Photo Biz Guru John Harrington, whose next photo book should be entitled, "How the Other Half Lives," turned his hotel room into the equivalent of the vendor's floor at PMA last night to host a little get-together for about a gazillion of his closest friends.

He had a full studio set up (Bogen-Autopoled lights, background paper and all) where people of varying degrees of sobriety created self-inflicted photos all night long. Being Harrington, there was of course a dye-sub printer spitting out the damning 5x7 evidence right after the button was pushed.

After the aspirin take full effect, we are doing one more lighting seminar this afternoon. Today's plan: Blow the meeting room after about 30 mins and head out into the halls and foyer to see how many settings we can explore/exploit with some cool light.

We'll either have a lot of fun, or not get invited back. Or both.

If you are Jonesing for some lighting writing this weekend, mosey on over to Neil Turner's site, DG28. If you have never seen it before, you are about to lose a few hours of your life to his examples and tutorials.

If you have been there before, he has totally redesigned the site. So there is new stuff waiting for you.

Thursday, March 8, 2007

Detailed "How-To" for eBay Remotes Mod

Over at Instructables, Strobist reader David W. Smith posted a detailed run-through showing how to mod on the cheapie eBay remotes with a much better antenna. I know we have mentioned this before, but this is by far the most detailed tutorial yet.

Total cost: Some solder and a small piece of wire.

Illegal? Possibly.

Effective? Given that it might be illegal, I am not gonna comment on the specifics of David's insanely increased range. Because that would be irresponsible.

Those of you who can live with occasionally breaking the law for 1/250th of a second at a time might consider putting your soldergeek skills to work on this very cheap alteration.

Being a fine, upstanding, legal Pocket Wizard user, I completely disavow myself of all knowledge of your actions, of course.

Wednesday, March 7, 2007

How to Get Dave Hill's Gritty Look

I love the serendipity of this blog thing.

As we said in the previous post about photographer Dave Hill, he is clearly using some post production to get from his wraparound light to his overall signature look.

A reader stuck a link in the comments section to a quick little Photoshop tutorial that shows how Hill might have gotten that high-pass, gritty feel after the fact.

The technique is surprisingly simple.

Always one for exhaustive research, I repeatedly studied the tutorial's before-and-after photos of Angelina Jolie very closely before posting the link.

Actually, on second thought it may just be a Jolie lookalike. I think am gonna go back and check those shots one more time. One cannot be too careful about these things.

On a housekeeping note, I am up in Rhode Island this week to do lighting seminars at the Northern Short Course on Thurday morning and Friday afternoon. The two seminars will cover the same material, except the one on Thursday morning is a little longer.

If anyone within earshot is coming, we'll be repairing to the hotel's watering hole on Thursday and Friday evenings to talk about lights. We'll also be talking about darks and ambers.

Hope to see you then.

Tuesday, March 6, 2007

Dave Hill Rocks.

Nashville-based photographer Dave Hill kicks serious boottocks in my book.

Not just because of his cool lighting. But because he has a website full of behind-the-scenes photos and videos of his shoots. I just love looking at this kind of stuff, whether I like the final effect or not.

There's definitely a lot of post-production going on here. But - get this - dude is using White Lighting Zaps (pre Alien Bees) and the new AB ringlight to do these high-profile shoots.

I wonder if his clients know his bill for each shoot is probably twice as much as all of his lights cost him? I love this.

Click "Behind the Scenes" on his main page to see them.

(Thanks to Marin G. for the heads-up.)

Monday, March 5, 2007

Introducing Photoshelter

Please join me in welcoming Photoshelter as a new sponsor to Strobist.

Photoshelter is the backstop for many of the world's top photographers. They offer off-site archiving via the web, integrated e-commerce, automated sales transactions and much more.

In short, they free you up to be a photographer. I hope you'll take a moment and check them out.

Sunday, March 4, 2007

Pimp My Light

Read enough psychology, and you will eventually come across the following theory:

On an instinctual level, we subconsciously classify each person we come into contact with into one of four categories. We either want to kick their butt, flee from them, nurture them or, uh, grab a cheap hotel room with them.

It is in that frame of mind that I have come to learn how I react to pictures as a photographer. Specifically, I am talking about how I react to them with respect to lighting.

The first category would be photos that simply do not interest me enough on a technical or emotional level to care about them.

The second would be photos that I immediately stop and try to reverse engineer. You cannot hide light. Light is physics. And if the light is interesting enough to me, I will come up with at least a rough approximation as to how it was done.

These latter photos fall into one of two subcategories.

First there are the ones that just leave me in awe after I figure out how they were done. After all, it is one thing to be able to reverse engineer a photo after the fact. And yet another to come up with the idea in the first place during the process of creating it.

It's the difference between Keith Richards creating the simple-yet-perfect guitar riff for "I Can't Get No Satisfaction," and some 9th grade hack aping it and thinking he is the New Keith Richards.

But then there is the other category, into which most well-lit photos fall for me. I can see how they were done. But I immediately try to think of a way in which they could have stretched them a little bit.

This is not perfectionism. Perfectionism is a vice from which I have proven myself quite immune. Just ask Missus Strobist. She'll back me on this one.

Rather it is a mental ethic that is a gateway to what I always hope to nurture as a shooting ethic: The idea that the first 95% of the effort just gets you to "good."

And the next 5% can get you to something better.

When I am working on a portrait or a studio shot, the last thing I try to think before I quit with something perfectly acceptable in the can is, "What can I do to amp this photo before I tear down?"

After all, you really have nothing to lose - and everything to gain - with this approach. No one is gonna take your already-shot good photo away because you fail at the stretch attempt.

Worse case, you make an interesting failure. Which in itself has much value to the learning process.

It is in that spirit that I am beginning this series. It is nothing more than a thinking-out-loud version of what I do when I cruise through the Strobist Flickr Pool every day. Or drive past a billboard. Or thumb through a magazine.

Like my favorite T-shirt, which simply says, "Quietly Judging You." (Only, not in a bad way.)

As I throw up PML photos over the next few weeks, the thing to keep in mind is that they were interesting enough to merit the effort to brainstorm how I would have tried to improve them, had I shot them.

They are already at 95%, and this is just a mental exercise to find something - not the only thing, but something - that could have sent them to the next level.

These will be pretty straightforward for the most part. I am not gonna launch into some exhaustive critique so much as throw a stream-of-consciousness idea or two out there to hopefully spark the way that you think about good photos when you see them.

Don't let the good photos you see be an end-all. Let them be a jumping-off point.

_____________________________________________________

The first photo, from GoHiking26, is a very good example of a group shot at a wedding. The photographer is using two speedlights, working quickly via the Nikon CLS remote lighting system.

They have one light on camera, bouncing off of the ceiling. There's a second light bouncing off of the ceiling off to the left. This is great frontal/side light, not to mention that whole Godfather-family-portrait posing thing they have going on.

But let's stop for a minute and think about the gear that is being used. There are two light sources to play with, and at least one stand. We also have a way to wirelessly trigger at least one of the lights.

We know that the photographer is probably traveling light and working pretty quickly, so let's keep that restriction, too. So what can we do with one light on camera and one off-camera stand light with this group shot?

The thing that immediately came to mind when I saw it was to use the stand light as a backlight. Only question is which way the backlight would be firing - at the background or back toward the camera?

Actually, there is another consideration: Whether to leave the backlight as daylight balanced or play with the color a bit. I'd probably warm it up to tungsten.

First, I know I am gonna have that gel, as it is one of the basic two gels I always have connected to my flashes. Second, it is going to add some color to the monochromatic theme of the photo. Third, tungsten is a color that we'd just take for granted as being from a normal, continuous light source.

Why the backlight at all? In a word, separation.

I'm not talking about nuking these guys. I am talking about adding another layer of light - with some warmth - to separate them from the background and provide another layer of depth to the photo. I'd just stick it off camera at back camera right and let it do it's thing.

The beauty of this approach is also the margin for error allowed on the lighting level from the backlight. Balanced with the exposure would look fine. One stop under: Fine. Two under: Subtle, but fine. One stop over: Fine.

You also have a couple of choices on the direction. You could skim it across to light the background from back camera right. The fact that the light would be coming from so far off of the camera's axis would texture the background nicely.

But you could also aim it back at the group, providing hair/shoulder separation lights for everyone. Might want to short snoot it to control any glare. Pointed in either direction, you would not need a lot of light, either.

Look at the photo and imagine either a muted warm glow on the areas in back or a muted splash of tungsten color on the back right side, which currently merges into the shadows. That'd be killer - especially the three ladies on the right.

My first choice would for that second effect - aimed back at the group from back camera right. I'd set the light to hit about one to two stops down. Less is more in this instance. Don't nuke - just separate. On second thought, I'd probably try to do both.

Snap, snap, snap.

"Just a minute, folks." (Walk back and quickly re-aim the separation light to point back into the background. Up the power by a stop.) Totally different look.

But wait, you say. We need the stand light for the front light.

Sure - we need a front light, but it does not have to be the stand light. Okay, best case, I want the front light coming from camera left just like in the current photo. But remember, they are also bouncing a flash from on camera, which could be the new front light. It is amazing how three-dimensional a bounced flash looks when accented by a raking backlight.

If I have two stands and the ability to trigger both flashes off-cam, I'll take the umbrella at front camera left and the back/separation light at back camera right. But if I only have one off-camera light, I am gonna bounce (on-cam) the main light and back/right stand the second light.

In fact, if I only have one light and I am gonna use it off-camera, I am just as likely to use it as a back/sidelight to help pop the ambient and add some three-dimensionality/separation as not.

The important thing to remember in this instance is that it would be just as quick to set up the second light as a separation light as it was to use it as a second front/side light. And again, this is a perfectly fine photo. And on a given day you could very well choose the employed technique over what I might like to do.

But that is what ran through my mind in the first 30 seconds I spent looking at this photo.

Saturday, March 3, 2007

Out: POTW. In: PML.

We're taking a little hiatus for Picture of The Week. In lieu of that, I wanted give a shout-out to one thing, and tease another.

First, the "Strobist Challenge," (which is an extension of last summer's Lighting Boot Camp) has just completed its fourth assignment. This is a reader-run group project in which everyone shoots around a theme. If you are looking for a little challenge (or just an idea for something to shoot) I highly recommend participating in this evolving group project.

If you want to know more, assignment #5 is being brainstormed now.

(The cool Kiwi shot above, was turned if for assignment #4, "Backlight." Click on it for a bigger version.)

Second is the previously mentioned "Pimp My Light."

Not coincidentally, it is similarly named to the MTV show, Pimp My Ride. If you are unfamiliar with Pimp My Ride, the guys from the show take a POS rust bucket of a car and amp it up into something really cool for some happy viewer.

This'll be a little different in that I will be regularly choosing pix that have been dropped into the Strobist Pool which are already quite good. I'll post them, with some discussion as to how they could have carried the thinking just a little further for that next level of goodness. I will try very hard to have the ideas make use of gear they already (apparently) had, and/or basic stuff anyone would have around the house.

This is total, stream-of-conscious, over-the-light-table kind of stuff. My hope is that this will grow into a regular feature and will provide a broader and more interactive learning experience than the process of merely sticking the best reader photos out front. Besides, you guys are getting so good that it is getting impossible to just choose a few each week.

Look for the first PML to pop up on Monday or Tuesday.

As for POTW withdrawal you can always check my Flickr faves page if you are a total approval junkie. I cruise through the pool every couple of days an click the stuff I particularly like, along with ideas for future content.

But, joking aside, the opinion which should matter most about your photos is, of course, your own.

Friday, March 2, 2007

Bridging the Gap Between Pocket Wizard and the eBay Remotes

Just hitting the street: The Elinchrom Skyport, a new mid-price flash remote that will provide a much-needed option for photographers not named Bill Gates (and hopefully get Pocket Wizard to lower their prices a tad.)

At least one Strobist reader has gotten his grubby little hands on a set, and is talking about it in the Flickr Strobist threads.

If you want more info, belly up to the Flickr bar and join the discussion.

Thursday, March 1, 2007

Neat Ad Campaign Built Around Photo Shoot Videos

The WSJ has a pretty cool ad campaign that uses "behind the scenes" videos of the photo shoots that created the stills for the campaign. What surprised me was just how simple the light was for such an expensive series of photos.

The shooter is UK-based "Platon," and light could not be simpler. It could be pretty much duplicated with a white wall and a single SB in a shoot-through umbrella. The guy just gets right up in there with the umbrella next to Crow and the wall and it becomes a huge, soft frontal light source.

You can see Sheryl Crow's shoot here, and there are eight others to watch, too.

The above photo contains a cleverly hidden Strobist reader, Photoplasia, who is already playing with the lighting technique.

Click on the pic to comment on how beautiful he looks next to Sheryl Crow...

-30-

Q&A, Speedlighting a Gym

You got questions, we got answers. This post will tackle many of the questions people had after the Speedlighting a Gym post from a few days ago. If you are coming in late, you should read it first.

One thing before I start. I will not be answering any questions that are basic Lighting 101 fodder.

I am amazed that, given the large and easily accessible library of info on this very site, many people will ask about a technique even when I go to the trouble to link directly to the appropriate reference article right from the post, (he said, smacking himself in the forehead with a Pocket Wizard.)

That said, here we go.

Leading off, the previously promised, poorly drawn lighting diagrams. But first, an error to point out in the "Top View" diagram. One of the other photographers, whose name I misheard, is not "Adrienne," but "Arianne."

Even better, she told me today that she just made staff at the Baltimore Examiner. (Way to go, Arianne!)

The top view, which is clickable to a much larger photo, shows the flash placement relative to the court and basket. The flashes are pointed just about straight out, just over the heads the players, to better feather the light.

This side view is also clickable, and shows about how much higher the flashes were than the players. It is your basic, 2nd-floor balcony railing.

Now, on with the questions, in no particular order. (Q's are in bold, A's in itals.)


I'm curious, did you attach a safety cable to the flash or bracket in case you had a mounting hardware failure? (It's impossible to tell whether or not there were fans seated below your rig.)

I used gaffer tape as a backup. The flashes were small and only a few feet over the band. Battery straps went around the railings, too.


David, I'm just a bit curious, one flash behind each basket, right? The local arena has solid walls behind the baskets and no railing systems I can see (apart from the one used for the overheads). Any idea where else can I clamp the strobes?

Every gym/arena is different, and you are on your own. I can almost always find something to clamp to, either behind the baskets or in/above the bleachers.


I'm shooting a Canon d-reb XT and mostly getting it for learning purposes. I know you probably get this all the time, but any advice?

See what I mean about the Lighting 101 question stuff?


Just wanted to clarify something. The SBs at 1/4 power enabled you to shoot at 4fps with the SBs lighting each of the 4 frames as compared to Patrick's 1 frame every 2 seconds using the huge lights?

Yep. Remember, the flash is only dumping 1/4th of it's stored energy each time it fires.


(Very long question on whether I am expanding the tonal range, or - as I had said - compressing it.)

Compressing it. If I shoot up into the ceiling (where the continuous lights are) I have to over expose the ceiling (and the top-down light) to get detail in the undersides of the players. I can strobe them from the side (from the basket's direction) and bring that portion of them up to a level that matches the top lighting. Thus everything fits more neatly into the tonal range that the camera can handle. Presto - smooth exposures with no dodging and burning.


I'd be curious to see a diagram of where your strobes were in relation to the court/basket and where they were roughly pointed. You seem to be getting much better coverage than me when I do the same with strobes behind the corner of the court, aimed at the top corner of the key.

The secret is feathering the light. Aiming them up a little to skim the players' heads means that most of the close-up action is on the outskirts of the flashes' beams. Combine that with a 50mm throw (you might think a 24mm throw would be better at this range - it is counterintuitive) and that strobe really reaches out onto the court.

Just to clarify, what was the ambient exposure? Obviously 1/250, but what aperture and iso? I would think if the ambient iso was 640 you would get a fair amount of ghosting.

I was shooting at 1/250 (and later, 1/320) at ASA 640 and some at 800. remember, the underside of the players was pretty underexposed before the flash got there (see the referee examples) so ghosting was not much of a problem.


I am curious about what you do to prevent errant basketballs from hitting the strobes. Damage to the flash is one consideration, falling objects on spectators or players is another more serious issue.

They were far enough back and up to where that would have been all but impossible. Basketballs hitting the fans would have been more likely (and more damaging.)


Why didn't you use the ol' Bogen super-clampy deal to clamp it to the railing (I know, they cost like 30 bucks, which is far more than your $2 setup....) but the seem to be a bit more secure. I thought you carried these anyway, so I was just surprised to see the home depot clamps (which, incidentally, I nearly bought the $3.99 version a week ago before I saw the .99 cent-ers. Spent a good 5 minutes trying to figure out the difference between the two - none.)

Why no Superclamps? I'll tell you why. Because I misplaced the @#!$% things and I spent the better part of an hour looking for them before this game. I promptly found them afterwards.


Seems to me that you are having a much easier time with white balance than I am. I'm shooting many different junior HS gyms that range from caves to dark caves; one however, has a good bit of daylight coming through large windows during day games, in addition to the sodium "vapes". I use a Expo Disk for WB; works great, but often the flashes come out too green (when gelled). Lighting is getting much better (thanks to your tutorials!), but having to process RAW files for white balance is getting to be a real p.i.t.a!! Other tips????

When working in noncontrollable mixed lighting sources, I match my strobes to the dominant continuous color and balance for that. It's the best you can do, without pumping tons of strobe in to overpower the mixed ambient.


How do you go about getting your strobes back if you get paged to be somewhere else mid-game?

Seriously, I know it sounds flippant but I really would like to know - adds another dimension to setting this sort of thing up if you nedd to be able to grab it all and run without interfering with play.


I had easy access to the second-floor balcony. If pulled off to spot news, I could unclamp the flash/bracket/batts/PW's wholesale and just put them, still assembled, into a gear bag. I could be out the door in 3-4 mins, tops.


I need to understand the real numbers here. The sample shots with refs to show ambient and the flash added is not what I would call fill flash, but direct lighting with the flash. Please clarify :) 1/250 ambient would show more finger/hand/ball blur and the fill would show ghosting ? - unless the flash took over to freeze that action. Would love for it to be this easy.

Again, there are really two separate components to the light. The top-down ambient, and the front/side flash. They really did not co-mingle too much. Thus, very little ghosting.


What does PITA stand for again?

Pain in the armpit.


I've quite a bit of experience using multiple flashed in "Manual Mode". However you mentioned that the flashes "greened ok". Does this mean that you are shooting with multiple flashes on "Auto". I never thought to try that.

(Wondering whether to take the whole bottle of sleeping pills first, or to start with the alcohol. The question being, which would would more quickly bring about my demise and with it, sweet relief...)


NEXT: Flavored Vodkas

Share

Twitter Delicious Facebook Digg Stumbleupon Favorites More