Wednesday, February 28, 2007

Thank You For Registering

Thanks for registering for either the Saturday May 12 or Sunday May 13 London seminar. I will be posting updated info and rosters soon.

Looking forward to seeing you there.

-DH

Lotsa Q's on the Speedlighting Hoops Post

I am getting a fair number of questions on the "Speedlighting a College Gym" post (just below this one.) In an effort to make this a little more interactive, I am going to do a follow-up post within the next couple of days.

Please post any questions in the comments thread of the original post and I will choose a selection and answer them.

There will also be some poorly drawn lighting diagrams.

Fire away.

Tuesday, February 27, 2007

On Assignment: Speedlighting a College Gym

Saturday, I shot the Towson/Drexel men's college basketball game for The Sun. I knew Strobist reader Patrick Smith would be there, and I knew he would be using the school's house strobes.

(Patrick is a photographer for Towson U's newspaper, The Towerlight, specializing in shooting sports and beer.)

For the record, we have the rights to use the university's house lights, too. In fact, as the local metro daily shooter, I am pretty sure the fine folks at Towson University's sports info department would let me (a) bump Patrick off of the lights, and (b) order him to be wash my car in the parking lot while I am shooting the game. (Don't tell him I said so.)

So I decided to use two Nikon SB flashes to augment the house sodium vapor lights in the gym. This also makes for a good time to compare what you can do with a couple of hot-shoe flashes, vs a few thousand watt-seconds (and dollars) of AC-powered, permanent strobes.

Before we get into specifics, let's look at the advantages of the two different systems:


Big, Honker Studio Strobes:

• Tons of light. Even bounced off of the ceiling (the Towson coach nixed the direct lights) they give you a solid 2.8 at ~ASA 400, everywhere on the court.

• Soft, pretty light (from the bounce)

• You can disregard the ambient light color temp, as the strobes totally trump the sodium vapes.


Little, Dinky SB Strobes:

• You can move them from venue to venue. (The biggies are pretty much permanent. Only SI trots them around regularly.)

• Recycle time: With Lumy turbo batts, I can fire my flashes eight times (on 1/4 power) while Big Lights Guy is counting, "one thousand... two one thousand...," after each shot. Even with Ni-MH AA's, I could get four 1/4 power shots off in a second.

• Oh, yeah: A couple thousand dollars cheaper.

_______________________

Don't get me wrong. The big lights are great if they are (a) aimed well and (b) you can justify the money for installing them in an arena. Smart photogs work out agreements with arenas and then rent out the lights (when they do not need them) to help cover the up-front costs.

But this article is about how to use the little flashes. So we'll set the Duke Nuke'em flashes aside for the moment.

What I am doing is different than the way I usually shoot hoops. Instead of using the strobes as the main light and the ambient as fill, I am gonna use the ambient as main and the strobes as fill.

Do not be biased for one method over the other. Go with what is presented to you. In this case, my flashes were not powerful enough to nuke the ambient, so I decided to enhance the ambient a little.

When I arrived, the ambient lights were better than I had remembered. Seems TU had been getting more TV coverage, so they shelled out for more sodium vapes.

(Universal truth: There is nothing a college will not do to facilitate more TV coverage. Ditto politicians.)

Actually, I could have shot available light with little problem. But where's the fun in that? Besides, there is a second floor walkway with a railing about 25 feet behind each basket that was just begging for SB's. So here's how (one way at least) to do it.

First things first: Assess the ambient light color. This is easier than it sounds. I shot an available light shot from the 2nd-floor walk with the camera set to daylight balance and chimped the result. Looked greenish - reasonably close to fluorescent.

"Close enough for government work" is all you are gonna get here, so I set the camera to fluorescent and shot another. Not too far off. So I greened a couple of SB's and clamped them to the railing.

I use the cheapo, lime-green Home Depot clamps - just 99 cents each. The orange ones are the same size, but cost $3.99. (I assume the green ones are not ripe yet, and thus 1/4 the price.) I modded them by adding another 37 cents worth of 1/4 x 20 bolt and a couple of nuts. Then I attached the spare 3/8" stud that comes on the Dot Line umbrella brackets I bought from MPEX. A little gaffer's tape to strengthen the clamp even more and you are out the door for well under $2.00.

Now, the umbrella brackets mount right on the clamps. Cool, huh?

Yep, in the big leagues no expense is spared in the mounting of lights. Even more impressive is that I paid for the clamps, bolts and nuts in cash, baby. Need secure lights to a railing? Just whip out your good friend, "Abraham Lincoln," and see if he can persuade the guy in the orange apron to hook you up with the parts for a remote mounting system.

Back to the ambient, it's not that it is all that bad in this gym. But it is coming from a bad direction (top down) if you are on the hardwood under the basket shooting up. So augmenting the light from slightly above and behind the basket is going to help it out a lot.

Flashes greened, another test pop shows that I am pretty balanced at 1/4 power with a 50mm beam spread (at ASA 640 at a 250th of a sec.) One very important thing to note is that I am not pointing the flashes down at the players so much as skimming them at head height.

This is to feather the light. I do not want it to be too bright under the basket and too dim at the top of the key. Aiming them up a tad evens things out, as the closer the players are, the more they are at the edge of the beam.

As an added bennie, the lights can reach far out into the court (example below.) Amazingly, they will be adding some nice fill even at the other end. This even surprised me. Flashes balanced and tested, I head down to shoot the game.

I have not shot a lot of hoops this year. Truth be told, I am a little rusty. So as insurance I went up into the stands to shoot the first five minutes of the game with a 80-200 up in the stands, straight across the sidelines from the rim, at rim height.

I do this as insurance. First, it is very easy to get something from here, as the angle is straight across to the basket. You can just pre-focus and let the players come to you. Also, if the beeper goes off three minutes into the game to send me somewhere else on spot news, I know I will have a couple of good shots. Further, this will give me a different looking "B" or "C" photo than the baseline action stuff.

Easy, and good variety when compared to the baseline stuff. Works for me. Five minutes into the game I move down to the baseline to shoot along with everyone else. But if I had to, I could have left at that point with good action.

Now's a good point to show the effects of the flash vs pure ambient.

Here are the refs, with no flash. This is the baseline exposure which takes into account the ambient light without having to over expose the ceiling because the light is really coming from the wrong direction.

Here they are, same exposure, with the flashes turned back on. Honestly, the fact that they are lit is not even that obvious if you had not seen the other pic. Remember, we are not nuking the ambient so much as fleshing it out. The flashes, coming from the top/front of the direction the action is going to be facing, are basically filling the shadows and compressing the tonal range of the photos.

Here is what the light looks like from the baseline at my end of the court. It has a lit-but-not-overpowered look that I like, given how little hardware I am using to do the job.

I also like that I can just set my motors to run at a max of 4 FPS and not worry about recycle times unless I fire more than eight shots in a continuous burst. (four shots at a time if using just AA's.) In both ways, this lighting style is a hybrid between available light and nuked gym.

Here is a shot from the same position of action at other end of the court, (with an 80-200.) I am clearly getting some fill from the flash even at this distance. In other frames, I can even see the shadow of the backboard on the far wall.

This gives clean, fast-sequence-shooting light. If the news of the game happened at the opposite end, I'd have it. At ASA 640 or 800, I can crop it in without too much grain. Not so at 1250 or 1600.

As an aside, we have big house lights in Comcast Arena for the Maryland Terps. But honestly, the shooting speed stops me from using them most of the time.

So, if you cannot afford the big lights, you can get most of the way there with creative use of your small strobes. They will be there when you need them, and you can easily fit the whole two-light kit in a small camera bag, clamps and all.

Next: Special Q&A: Speedlighting a Gym

Monday, February 26, 2007

English. French. Italian. Pig Latin. Whatever.

Babelfish, the web-based auto-translating site, is now translating Strobist without stripping the blogger-hosted photos. Which is etty-pray eat-nay, if you ask me.

Just enter the full URL, (including the http part) into the "Translate a Web Page" part, and choose English-to-(your language) from the dropdown menu.

It does pretty well on the western languages. But once you get east of the Urals, you're otally-tay ewed-scray. But I'm sure they're working on it.

Sunday, February 25, 2007

POTW 2/25/07

Another strong week in the favorites folder on Flickr, where it is getting harder and harder to pick which photos will go out front each week.

This flaming martini shot, by Justin Lucarelli, jumped out immediately.

This is way cool. And as I have to shoot a near-weekly illustration on alcoholic drinks for The Sun, I am so gonna steal borrow this technique sometime soon.

Of course, I will feel compelled to improve upon it. But I will be hard-pressed to do so. I'll post about it when I shoot it.

As as for the idea of a flammable beverage, martinis are so high school. I prefer ethanol as my cocktail of choice, with a splash of diesel.

This backlit twilight scene, by HeNkiS da Bro, looks like it could have come right out of the movie adaptation of Sin City.

All it needs is Jessica Alba and a pole. This is awesome light. And if shot for publication, the internal contrast is such that it would repro well on almost any paper type - including the Charmin that we print on at The Sun.

Update: The above photo, it turns out, was done solely with ambient street lights. But I am going to leave it up to avoid confusion as to why it went away. (Thanks for the heads-up.)

Like the drink shot, this multi-flash-blur shot of a book, by Andy Spencer, is another technique that could come in handy for an illustrative photo on winter reading (or almost anything else to do with books.)

If you are shooting for publication, you always want to have some neat tricks in your pocket to save your bacon when you have a mundane subject that needs to be shot for a conceptual purpose.

Just don't pull them out until you really have to, and they can turn what would have been a failure into a home run.

Last but not least is this portrait by Xombi Rises, which gets double duty out of the pan-reflector background light to act as a low/cross rim light.

The effect really gives a three-dimensional effect on the (camera left) arm, the shadow side of the face and, uh, other areas.

There is a lot to like about this light, from the coolish palette to the fact that it is at once soft and still very textural. Nice.

This week I have a couple of long-form posts in the on-deck circle. One is on using speedlight flashes in a college basketball arena, where I shot along with reader Patrick Smith on Saturday afternoon.

Also, I am going to start a new feature called, "Pimp my Light," where I'll take an already very good reader photo in the pool and look at ways it could have been amped up just a little bit more for that "little something extra."

So, look for those in the next couple of days.

Saturday, February 24, 2007

Reverse Engineer This:

Strobist reader teewonk got his flash just last week and threw this very cool shot of a helmet up as his very first picture posted to the group.

It's wonderfully lit, to be sure. But can you figure out how it was lit?

If I had not already seen the book, Light, Science and Magic, I have to admit that it would have stumped me. And lest you think he is all high-end lighting gear, I will tell you that he used only a single Vivitar 285HV. And one of his light modifer supports is the post from a floor lamp.

This is totally ghetto-studio.

If you have not already seen the "how-to" pic in the Flickr Strobist pool, take a moment to reverse engineer the photo. When you think you have it - or are stumped - you can see the solution here. If you want to take a closer look at the photo, you can see it in its hi-res glory here.

And nice shot, teewonk.

Friday, February 23, 2007

Sensor Cleaning Update

I have updated the sensor cleaning post from a few days ago. But thought it important enough to stick up top, too.

Most people are happy with the Copper Hill cleaning method, but a few have pointed to warnings. They seem to center around Canon 5D owners, so use care and read up if that is you.

There is a thread on DP Review specifically detailing the combo.

Wednesday, February 21, 2007

Breaking News: Canon Flash Reaches Puberty

Well, knock me down with a feather.

As of, well, sometime soon, you will finally be able to buy a Canon flash with an external PC jack. (Scroll down in the new camera PR for the flash info.)

I'd love to think we had something to do with this. Was it was the constant harping on the site? The drunken 3:00 a.m. phone calls? The "plus-sized" Strip-o-Gram we sent to Canon HQ on Valentine's Day?

Whatever the reason, no matter. Thank you Canon.

From the PR:
Speedlite 580EX II Flash

The popular Speedlite 580EX Flash is being replaced by the new Speedlite 580EX II Flash, which features a host of improvements, including a metal hot shoe with an improved locking mechanism for added durability, an external metering sensor for non-TTL automatic flash exposure control and a PC socket for use with non-dedicated slave triggers. Fully compatible with all EOS SLRs, the new Speedlite 580EX II is gasketed for dust and moisture resistance, making it possible for users of EOS-1 class digital SLRs and many L-series EF lenses to use flash safely when shooting in dusty or wet environments.

In a separate PR, Canon announced that all of its North American offices will be equipped with indoor plumbing by the end of the year.


Thanks to W.o.L. for the tip.

Today's Special: Charred Squirrel

Let me preface this post by noting that I am trying to get away from the "hey, look at this neat website" posts and more into the long-form, "On Assignment" and gear/technique stuff.

Really.

That said, "EFP Lighting" has a great little history lesson/tutorial on Chiaroscuro. So for the moment, ditch this website and go learn from the Old Masters.

Then you can cook your own charred squirrel.

Tuesday, February 20, 2007

SB-24 vs 285HV Comparison

On the Strobist Flickr discussion threads, reader tmoreau has posted a comparison of the SB-24 vs the Vivitar 285HV.

If you have used both models we'd love to know what you think, too.

IMO, both are good flashes. And with the re-introduction of the 285HV, there is now an easy retail option for a good off-camera flash below the $100 mark.

Sunday, February 18, 2007

You Can Do It: Clean Your DSLR's CCD

UPDATE #1: There is a Flickr thread with stories of people who have had problems doing this. Ditto someone that got the anti-aliasing filter messed up by the manufacturer's guys, too.

To clarify, I used only the weight of the tool itself as pressure as I pulled it across my sensor. I felt like that was a very safe practice and I would do it repeatedly without fear. But this is a personal decision.

__________________________________

UPDATE #2: While the Copper Hill method works well for most cameras, apparently the Canon EOS 5 has potential problems. So if you use that camera, you will probably want to consider another chip cleaning method. Details of the Canon 5d/Eclipse fluid issues are here.


____________________________________
Original post:

DSLR sensor chips collect dust. That is a Photoshop-time-consuming fact of digital life. At The Sun, whenever we send in our DSLRs to be otherwise repaired, one nice little bonus is that (along with the obscene repair bill) they come back with a freshly cleaned CCD.

Which, of course, lasts for about a week. Two if you are lucky.

You may not even notice that you have dust at all, until you stop down and shoot with a wide lens or macro. Then, all of a sudden it looks like you are looking through an electron microscope or something. Eww.

Heck, I used to even keep a little sticker on one of my bodies to denote which one had the "cleaner" (and I use the term in the relative sense) CCD. That was so I would know which one to use if I needed to shoot something at f/11 or higher.

Truth be told, I was scared to death of the idea of cleaning my own sensor. But finally screwed up the nerve and did it myself with the help of a $32 kit from Copper Hill Images. I don't think I have to tell you that the ol' pucker factor was running at about f/64, if you know what I mean.

But I read through the site's tutorial, which over-explains every step to the point that even a numbskull like myself feels as if he has a fighting chance. Then I spread my gear out on the table, along with their Basic Sensor Cleaning Kit, and took the plunge.

NOTE: Read the tutorial before you try this. Don't be a “guy” about this. These instructions are there for your protection. This is not something you can just breeze through like, say, birth control. THIS IS YOUR SENSOR.

The basic kit is a package of Pec•Pads, some Eclipse cleaning fluid and a cool little tool best described as a cross between a windshield wiper and one of those things you use to get the last of the mayo out of the jar. Make sure you choose the one sized for your sensor.

First result: I was very successful at moving the dust from one part of the sensor to another part of the sensor. But I did not eff up my sensor, which I saw as a victory.

Ditto on the second attempt.

Third time was the charm: A clean sensor. A brand, spankin' new clean sensor.

Schwing! Why did I wait so long to try this?

After my sensor-cleaning deflowering, I would now clean my own sensor without a second thought. Heck, I'll clean yours for half of what Nikon charges – heh, heh.

Not really, but the point is (a) that it is easy and effective if you follow Copper Hill's instructions as listed above, and (b) the camera manufacturers charge way too much.

Look, I am not going to sit here and guarantee that you wont spaz out and do something bad to your camera. But what I can say is that I found the tutorial to err on the over-cautious side and this kit worked just great for me.

That said, the decision to go into your digital baby is yours and yours alone. But I have been to the promised land. And I can report that it is dust-free.

Since I have started cleaning my own Copper Hill also has a new method (called "Dust-Aid") that looks even easier if your sensor only has dust as opposed to stuck-on grime. If anyone has real-world feedback on that, I'd love to hear about it.

Do any of you guys already clean your own sensor? What do you use? Yak back in the comments section and let us know what works – or doesn't work – for you.

UPDATE: There is a Flickr thread with stories of people who have had problems doing this. Ditto someone that got the anti-aliasing filter messed up by the manufacturer's guys, too.

To clarify, I used only the weight of the tool itself as pressure as I pulled it across my sensor. I felt like that was a very safe practice and I would do it repeatedly without fear. But this is a personal decision.

-DH

Friday, February 16, 2007

POTW - 02/17/2007

What follows is a selection of photos from those submitted to the Strobist Flickr pool within the last week.

They were shot by people ranging from amateur to semi-pro to professional. By photographers with years of lighting experience and by those who have only been lighting for a very short time. I would have trouble telling who shot what and I'll bet you would, too.

To those of you still sitting on the sidelines: Get off your butt and try this stuff.

It's easy. Really.

It makes me very happy to see so many people learning so much - and sharing their knowledge with others via the discussion boards. Rather than weave together some sort of narrative for these photos, I am going to just let them speak for themselves.

Please click on a photo to see it bigger, along with who shot it and some lighting info. Or to leave them some props in the comments section.

_____________________________________


And the latest addition to our group, courtesy Wiredfool:


(With a little help, of course.)

Thursday, February 15, 2007

Umbrella Update

UPDATE: MPEX has revised their shipping policy and lowered costs to better suit the small orders of many people who are readers of this site. The details are here.

I appreciate you guys' accomodation with MPEX's process of growing into their role as a major supplier as much as I appreciate MPEX's quick response to the issue.

-DH


Two things on the convertible double-folds:

First, MPEX got deluged with emails, orders, etc., and are digging themselves out in much the same way one would dig out of a 4-foot snowfall.

Make that 8-foot snowfall.

Second, I talked to Moishe and found out that their shipping/package/labor costs start at about $12. He is planning to grab one of those big, thick Gitzo monopods (the steel one, not the carbon fiber) and pay a little visit to the shipping guys to see if he can get that price down a bit.

Long story short, for both of the above reasons it may be a smart to wait on the umbrella until you could gang it as part of a multi-item order. (Minimum ship cost aside, they work hard to ensure that shipping costs are in line - or better than inline - whenever possible.)

For international readers, Moishe has set up a shipping costs page that will give you a good idea of the transport costs.

International shipping is a bitch bear, cost-wise. But in many countries the total still nets out favorably in comparison to local prices. Not to mention availability.

Hopefully, we can have a drop-off/pick-up point at the U.S. embassies in the biggest 100 or so countries by the spring...

Tuesday, February 13, 2007

Westcott's Convertible Double-fold Umbrella: Made Just for Us

I had a few minutes after work before dinner was ready tonight, and decided to quickly try out a new toy: The Westcott convertible double-fold umbrella.

Moishe at MPEX actually had these manufactured special (just for us) and he has gotten a big batch of them in. MPEX logo on the side and all. I can't tell you how cool this is that he would go and have something made-to-order like this.

I have known about it since October (these things do take a little time) but just got a chance to play with one for the first time today.

I really like this umbrella.

Here's why. It is efficient when used as either a shoot-through umbrella or as a bounce umbrella. In shoot-through mode, this headshot of my daughter was done with a Vivitar 285HV on just 1/16th power at ASA 400. And I still got f/6.3 as a working aperture.

(Click for a big version.)

In shoot-through mode, the beauty of this thing is that it can be used as a very soft light source, because you can put the umbrella very close to the subject. That makes it both soft and efficient if you are trying to squeeze some extra f/stops out of your small flash, which is a good thing.

Here's a wide shot of the setup, which we were racing through before mom called us both to dinner. (Spaghetti night - everybody's happy...)

You can see how large a light source this setup is when you bring it right in close. I picked up some internal lens flare because I included the raw light source in the photo, BTW.

But slip the cover back on that bad boy, and it offers more control of the light spill light, like a traditional umbrella. Even shooting right into the flash with the backing on, it can barely eke out a medium grey through that material. That's my boy, by the way, grabbing some equal time in this shot.

Just like the other Westcott double-folds, it is very compact when collapsed. For you international types a piece of US paper currency, by comparison, is about 15 cm long.

And this umbrella won't set you back much more than a sawbuck, either. At $26, I think it is a very fair price for all of the versatility it offers.

It's lightweight, which is actually good for my purposes. It is not particularly heavy-duty, but with care it should hold up for many assignments. Fortunately, it ships with both a nylon cover and a clear plastic case. This will protect it while in your bag, rattling around in your trunk. That's where your gear takes the hard knocks.

And back to the thought of Midwest proactively having these things made for us, I can't tell you how pleased I am about that.

Monday, February 12, 2007

Woo-hoo! My Email is Back Up!

I am connected to the world again. Here's what I learned:

• When the server on which Yahoo! has your email account goes screwy, Yahoo! will fix your [sarcasm]free email[/sarcasm] for just $30! (Ooh, sorry. Our bad. Credit card number, please?)

• About a gazillion of you Flickrmailed me to suggest I switch to G-mail. You're right - I probably should. But do you know how hard it is to extricate yourself from a longterm email addy? I'd sooner change my name.

Well, I'm back, baby. And I have new messages. Boy, do I have new messages.

On Assignment: Macaroni and Cheese

Most of the assignments I shoot are not what most of you would consider glamourous. To be honest, I rather prefer the day-to-day stuff. As much as possible, I try to approach each assignment with the idea that you should not let your attention slip just because you are shooting a less exciting subject.

You've heard all of the sports analogies: Hit for average. Block and tackle. Or as the boxers say, "work the body and the head will follow."

In other words, take care of the little things, and the big things will take care of themselves.

Shooting your day-to-day assignments with your small, portable lighting gear dovetails with this school of thought very nicely. You do not need big expensive lights - or a ton of shooting and prep time - to create photos that are lit appropriately and can hold some size if needed.

At The Sun, we do a lot of tabletop shots for the interior of the food section. These are not as designed/produced as the section front lede stuff, but tend to run pretty big on the inside pages. So you want them to look nice.

In the studio, we keep a set of sawhorses and a few boards which serve as small shot platforms. This is better than an actual table, as you can easily stick a piece of plexi across the sawhorses instead of the wood and light right through from beneath. But that's for a different day.

The above shot was to illustrate a "test kitchen" story on how box-mix macaroni has grown up. The stuff is much better than the old Kraft blue-box staple we lived on as kids. They use white cheddar, organics, better pasta, etc.

So we just wanted a little bit of a dressy mac 'n cheese photo.

This simple setup uses a cloth napkin atop the board as a textured surface. It's a very straightforward technique that could be easily replicated with one speedlight on any kitchen table.

I usually base my food-shot lighting on soft back/overhead light. It brings out the texture, which is the closest thing you have to "taste" in a photo. But given that, couple of things differently than in most of our "tabletop food quickies." Instead of using our usual - several reflectors to flesh out the soft backlight - we used no reflectors and one light-blocking gobo.

This subtractive method allows you to add shape to the light and seal the edges of the photo.

(A "gobo" is slang for a "go-between" and basically means anything that partially blocks the light. There is a flashback link to the Lighting 101 post on gobos in the resources section at the end of the post.)

Usually when we do these shots, we'll gang up three or four and do them all in about an hour. I work with the page designer, who doubles and designer (and cook, if need be.)

Oh, and at the same time, Sam (our intrepid takeout food guy) is grabbing "to-go" food from a local lunch spot to shoot/eat/review. So, contrary to what the biz books tell you, sometimes there is such a thing as a free lunch.

We comp out what we want to do on the various pix, then I set up the lighting for the shots as she preps the food. Working together this way, we can usually bang off the three or four things in a hour or so.

The only question to be decided is how appealing the takeout food subject matter is, and who gets to nosh.

Back to the macaroni. As the food was being prepared, I decided to use a a crumpled piece of paper as a stand-in so I would have the light all set when the food arrived.

I knew the macaroni (shells, actually) and cheese (white cheddar) were gonna be darn close to white, and I was worried I would not hold texture and highlight detail. So I made it a point tho choose something lighter than the subject - a crumpled sheet of typing paper - for the stand-in.

I figured if I can hold the tone in the paper, I can certainly hold the pasta without blowing it out.

Here's the first look. It's easy and safe, but I did not like the light tones on the top of the frame. That part of the napkin is closer to the umbrella'd flash above and behind the food, so it is naturally gonna be light.

As a quick fix I propped a sheet of black foamcore up behind the table, which blocked the light on the back part of the table and sealed it nicely. This also made the back rim of the bowl pop from the background a little more, which added a nice line to the photo.

Normally, I would probably be using folded sheets of paper in front of the bowl to throw some reflected light back in there. But I liked the way the shadowed front (bottom) mimicked the gobo'd back.

Now, this ain't the cover of Gourmet magazine. This is more like assembly-line lighting to efficiently flesh out a food section under the same time/resource constraints everyone else has to deal with, too.

Here's the massively complicated setup, bearing in mind that I shot from the right side of this frame into the umbrella:
The photo does not call attention to itself so much as call attention to the macaroni. Which is the point, for a test-kitchen sort of thing.

This soft-backlit-food thing is a quick and easy technique that you can do for any restaurant-review-type photo. And if you are traveling with the starving student kit, you are totally ready to go.

Remember to keep a couple of sheets of typing paper in your bag (or just use your assignment) to fold up and use as small reflectors when you need them, too.

It's easy-greasy, but you won't be doing this with your TTL on-camera flash.


Next: Speedlighting a College Gym

Sunday, February 11, 2007

Attend the May 12/13 London Seminar for Free

Cool photo by "PDPB". (See larger)

I am currently collecting ideas for a venue for the London seminars. I am looking for something that can hold about 40 people, with extra room for lighting demos and such. It would need to be available both Saturday May 12 and Sunday May 13. The latter precludes any religious venues. (We had a great room at a church complex - a "fellowship hall" for the last seminar.)

Ideally, it'd be near some place(s) to eat as we will break for lunch.

I am very flexible. And I'm not yet ready to make the default choice of a sterile chain hotel meeting room. A large school classroom would be nice, for instance.

I could pay for the venue in dollars or pounds, combined with significant web exposure (say, 1,000,000 page views) and/or tuition for one or two associated local helpers in the organization, should they be interested.

I have already received several suggestions - thanks much - and am collecting as much data as possible before choosing a venue.

Now, for the carrot. The person who first suggests the venue that I end up choosing will receive the following:

• They will attend the seminar for free on either/both days, and

• I'll toss in this lovingly used Nikon SB-24 speedlight with one of my favorite mods - a slight warming gel permanently slipped in behind the front lens. And it comes pre-velcro'd, too.


Think of it as a very Strobist-oriented finder's fee.

Nevermind the chain hotel meeting rooms - I can easily research those on the web. I am looking for a space that we can creatively repurpose without breaking the bank.

Convenient access to public transport is preferred, and it should be either inside the M25, or at least close to it.

Please put your suggestions here. This way, we can brainstorm together.

And all ideas previously Flickrmailed to me are already in the running.

Please note that I reserve the right to choose somewhere other than one of your suggestions. But you guys have every advantage over me. (I would soooo kick your butts at picking a venue in Baltimore.)

I hope to make a decision with about two weeks. Put on your thinking caps, and good luck!


Thanks,
David

Saturday, February 10, 2007

POTW 2/10/07; Still Sans Email

As I continue to try to resolve my no-inbound-emails problem (and to try to work out more London seminar details without that little convenience) I am taking a sanity break to do this week's POTW.

We had some amazing photos this week, including a really cool shower self-portrait.

In the end, I was never able to figure out how much of the look of the photo was due to lighting and how much was due to the HDR post processing. Nothing against, HDR, but this is the lighting site. The HDR blog is down the hall.

Hmm. "HDRist? HD-Arrrrrrrrgh? Someone ought to do a site like that. Any takers?


POTW: Score One for the Skaters


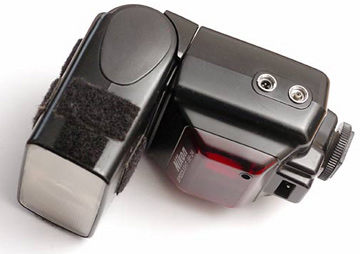
This awesome skateboarding photo, by Ismael Gomez, jumped out at me the moment I saw it.

FWIW, as I look at the 300 or so new Flickr pool photos that pop up each week, I stick cool stuff - pictures, DIY how-to's, etc. - in my favorites folder and go back to them regularly.

All week, I could not go to my faves icons without opening this photo back up.

Talk about having the whole package. Look at all of the things he has going on here:

• He's cross lighting with a pair of Vivitar 285's - hopefully HV's if he is physically connected. I'm telling you, these things rock.

• He's got the warm-flash-vs-cool-ambient thing happening.

• Speaking of the ambient, he nailed the tonal balance. Just nailed it.

• Perfect timing for nice action - this photo isn't just about the light.

• And the ambient/flash combined exposure both freezes and give the smallest hint of motion.


Sweet.

If I was sent out to shoot at my local skate park, I would be totally stoked to come back with this image. And if anyone out there works for Yahoo: C'mon. Little help, please...


Related Archive Links:

How to balance flash with sunset

Friday, February 9, 2007

FYI: My Email is Down

Just a note in case you have recently sent me an important e-mail that I have seemingly ignored.

Normally I get over 100 e-mails a day, and earlier today they just stopped. I have no idea what the problem is, but have a message into Yahoo. I am not holding my breath.

I am checking Flickrmail, and am able to moderate blog comments via the Blogger interface. But other than that I am completely in the dark. I'll post again when it comes back up.

If it comes back up.

(Oh, Lord, please...)

Thursday, February 8, 2007

Save the Date for London: May 12th and 13th

Just a brief note to reserve the date if you are interested in attending a London lighting seminar.

I have blocked off the time to get over to the UK and will be doing two, all-day seminars: One on Saturday and one on Sunday. I was originally looking at the summer, but scheduling conflicts prohibited.

I very much appreciate the feedback you offered on the Flickr thread. Among other things, I will be repeating the Saturday seminar on Sunday in response to the requests of the wedding shooters who tend to be booked on Saturdays.

I am looking forward to meeting many of you and hopefully experiencing one (or two, or three) of your famous pubs in the evenings surrounding the seminars.

More info (and more coming) on the London Workshop Flickr thread. Please use the workshop thread as opposed to the previous "British Strobists Introduce Yourself" thread to avoid confusion.

Wednesday, February 7, 2007

On Assignment: Found Backdrops, Pt. 1

NOTE: Just a heads-up that I will be altering things a bit. Starting this weekend, I am moving the POTW to the weekend to better fit with my Baltimore Sun schedule. Henceforth, it'll pop on on either Saturday or Sunday, depending on my assignment load. -DH

At The Sun, we include zoned prep sports coverage in our sports section. In addition to game action, we do "Varsity Features," which are profiles of standout athletes.

That means that each week we do an athlete portrait which will run large and needs to have a little impact. That's all well and good, but frequently time constraints (either from our end or because of the team's practice schedule) mean that you have to bang one of these off pretty quickly.

Like, say, five minutes, door-to-door.

One of my favorite techniques in a situation like that is to make use of any nearby vertical surface that is sporting the team colors. These can be found in just about any gym or practice room, and make an easy color key on which to base your photo.

This is a run-and-gun, quickie technique. The two photos in this post were shot last week, and are typical of what we do.

I start off by setting my background light first, and power the flash down until it gives me a nice-looking backdrop at f/4 or f/5.6

At my max synch speed of 1/250th, this means my subject (who is not yet lit) will be in silhouette. From there, it is an easy matter to bring the subject up to the proper exposure with a second light to match the background exposure.

In this photo, I used what is probably my most common two-light setup - umbrella on the subject and a hard light on the background.

In this case, they were folded up bleachers. But there will almost always be something - painted walls, pads that protect the players from crashing into the wall, etc.

These backgrounds are neat because (a) they give a strong visual theme to the photo - ready made - and (b) the color is an appropriate school color.

I usually make sure the player knows to wear at least a game (or practice) jersey, and that way I know I can tie the color scheme together easily. As a bonus this monochromatic environment really makes a person pop, IMO.

In the top photo of the wrestler, I did a little something different, deciding to go with hard lights all around. There's a snooted flash (camera left) on the background, a snooted flash from camera front right on the guy and a snooted flash with a 1/2 CTB gel (CTB is the reverse of CTO - a cooling gel) acting as a kicker from back camera left to define the shadow area of his arms.

(If any of the above is Greek to you - and you are not Greek - hit Lighting 101.)

If you are used to working with a bag of small lights, even a three-light shot can be conceived and set up in five minutes. I plan on having five minutes to actually shoot - people usually do not have the nerve to schedule less than five minutes for a newspaper photo. If I get more, fine.

Teardown is even quicker than setup, because there is no thinking involved.

Next in this "found background" two-fer, we will look at how to expand a small area of color-keyed background to fill the frame of a photo for a more dramatic look.

Next: Macaroni and Cheese

Monday, February 5, 2007

The Return of a Classic?

*****IMPORTANT UPDATE***** Alas, the reissued Vivitar 285HV is a Vivitar in name only. (They have also morphed into the "Cactus KF36". Same flash.) This article, originally written in 2007, has been updated to reflect that the reissued version has turned out to be famously unreliable. Such a shame. PLEASE read the appended sections below for more info.
__________


To say that the Vivitar 283 and 285 flashes were regarded as workhorses would be rather like calling the VW bug just another popular small car in the 70's.

Consider this little factoid:

Vivitar introduced the 283 in 1972. By 1976, they had already produced their 3,000,000th unit. It's actually a ceremonial flash, made of gold, and it sits in the office of Jim Wellington, who is a Big Cheese at the company.

Jim has been with Vivitar since portable flash was a small pile of magnesium powder. Okay, maybe not quite that long, but Jim has been around the block a few times.

I spoke with Jim last week to get the skinny on the reintroduction of the 285HV. The 285HV is basically a pimped-out 283 that also offers a zoom head and full manual control - just the way we like it. 285HV's are also safe for your digicam, with a ~6v trigger voltage.

PLEASE NOTE that older 285's which are NOT designated as "HV" are NOT voltage safe and can fry your digital baby. Be warned.

The Vivitar 285HV, and its less-versatile sibling, the 283, have been a staple of off-camera lighting for more than a generation. But newer model flashes have gotten more computerized, with TTL functions and wireless IR capability. But they have also gotten price tags to match, heading north of $300 each.

Which is why last year when I started the site, I recommended scrounging for old Nikon SB's. They offer reliable, (and variable) manual flash with a PC jack without the $300 price tag. And at the time of my writing, you could snag them for less than $50.

Alas, the notion of off-camera manual flash gained a tad in popularity over the last year. Those same flashes now regularly go well north of USD $100 - if you can find them. As a side note, I recently picked up a couple of used SB-26's on eBay and you chowderheads bid me past the three-digit mark. Serves me right, I guess.

But now, Vivitar has also noticed the resurgence in off-camera manual flash and has reintroduced the classic workhorse Vivitar 285HV. Actually, some company you never heard of bought the rights to this name from Vivitar and started reproducing the flash. Badly.


BOTTOM LINE: Don't Buy This Flash

I hate to see this -- a company buying the name of a formerly great piece of gear, and then cranking out poor quality versions on the cheap. That's why you can now get a flash that looks just like a V285, but is also labeled a "Cactus" flash.

They are total crap. Don't let the reputation fool you. And sadly, when buying used it is hard to tell whether you are being offered the newer crap version, the mid-aged good version which has a safe sync voltage, or an older version which can kill our camera with very high sync voltages.

Fortunately, there are very good alternatives. Used Nikon flashes (SB-24, -25, -26 and -80 in particular) are great value models from which to choose. Unlike the new crap versions of the once-venerable 285's, they are well made.
__________


But there are great new alternatives, too. Deserving special consideration is the LumoPro LP160 (much more info here) which has full manual control, a killer slaves and syncs four different ways. (Hot shoe, slave, standard PC and miniphone jacks.)

Plus, it has an unheard of two-year warranty. So unlike the new 285/KF36, there is little to no risk involved.

In short: Please, PLEASE do not be fooled by the great reputation of the Vivitar name. Many, many people made this mistake when the flash was first reintroduced in 2007. Don't get taken.

Sadly, until we found out the the new 285 was in fact a dysfunctional sheep in wolf's clothing, I was responsible for introducing many readers to this dressed-up dog. Which is why I have taken the extraordinary step of completely rewriting an archive post.

Sunday, February 4, 2007

The Hot List: January 2007

Apparently, it is now too cold to be shooting nudie shots in the Garage, as Garage Glamour has finally dropped from the top ten.

But that didn't stop Strobist's readers from curling up by the fire with a good book. Or a bag of ball bungees, apparently.

A newcomer on the list is a DVD by Jim Brandenburg, of which I was previously unaware. I am a big fan of Brandenburg's work, (he is an available light nature photographer, FYI) and will definitely be checking this out. Thanks for the heads-up.

Herewith, the most popular items ordered from Amazon by you guys during the month of January. New this month is the inclusion of Amazon UK links (where applicable) after the main links. The main links still go to Amazon US.

As always, I very much appreciate your choosing to pass through my site when shopping at Amazon. When you go there via any of my outbound links, your purchases help to support the site.

Thanks,
DH


________________________________________

The January '07 Hot List:

1. Lighting and the Dramatic Portrait | UK

2. Skin: The Complete Guide to Digitally Lighting, Photographing, and Retouching Faces and Bodies | UK

3. Best Business Practices for Photographers | UK

4. 25 Pack of 9-inch Ball Bungees

5. Master Lighting Guide for Portrait Photographers | UK

6. Matters of Light & Depth | UK

7. Photojournalism, Fifth Edition: The Professionals' Approach | UK

8. Chased By The Light DVD - A Video Journey With Jim Brandenburg

9. SanDisk SDCFH-2048-901 2GB ULTRA II CF Card | UK

10. Photo District News (magazine subscription)
________________________________________

In the "on-deck" circle for Tuesday: The return of the Vivitar 285HV

Saturday, February 3, 2007

Hack-e-Flash Heaven

Step right up, all you DIY-ers. Today's post will point to a few fun projects for those of you with more brains than money.

First off, is this cool Vivitar 283 homebrew varipower hack, courtesy Metropolicity. Turns out the formerly $20 now $35 Varipower VP-1, which makes a Vivitar 283 an infinitely controllable manual flash (over a 5-stop range) is just a plain 'ol 100k linear pot in disguise. Click above to find out how to ape one for just a few bucks.

Speaking of 283's, a Big Honcho at Vivitar just told me how to tell the "digicam-safe older 283's" from the "not safe older 283's" that will smoke your expensive little baby. The following 283's are safe, with a low trigger voltage (~6v):

• Ones marked "made in Korea."
• Ones marked "Made in China."
• Ones with a red dot in the battery compartment.

According to Vivitar, the above flashes are safe.

Not so the following:

• Any Vivitar 283 marked as "Made in Japan."

These have a synch voltage of 300 volts. Do not, repeat DO NOT, connect it directly to your digicam via hot shoe or PC cord. Or lick it when it is charged up.


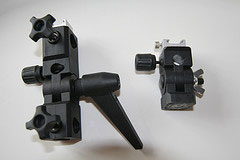
Next up is a little space-saving hack for the umbrella flash bracket. Literally. (He just took a hacksaw to his bracket and played with some bolts and epoxy.)

Click through to see how to tighten up on space and weight the next time you are schlepping your lights up the Andes or something.

And lastly, a neat little project that popped up in a cryptic photo posted in the discussion group. Check out this tutorial on how to build a slave for next to nuthin'.

Here's what I am thinking: With this thingie and the single AA-powered flash from a disposable camera, you could make a little slaved, manual miniflash for accent lights or whatever. You could use the neutral density gels from the free sample packs to control the output, too.

Total cost: Probably under 10 clams.

Hit for Average

Overnight, after posting the POTW's, I had a fellow PJ make a (physically misplaced, I think) comment that I assume was meant to go under the POTW post just below this one. He felt that it would be better to stick with the good stuff and lose the group shot.

Granted, the post would look better (no offense, Chris.) But I would point out that for many people shooting for a living, this is more real-world than the other two photos. In fact, at my last workshop, "how would you do a group shot" was a question in which there was wide interest.

Here's how I feel about that.

First, group shots are a fairly common assignment for many of the people who read the site.

And second - and I strongly believe this one - the biggest gains in photography come from learning to hit for average.

To some of the foreign readers who may not appreciate a baseball reference, "hitting for average" means making it a priority to do well on the less glamorous jobs. I think you can effect the biggest change the fastest by bringing up your minimum quality level on every single job you shoot - even group shots.

Look, we all want to hit home runs. And by that I mean shooting the occasional amazing photo or winning the big, important contests, or whatever. But far more important (to me) is what you do every time you go out. What do you do with the little stuff?

Heck, you send me to Darfur and I will come back with interesting photos. A trained monkey could, as one of my colleagues is wont to say. But how many times am I gonna go to Darfur?

(The answer, so far: Not once.)

But I do mundane assignments all of the time. So that's the first place I am gonna look to improve when I want to raise my overall quality level.

And that'll give me a better chance of getting more of the really interesting assignments.

Friday, February 2, 2007

POTW - 2/2/7

Yeah, I am a little behind. It's like they say: Some days you're the windshield, and some days you're the bug.

This week I was the bug.

What I need is a long, protracted - but not too severe - illness to give me time to catch up on all of the little things I seem to be a wee bit behind on. About three weeks in bed with a laptop, wi-fi and a CD burner would do it.

But it's Friday, and Friday means POTW. Even if it is late Friday night.

And before I start, a little reminder: This is just one guy's opinion. Nothing is gospel here, and any other person might choose an entirely different set of photos. My goal is to highlight cool pix, kickin' light and/or different techniques.

As Dave Letterman would say, it's only an exhibition, not a competition. So please, no wagering.

Leading off this week is a beautiful white-on-white flower shot.

Art decided to go the counterintuitive route by matching the subject to the background and separating the delicate subject using total control of two almost identical tones.

The trick, of course, is lighting on two planes. Setting the background at blowaway white left the photographer the ability to separate the slightly off-white flower with ease.

Okay, I'll grant you that this next one, by Jeremey, is a very simple photo.

But take a moment to look at how subtle and three-dimensional the lighting is. He happened to do it with a few Alien Bees, but there is no reason that it couldn't have been done with SB's.

Soft light from upper front right, with two gridded side lights. A background light finishes off the look.

But the key here is as much the relative levels of the light as it is the softness and directions. The light does not call attention to itself so much as subtly reveal and define the subject.

Looks like the foundation for a high-end European advertising shot.


And finally this seemingly ordinary group shot, which I will admit is not a show-stopper. But I simply wanted to stick Chris Parker's photo up as an example of just how big a group shot pair of SB's could pull off.

No, it ain't a majestic tableau. But it is a reminder to let yourself reach out a little further than you might think to take advantage of what a couple of speedlights can do.

Like, say, lighting fifty six people in a big room.

Share

Twitter Delicious Facebook Digg Stumbleupon Favorites More