Friday, June 30, 2006

Look, Ma! We Got A Discussion Board...

Those of you who have not yet moseyed on over to the Flickr Strobist yakkin' board are missing out.

The discussion board has pretty much morphed into a quasi-site of its own.

As of this posting, there are over 100 discussion threads, including things like the afore-mentioned headshot discussion thread, a thread on those "cheapo" eBay radio synch triggers (which I have not yet tried but apparently are pretty darn ok for the money) and even a thread on a (possible) future Strobist seminar/workshop.

You got questions? Post them there.

Rants? You won't be the first.

Answers? Always appreciated.

And at free, it's worth every penny.

Thursday, June 29, 2006

Headshot Assignment Discussion

First of all, I have to say that I have to say that am floored by the results from the first Boot Camp assignment.

You guys clearly gave this one a lot of thought. (Not doing that is the easist way to screw up a headshot assignment and never get called back to work for a publication again, by the way.)

You can see (most) all of the entries here.

I went through and ticked off a selection of photos that I thought were done particularly well, here.

You'll note that many of the more ambitious versions were not among that group. That is certainly not a knock against them, either. When I was collecting a group to use as examples, I went (mostly) with photos that were clean, simple and would have looked just fine if run very small. (It happens a lot.)

Many of the other photos were more complex. And some were very well executed, by the way. The would have worked very well as full-page covers, or even full- or double-truck inside lede photos. (Some of you guys do like to get ahead of me, I have noticed.)

The dozen that I stuck up top on Strobist were some of the ones that struck me as being very versatile photos. With the exception of the second from the bottom on the left (which I really liked) they all read very well, even though they are repro'd at only about 1 cm square, and have been cropped to squares by a thoughtless machine on Flickr.

It is a testament to this group that a designer could probably not destroy their impact if they tried. (And sometimes, I suspect they do just that...)

I am going to pull up a few examples here, and will link directly to the thumbnails on Flickr to save space. Please leave them up on Flickr, if you would, to avoid future broken links.

The "Screw the Assignment, I Like My Photo" award goes to:

TP05-08-02-001
I love this photo. It ain't a headshot. But I can empathize with a dad who comes up with the surpise gift of a nice shot of himself and his daughter. I'd rather have one of those than a well-exectuted blog/website/photoschool/sort-of assignment. :) If you continue the series, I wanna see you work in color some, too.

The "Creative Avoidance of Submitting Just One Photo" award goes to:

Bill
For a trio of photos which look like they could have been done by the late Richard Avedon himself.

This person actually used film - four-by-five film - and the tonal range on these were outstanding. Click on it to get to larger sizes for its true impact.

I know I said that we were gonna try to do these in color. But my reasoning behind that was that I did not want you guys to be able to fix your color-balancing screw-ups by just de-saturating down to black and white. This photo was no color cop out.

The "Inside Lede Disguised as a Headshot" award goes to:

IMG_7852
This photo would look great at a half page, or spread across two pages. I'm trying to start you guys simple enough to bring everyone along, and some of you guys are way ahead of the pack. I'll be expecting great things from those same people when the assignments get tricker...

The "How Dare Your Run This one Small" award goes to:

Ola
This picture needs space to read, but it is worth the space. This was one that could have been bumped to a cover, but would not read well if run very small (see up top.) You'd want to cover yourself with something simpler (with respect to the partially hidden face) so you would not piss off the designer by hitting too far above what the assignment called for.

The "You Did Say This Was For an Arthouse Magazine, Right?" award goes to:

HeadShot1

Who would likely also get called back for a second assignment - provided they backed this up with some more standard headshots in case it needed to run like, well, a headshot...

The "I'd Really Rather Be Shooting CD Covers" award goes to:

Headshot, Video producer
Which makes me hope he/she has not used up his/her one good idea for this genre. They may need another idea for a subsequent assignment...

The "Can We Bring the Dog, Too?" award goes to:

Girl's Best Friend
For their off-the-scale cute photo with the dog. If the assignment is for Dog World Magazine, you're in. Otherwise...

And the one that stood out (to me, anyway) as the most versatile photo was:

Strobist Assignment 1 - Headshot
This would work just fine as a headshot. It reads fine at 1 cm x 1 cm (see up top.) It would work well as an inside portrait at just about any size. It could hold as a cover.

This picture says, "I know you just hired me for a headshot, but I can do it all."

It is the equivalent of the restrained, yet tantalizing, good night kiss at the end of the first date.

Darn near irresistible, for a second assignement callback.

All that said, I would very much like to post and comment on every single picture that was entered. But I would also like to get, say, 6-7 hours' sleep every night, too.

We had nearly 200 total entries (I looked through all of the URL-posted, "mine is not in the pool" entries, too) and I am barely treading water (as far as time goes) with this blog, family time and work as it is. So this is what I hope is just the beginning of the after-action discussion.

And I very much hope that you will continue it here.

Tuesday, June 27, 2006

Ask Not for Whom the Bell Tolls

Wow.

It's headshot heaven over at Flickr's Strobist Group. True to form, the procrastinators are coming through in spades at the 11th hour.

Take a look at the group's effort thus far if you haven't, and see what a broad and hard-working bunch you guys are. I am heartened to see such an enthusiastic response and am looking forward to the follow-up discussion and the more challenging assignments.

Remember to drop them in before midnight tonight. And don't forget the tags.

There are quite a few headshots in there without the necessary tags. I hope these are dupes from people who have already entered their first choice. Please take a moment to check your photo.

A reminder - the tags for this asignment are:

• strobistbootcamp (one word)
• headshot (one word)
• pro (or amateur)
• (your country)
• (any additional tags you would like)

EDIT: Someone in the discussion section brought up a good point. Please remember to post some info in the comment section (of your own photo) of just how you lit the headshot, too. That is, uh, sort of the point here...)

Off The Rack: Bicycling, July 2006

Between assignments I tend to hang out at libraries, bookstores and any place else I might find a decent magazine rack.

It's a constantly renewed source of visual stimulation. I live in the suburbs of Baltimore, MD, so I do not have nearly the magazine diversity someone who lives in, say, New York City might get. But there is still a good new crop of ideas to file away every month.

This is something I have done out of habit for twenty years or so. But it occurred to me that some of you might not have thought of this in the same way. So I am going to start including a few of these on Strobist.

The first Off The Rack example is from Bicycling Magazine's July 2006 cover, which was shot by Patrik Giardino. Please take a few minutes to check out this guy's website. He is really cranking some powerful and elegant light in his sports/lifestyle genre of photography.

Before I get into the particulars of this one, I want to back up and go into some detail on why trolling the mags can be so beneficial.

First of all, if you have been working your way through Lighting 101 and On Assignment, you should have a pretty good handle on reverse-engineering light. This is one skill you can really improve by regularly scanning the magazine racks.

Better yet, what you are seeing is a distillation of visual ideas that has risen to the top of the barrel by virtue of the cover photo selection process at each individual magazine.

I would remind you that magazine covers are not the end-all, as far as photos go. They tend to be quick-read, iconic images. Their primary purpose is to try to grab the reader's attention in about a tenth of a second. But much of that stopping power can frequently be attributed to killer light, so they are worth studying.

And the web being what it is, it is easy to look at the cover photog's credit, jot down their name, and be cruising their portfolio in five minutes to get even more inspiration.

Notice that I said inspiration.

This is not about ripping off cover shots. It is about constantly seeing how other photographers have solved visual problems - and training your mind to think in a way that will give you that same ability.

Take Bicycling Magazine, for example. They have to come up with a stopper, vertical, room-left-for-type photo of a person on a bike every month. How's that for working hard to stay out of a rut?

Even worse, how would you like to be the art director for "Oprah" magazine? Same format, every month. Portrait, every month.

Same person on the cover, every month.

Hey, don't get me wrong. I like Oprah. But after about 6 months of choosing photos of her for the every single cover of that magazine, I would begin to feel an itch on the roof of my mouth that only the cold steel of a gun barrel could scratch.

Okay, let's take a look at this Bicycling Magazine example, and see what we can glean from it.

The first thing I like to do, assuming a photo has grabbed my attention, is to imagine that I am in the process of taking it. That facilitates the reverse engineering process and also helps me to try to imagine what curve balls the photog had to overcome.

All right, let's look at the light. Regular readers will notice a familiar lighting pattern. If you remember, I used a stripped down version of that in a cover photo for Varsity a couple of months ago. It's two hard lights, one on each side (and behind) the subject.

Since the lights are hard, you could do this with small strobes. No light-sucking softboxes or umbrellas here. So this idea is very applicable to us cheapskate SB-types.

So, now you have your aiming-back-at-the-camera cross lights set up. How do we control glare? We snoot them, of course.

But doing this kind of thing is tricky enough for many people when the subject is standing still, right? And this biker is not just cruising down the street. He is hauling butt.

How would you handle this?

If I am looking to get this photo, I would set up some sort of small marker on the road. Probably in the photo, but it would not appear in the final crop.

This is a simple little technique that gives a shooter an immense amount of control and predictability. And I'd bet dollars to donuts that Giardino used some version of this trick.

Now, we have a small pebble put in the road, right in the sweet spot of the light. Focus on it. Then we have the bike racer do about a bazillion runs right through the chute, and fire right when the front wheel gets to the pebble. (I'd time it for the front wheel to compensate for the lag time of my old, tired brain and trigger finger. You'd have to check out your screen on the back of your camera and adjust, most likely.)

The pebble gives us perfect timing, light and focus - every time. No autofocus needed. The guy also gets shot just as he gets into the sweet spot of the light. The only remaining variable is where the guy's feet are on the pedals when we shoot. I'd be looking for one of the feet moving through the power portion of the cycle - just coming around the top. Just like the magazine chose.

That last variable is solved by repetition. That's why you use multiple runs. Lots of them. If you have everything else nailed down, the repetition will give you choices on pedal location and facial expression. Nail down what you can control, and shoot through what you can't. It really works.

The photo is also shot at a low angle, which makes the biker look that much more powerful and gives the designer a nice, clean, blue background to set type against.

Presto: Killer, three-dimensional biker photo.

And, BTW, sorry about the bad copy shot. This being the last days of June, the July Bicycling issue is yesterday's news. I had seen it a couple of weeks ago when I got the idea to start reverse-engineering some magazine covers. And by the time I got a chance to actually do it I had to scrounge at the library to find a copy. So it was a quick grab with no lights or glass cover.

Now go check out Giardino's website and see what else he is up to.

Monday, June 26, 2006

Lighting 101: Two of My Favorite (if a Little Unusual) Light Mods

Photo by Strobist reader James Madelin

While we are on the subject of the quality of light, here are two of my favorite light modifiers for creating interesting light for portraits. I use them a lot—both individually and combined with each other.

The first is a ring flash adapter. A ring flash is a donut-shaped flash, with your lens sticking into what would be the hole of the donut. This allows the light to come from all around the lens axis, which does a couple of things.

First, it makes smooth, shadowless light (on the subject at least). Second, it creates a unique, signature shadow on any wall or backdrop that might be directly behind the subject.

You have probably seen that look before in fashion and or modern portrait photography. Now you know how it was done.

Real, professional ring flashes are… very expensive. But you can turn your garden-variety speedlight into a ring flash for a lot less with something called a ring flash adapter. Essentially, these are very sophisticated reflectors that bend light around your lens before releasing it.


My favorite of the ring flash adapters is something called an Orbis (seen above). I like it because it is the only model of ring flash adapter on the market which (a) can be used with nearly any hot-shoe style flash, and (b) has a better quality of light than the others.

I use it a lot, both by itself and in combination with other lights. It was invented by James Madelin, a long-time reader of this site. As such, he has set up a tutorial/special offer page where Strobist readers get free shipping and 10% off, here. (Thanks, James!)


In the montage above, shot by Strobist reader Ed McGowan, you can see how a ring flash adapter can quickly give a cool look/theme to a series of portraits. It's a unique vibe, which works well on its own. But I tend to also use a ring flash in conjunction with other lights. (More on that in a minute.)


Little Bitty Soft Box


A soft box is simply a box that emits light. They usually run from 2x2 feet to as big as 4x6 feet. But filling a box that big is a lot to ask in terms of power when using speedlights.

So another of my most-used light modifiers is a tiny (as in 8x9 inches) version of a soft box, which happens to be very useful for lighting portraits from up close. That's it above, providing the light for a self-portrait. (As you can see, I like to experiment with my light mods…)


But these things are super useful. Take this photo, for example. The small soft box is being held just out of the frame to the left, and is what is responsible for the great quality of light sculpting his face.

Soft boxes of this size also fold down to almost nothing (8x9", and maybe half an inch deep) so they pack great. They are also very inexpensive. My favorite tiny box is the LumiQuest Soft Box III (AKA SB-III). I use the crap out of this mod—especially for close-in portraiture.


Just Like a Reese's Peanut Butter Cup


Often when I photograph people, I am working quickly and with very lightweight gear. And I frequently use the Orbis and the Soft Box III in combination. These last two photos are all good examples of that.

Seen above, I photographed poet Linda Joy Burke using a flash with an SB-III as my "key" (or "main") light off to the left. For fill light, to get that very controlled intensity of shadow, I used a second flash with an Orbis Ring flash Adapter.


Ditto this portrait of blogger Siany Meades, shot in London. Same combo, same general light locations, actually. This was shot in a shaded courtyard but the light(s) gave me the ability to create a little sultry late-afternoon style light.
__________


So, lots of cool toys and gear to think about to get your mind spinning. But now, let's take a moment to learn about balancing the light from your flash with the existing ambient light.

For most people, this will be when you start to really see the control you get from learning to use your small flash like a professional…


Next: Balancing Flash and Ambient, Pt. 1

Saturday, June 24, 2006

Still on Vacation, But Watching Those Headshots Roll In...

Seeing some real nice stuff popping up for the Boot Camp headshots. Hard as it is, I am doing my best to stay away from the computer while on vacation. I'll be back in full swing come Tuesday, June 27th - just in time to drop the hammer for the June 28th headshot deadline.

That said, I got lots of "eye rolls" for reading the Raw Conversion book instead of a beach novel. But it was very good and I think I enjoyed it just as much as whatever John Grisham or Dan Brown has out for the summer. I am glad to see such a multi-lateral discussion springing up in the comments, too. Knowing this stuff is very important if you are quality minded.

While I am not posting as much, I am checking in frequently and enjoying checking out the headshots that have already been filed. I am looking forward to seeing what deadline brings.

Oh, and absolutely no flash was used at all for a grab shot of my two kids on the dock at sunset last night. (To see a larger version, click the on the pic.)

Hey, I'm on vacation. I don't have to light anything.

Friday, June 23, 2006

Confessions of a Jpegger

Once in a blue moon, a product comes along that gives you so much bang for your buck that it becomes a no-brainer to snag it.

Usually, it is an inexpensive little item that leverages something you already own to make it perform much better.

Such is the case with budget, off-camera lighting. You have this $500/$1,000/$3,000 digital camera and you can make the photos that much better by (a) getting yourself some quality light, and (b) learning how to use it.

Before I get ahead of myself, let me back up a little.

In the newspaper business, we have to apply the standard of "good enough" far too often. We are always pinched for time and resources, and we can't apply the same energy to a story that they can at, say, National Geographic.

As a result, I have been shooting jpegs on my pair of Nikon D2h's since day one. Ditto my D1h's and the D1's before them. I know from conversations from many of you that I am woefully behind in the area of understanding about shooting raw. Not to mention color space.

Are jpegs "good enough" for many situations? Sure. I'll confess right now to not even using the highest quality compression on my jpegs, too.

Why? The buffer holds more pix while shooting. I get more pix on a card. Archiving takes far less time. My final product is printed on Charmin. The list goes on. Heck, on deadline (and shooting with cell phone transmission in mind) I will size my photos at 8" x 200DPI on the long side, with enough jpeg compression to get the file size down to less than 200k.

Pretty? Nope.

Fast? You betcha.

But in the back of my mind I knew that shooting raw when possible could get so much more out of my cameras. And I also knew a good understanding of what color space I was using (and why) would also kick my quality up a notch or ten.

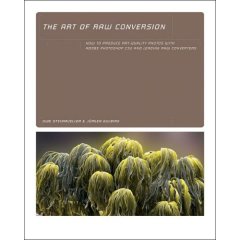
With the arrival of the book, "The Art of Raw Conversion," by Uwe Steinmuller And Juergen Gulbins, there is now an great way to learn how to push the limits of what your digital camera is capable of producing.

If you recognize the names of the authors, it is because these guys were strong shooters before they were educators. Uwe is also the man behind Digital Outback Photo, one of the more popular hangouts for digital shooters on the web.

Simply put, the book, The Art of Raw Conversion is a $25 plug-in for your brain that will soup up your digital camera (and every future digital camera you'll ever own) and drastically increase the quality of your photos.

(The book lists for $39.95, but Amazon displayed a price of $25.17 when I looked it up. Amazon uses "dynamic pricing," so your price may be a tad different. But at $25.17, this book is a steal - and just over the price line for free US shipping. Schweet.)

The first two chapters alone are worth several times the price of the book.

In chapter one, you will learn the basic theory behind shooting raw. Long story short, your camera is producing far better files than you are seeing if you shoot jpegs. And then it is "helpfully" processing them for you - not unlike a drugstore photo finisher. This onboard jpegging process also takes away your ability to change exposure several stops after the fact, for instance. Ditto (real) white balancing, contrast and several other functions.

Yeah, I know you can do that to some degree in Photoshop. But not nearly so much as the control you get while working in raw. By the end of the first chapter (OK, maybe by the end of the second reading of the first chapter) you'll be conversant in the DSLR's abilities and advantages of shooting raw.

You think the shooters from Sports Illustrated (and the picture agencies) shoot jpegs? I can tell you that they don't. They know what you don't - that raw files are worth the extra storage space and buffer capacity than shooting faster, smaller jpegs.

The second chapter embraces an area no less important - that of understanding and choosing your color space. Shooting for monitor display, inkjet print output, newspaper, etc., all present different requirements and challenges that can be better addressed by choosing the proper color space.

Chapter three gives you a strong foundation in raw image work flow. This is important, because you will want to get the benefits of shooting raw and keep the ability to go back to square one should you come across a better conversion program - or better tune your image post-production skills.

They spend much of the rest of the book teaching you how to better use several of the most popular programs for handling raw format images. (Most DSLR cameras come with some sort of program for manipulating raw images, too.)

Their analogy of "the digital negative" is a sound one. And for people who shoot jpegs, all of the first layer of processing that are applied to every picture is done by a relatively weak program in your camera's firmware that is optimized for speed.

If your photos matter, it is far wiser to do this work yourself on your computer instead of in-camera where the choices are made for you and the "computer" is a relatively dinky one.

You will be driving instead of your camera's (well-meaning) firmware authors. You'll be working with 12-bit image depth to get exactly what you want before you bring it down to the 8-bit depth of jpegs at a time of your own choosing.

You do not have to read the whole book to get the benefit, either. The first three chapters are required reading, tho. And if you are contemplating buying Photoshop CS, or any other advanced raw processing program, this book will allow you to make a far more informed choice.

The best analogy I can think of is this: It is as if someone has invented a $25 fork that makes every bite of food taste much better, without raising the cost or caloric content of the food.

Heck, I wish I would invent a fork like that. I'd be a gazillionaire.

Get yourself a tasty bite of The Art of Raw Conversion. It's food for thought for photographers who want to inexpensively push their digital DSLRs' capabilities to the max.

Wednesday, June 21, 2006

Bootcamp Headshot Deadline: One Week From Today

One week to go, my procrastinating friends...

But as you can see by the sampling on this post, there are a few brave souls out there already posting their efforts way before deadline. Good for you guys. Still waiting to see if you guys (as a group) are actually going to take up the challenge in real numbers. Or perhaps I have attracted a passive group of recreational readers. (No pressure, though.)

On the other hand, I am amazed at the number of people who have joined the Strobist group at Flickr. (Of course, all that takes is the click of a mouse...)

If you are late to the game, there is still time to do the first assignment of Strobist Lighting Bootcamp. Just follow the link in the sidebar at right. If you aren't showing up for the headshot stuff, you are gonna have a heckuva time catching up with the assignments start to get interesting.

On a side note, I would strongly prefer limiting the pool photo posting to photos lit by off-camera flash - or extremely interesting photos with on-camera flash. That is kind of the idea of the group. One of the admins could just run through there, deleting photos willy-nilly, but it would be much better to self-police if you could. Muchas gracias.

No posts tomorrow, as the Hobby family (me and the missus, an 8-year-old and a 5-year-old) are going to be at the gates of Disney's EPCOT when they open up and go straight through until they kick us out at closing time - 14 hours later.

Crazy? Maybe. We'll see. I've been several times before, but it is the first time for the curtain climbers.

Just hope we remember the sunscreen. I'm the beet-red, burn-and-peel type.

Wish us luck.

-D

UPDATE: Silly me. I thought EPCOT stood for Experimental Prototype Community of Tomorrow. Turns out, it stands for Every Person Comes Out Tired. But it was a lot of fun. Especially with two kids soaking up just about as much knowledge as they could in a single, albeit long, day.

Tuesday, June 20, 2006

Developing an Idea, Part 2: Compact Fluorescent Bulb

In Developing an Idea: Part One, we talked about the process of coming up with an idea for a photo and then letting it sit in the back of your mind while you solved the series of problems you would encounter while producing it.

In this case the idea was to produce a photo to grab people's attention long enough to learn more about compact fluorescent light bulbs, or CFL's.

In preparing for the shot, four major "curve balls" were identified. Again, I like to think of problems as curve balls. They can be very daunting, but many people obviously learn to hit the daylights out of them. It's a good mindset.

First was the illuminated CFL light source itself, which was to drive the exposure for the photo. It would leave the remaining part of the bulb very dark. This would be solved by combining flash and available light (the CFL's light output) to compress the tonal range. No different, in theory, than using "fill flash" in the noon-day sun.

Second, the business end of the bulb is white even before it is turned on. So that part of the bulb would have to receive almost zero strobe light, which would be tricky given it is right near the base of the light, which would have to be fully lit by flash.

Third, the light would need to glow, even with the base fully visible and apparently unattached to AC.

Fourth, an offshoot of curve ball number three, is how to make the bulb appear to float.

Starting with the glowing light issue, we simply needed to design an invisible lamp. This was easy enough, but not something I would encourage unless you are comfy working with household AC current.

(No kidding, this stuff can kill you. It basically can defib your heart if you grab it wrong. Don't play with it unless you know what you are doing. Strobist is less than three months old and I do not need to be killing off readers.)

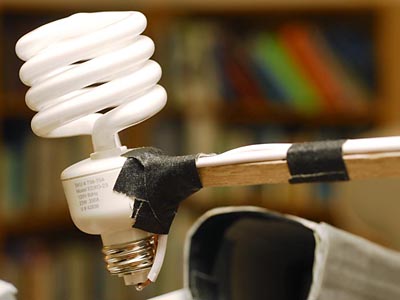
What I did was to solder a lamp cord directly to the screw threads and bottom of the CFL. By doing both wires on the same side, I could shoot the CFL and have it appear to be unconnected to power.


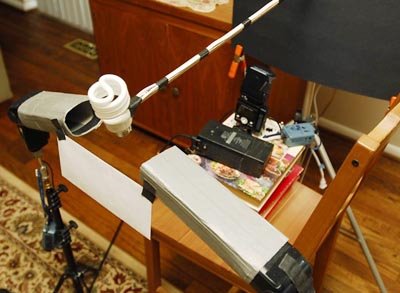
Second, I wanted it to float in order to reveal the entire screw thread assembly. By running (and taping) my lamp cord down the length of a dowel clamped to a light stand, I could invisibly support the light and apply electricity to it at the same time. The dowel passed through a small hole in a piece of ordinary black poster board, which hid the light stand support and gave me a sort of "studio" background look. I say "studio," because it was shot in a smallish townhouse living room.

Studios are just big, boring rooms. "Studio lighting" is very limiting. Try to learn to separate the terms, "Studio" and "lighting" in your mind. It's a strong and needless association for many people. I actually got yelled at on a very popular digicam message forum recently for just suggesting such heresy. Oh, well.

Total cost for the extras at Home Depot: Couple of bucks for the dowel and $1.24 for the extension cord. (I just cut the female end off.) Forty nine cents for the poster board and some gaffer's tape later, I was in business.


Here's the shot with a couple of Nikon Speedlights lighting the base of the lamp. There's WAY too much light spilling onto the bulb part, but the shooting angle is hiding the support just fine. So we are getting closer.

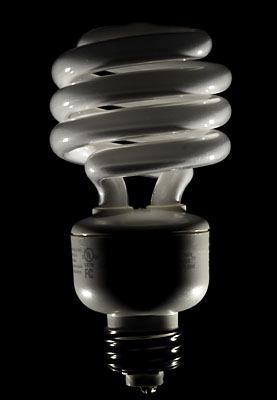
A few minutes later, having experimented with some cardboard snoots, I had most of the strobe light killed from the bulb part, as seen above.

Here is a shot without flash, with the bulb plugged in, showing what will be the ambient portion of the exposure. (I held my breath the first time I plugged in the lamp.) Remembering that we have controlled the flash spill from the base, combining the two light sources is now very simple.

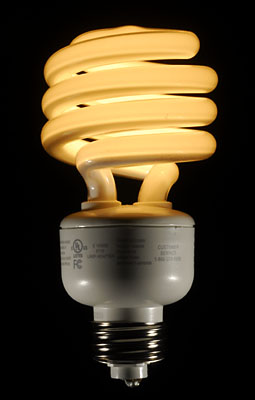
Here is the combination shot. If I wanted to change the light level on the base, I did so by changing the camera's aperture. If I wanted to change the exposure on the bulb, changing the shutter speed made it a piece of cake.

Only thing left is adding some tone and color interest to the background. This was done with a third Nikon SB-800 speedlight with a blue gel on it propped up on some books.

All of the flashes are on manual for full control. The back flash was powered way up because the black poster board ate light like crazy. The front flashes were almost too bright at 1/64th power.

And there is the pull-back, which shows the whole setup for the final shot. What amazes me is how spartan the set is, and how produced the final photo looks. It looks better than the original version, which was shot in my brain about a month ago. This is almost never the case for me. But I will gladly take it when it happens.

Photoshop-wise, this is almost a straight, in-camera photo. There was a dollop of solder on the bottom that I cloned out. You can see it in the interim photos. It was a tradeoff between safety (I wanted a very good solder joint) and invisibility. Safety won.
Much of the credit for how good this final image looks goes to Nikon. The D200 (loaner) digital camera I was using when I made this shot makes some amazing files. I want one. Or two.

All of my cameras are purchased by The Sun - and I am not complaining, mind you. But that also means that I am not in control of when I can upgrade, and what I will upgrade to. If it were up to me, I would gladly trade in my two (Sun) Nikon D2h's for one Nikon D200. The camera is far ahead of the D2h.

If I got this assignment with one day's lead time, it would not have happened. But being on your own time frame - and having a chunk of time to learn to hit your curve balls - can let you find the path to the photo your mind can easily snap the instant you get the idea.

Oh, and switch to compact fluorescent bulbs. You'll save money every month on your electric bills.

And if you don't need to save money because you already have too much, do it anyway. You can use the money to buy me one of those D200's for my birthday.


Next: 5-Minute Test Shot

Monday, June 19, 2006

Flickr's "Strobist" Group Hits 500 Members

Having started less than a month and a half ago, there are now 500 of you in the Flickr Strobist Group, sharing your off-camera flash photos and ideas on a daily basis.

This is way cool. If you haven't checked it out, you really should. It's free, easy and lots of fun.

Sunday, June 18, 2006

Pro Tip: How to Quick-Change an SLR lens

Professional photographers see you amateurs out there, frequently shooting right along side of us while we are on assignment.

You're right there at events like festivals, fireworks displays and high school football games. A few of you even seem to know how to BS your way onto the sidelines next to us a pro football games. (How do you do that, anyway?)

We see you watching us. What you might not know is that we are also watching you. While we sometimes get P.O.'d when you crowd our shooting angles, we are frequently jealous of how well you are equipped.

A couple of things we might not be so jealous of: Your shooting and equipment skills.

Which is why we think it is particularly entertaining to watch you do something like try to change lenses quickly when a fleeting moment is slipping by and you are caught with the wrong glass on your camera.

That said, here is how to quickly swap a lens and not look like Barney Fife going ballistic as he tries to wrestle his gun out of his holster on The Andy Griffith Show.

The following steps should (eventually) be performed in one smooth, fast motion. I am using Nikon as an example, but everything is the same for Canon. The twist direction is simply reversed.

1) Hold your camera in your left hand as shown in the upper left part of the top photo. Approach the lens as shown with your right hand open and the right forefinger extended a little.

2) As seen in upper right, when you close your hand around the lens, depress the lens release button with the left side of your right forefinger.

3) Moving onto lower left, rotate the lens clockwise (for Nikon, reverse for Canon) and let the forefinger slide along the still-depressed release button.

4) Finally, as seen at lower right, the lens slides smoothly off of the camera and leaves with your right hand.

Mounting the lens is the reverse action - just as smooth - except the lens itself depresses the lens release as it is pushed onto the camera before rotating into final position.

With about a minute of practice, you should able to go from not touching the lens to having the lens off in your hand in about a quarter of a second.

Don't believe me? Try it.

Learn it like they do in the Army Rangers - start slow and smooth at first and get the muscle memory down.

Like the mantra goes: "Slow is smooth and smooth is fast."

You'll soon be able to perform this maneuver while keeping your eyes on your subject instead of watching yourself fiddle with your camera. And that's important when your are seeing a good moment come together.

Try it - you'll be surprised at how easy it is.

Hey, Where'd the Montage Go?

I am very pleased to welcome the folks at Adorama to the leaderboard position. Please do give them a visit and have a look around their vast online store. They offer darn near anything photographic, and I am proud to be associated with them.

If your company is interested in advertising on Strobist, please click here for more info.

Saturday, June 17, 2006

Mo' Bounce to da Ounce

That "Cabbage Patch Doll" of the lighting umbrella world, the Westcott 43" Double-Fold Soft Silver, is starting to show up as back in stock at various retailers. Whether that situation lasts is, of course, a different matter.

I say we just mount a hostile takeover of the company (how big can they be?) and start running the production lines 24/7. Double-fold umbrellas for everybody.

Who's with me?

Friday, June 16, 2006

Monsterpod With a Strobist Mod

I am apparently asleep at the wheel. The "Monsterpod" is making the rounds on the photo websites and I only saw it thanks to a heads-up from an Alert Reader.

It basically a big, $30 glop of something red and (apparently) very high tech. I won't tell you what it reminded by 5-year-old boy of. But suffice to say I hope it is not made of, uh, anything that rhymes with "sugar." It sticks to darn near anything well enough to hold a small digital camera (thanks to the integrated 1/4 x 20 screw head.)

Why would I care about a red-gloppy-digicam-sort-of-tripod? Because if it'll hold a small camera, I'm thinking it'll hold a Nikon SB-800 speedlight.

You start to see the possibilities here?

Head on over to the Monsterpod website if you want to know more.

(Thanks, Mark!)

UPDATE: Click here to see a very interesting production report from China, along with photos of the new, ready-for-prime time version of the Monsterpod. They have also apparently upped the weight limit to well above that of a typical shoe-mount speedlight, and are going to offer a slaved hot shoe adapter, to boot. Schwing.

SECOND UPDATE: Good news/Bad news:

Good news: These are now available at retail.

Bad news: Rob Galbraith did some tests and found they are not very reliable for holding flashes, in that they tend to drop them.

Thursday, June 15, 2006

Developing an Idea, Part One

Even though you guys are off shooting your Boot Camp headshots, I am going to try to shoehorn something else into your brain as an exercise in learning to be a thinking photographer. After all, you have loads of free time on your hands, right?

With the On Assignment post on Ant Upton's Paris soccer shot, I included a lot of color about the process he went through to fine tune and then nail his photo. Today, I want to take that concept a little further.

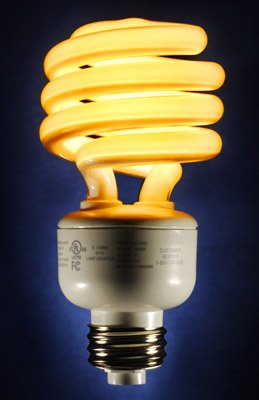
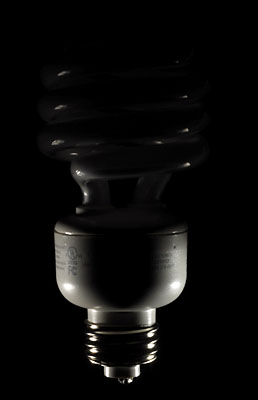
If you will remember back when we made the DIY macro strip lights, I said that I was planning what was (for me) a relatively difficult close-up shot. As it turns out, the photo was to be of a compact fluorescent bulb, or CFL, as seen above. Note that this is not the final photo. (Hey, give me a little more credit than that...)

I am throwing this up today to try to introduce you to the idea of the long-range fermenting process that can yield a high-impact photo. The idea it to let it pickle in your brain until you are ready to shoot it. Long-range thinking is quite different than a 20-minute brainstorming session. For me, it is the only way to get around some of the engineering "curve balls" a more complex photo can present.

But, before that, this:

Incandescent light bulbs are positively neanderthal in their energy consumption. A 60-watt light bulb is denoted as such because it uses, continuously, 60 watts of electricity to produce light. The light itself is measured in lumens, not watts.

A typical CFL will put out the same number of lumens as a 60-watt incandescent bulb, but only use about 14 watts. Given that about 30% of the average household electric bill (and energy usage) comes from lighting - if you use incandescents - you can see what a difference reducing that portion of your consumption by 77% can make.

Want to know more? Look here, here and here. Some countries are even considering dumping all of the incandescents. Not a terrible idea, IMO.

We are all going there eventually. It makes too much sense not to. And after that, LED array bulbs are on the horizon (already available but still very expensive) that can light your whole house for less than then energy consumed by a 60-watt old-style bulb. Sweet.

That's the good news. The bad news is that, for us photogs, the day of the "30cc-green," standard fluorescent are going away. These CFLs are all over the map, color-wise. You'll have to white-balance and pray. Or gel your flash with a CTO and go with the tungsten setting for white balance, which will get you pretty close on color.

And speaking of color, some of the new CFL's are flippin' gorgeous. You just have to try them out until you find one you like. In the USA, try Home Depot's "Consumer Electric" bulbs. They are only $10 for 6 bulbs in a multi-pack. I have changed over my whole house, and do not miss the tungstens one bit. And, as you might imagine, I am pretty picky when it comes to the quality of light.

OK, the sermon's over. You can wake up now. Back to the long-range, percolating idea thing.

In presenting the story on the benefits of CFL's, I wanted to make a stopper of a photo. The money/energy savings are stunning, so I wanted the picture to grab the reader to make him/her soak in the numbers.

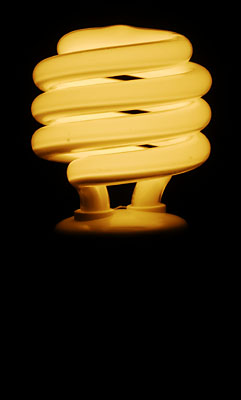
Here is a shot, stopped way down, of a lit bulb in a fixture. You can see that (a) they really are getting pretty close to tungsten, and (b) this CFL really takes on a lovely, neon-sculpture look when exposed as an internally-lit object instead of used as a light source.

This little grab shot in my basement laundry room got me thinking. Given that you can use fill flash to compress the tonal range of a sunny day (filling in dark shadows) could you use flash to compress the tonal range of the lit and unlit portions of the light bulb?

Sure you could.

But look at the light again (up top.) It's white, shiny, filled with complex, convex curves. It is gonna pick up any strobe fired near it. And the strobe-lit, white bulb parts will then be contaminated with frontal strobe light, which will ruin the internally lit color intensity that drew me to the shot in the first place.

Then, we will of course want the bulb turned on for the photo. So choosing the lamp will be important, too. Or not, as the case may be.

Over the course of a few weeks I let the shot turn over in the back of my mind. One by one, I came up with solutions for the problems. Some solutions worked right away. And some ideas needed to be revised when I actually tried them. But by stretching out the problem-solving process, one complex problem morphed into a series of very solvable smaller problems. It is a very organic and satisfying experience, and a process I highly recommend trying.

It is important to note that I had the time to think because the proposal was mine. I did not even present it to an editor until I had my shot worked out. That's a good way to control your timetable if you are typically rushed with the illustrative ideas at your own publication. When I presented the idea in its final form, it was an easy sell.

So, if you are up for some mental gymnastics, take three or four days to mull the hurdles over in your mind and figure out how you might shoot it. As a reality check, I ended up using about $5 worth of items bought (all at a hardware store) specifically for the shoot. I also used three small Nikon speedlights (2 SB-26's and an SB-800) to light it. Nothing fancy, and all done in my living room.

In the end I was particularly pleased with the result, which I will post in a few days. At that point, I'll go through how the problems were solved and go into detail on the light.

Feel free to think out loud in the comments section in the interim.
__________

Next: Pt. 2: Final Shot and Setup Photos

Tuesday, June 13, 2006

Strobist Boot Camp: Rules, Guidelines and First Assignment

Editor's note: Lots of questions and answers already popping up in the comments section. Click "comments" at the bottom of the post, or pull up the permalink here and scroll down.

Welcome to Strobist's first-ever Boot Camp! It starts now. This is where you make the transition from "talking the talk" to "walking the walk."

The main point of SBC is to nudge those photographers out there who have not made the transition to actually trying this lighting stuff out to make the jump. Secondarily, we will hopefully all get a chance to see what many different photogs - from all around the world - do with the exact same assignments. You'll also be able to ask "how'd you do that?" questions to your fellow photographers. Using Flickr, we will effectively become a virtual classroom.

I'm not sure this has ever been done before. In fact, I am pretty sure that it hasn't. Heck, this blog has broken just about every blogging rule there is - "brevity" comes to mind - so we'll find out what happens together.

If you are one of those people hoping to make the transition from advanced amateur to pro, this will give you a little bit of valuable experience and some inside knowledge you otherwise would have to find out by trial and error. Mostly the latter.

If you are a straight amateur, this might be the closest thing you'll ever get to a pro experience.

There will be the normal other stuff going on here, too. Just because you are learning to light does not mean that the rest of the world stops. So when this post falls off of the front page, I will put a link up on the sidebar so you can get to it.

Here are the rules:

1) You will declare yourself as a Pro or an Amateur. I don't want a bunch of amateurs to be intimidated by the work of some hotshot without knowing that he/she is a professional. And if you are a pro, you should expect to answer a few questions about your photos from the rookies. For our purposes, if you earn more than 5% of your income from shooting photos in any way, consider yourself a pro. We are on the honor system here. But if you call yourself an amateur and look suspiciously good, I will Google your butt to check you out.

2) You will have to be a member of Flickr and the Flickr Strobist Group to turn in your photos. So if you haven't done that, get on it. It's free. If you need directions, check here.

3) You may turn in only one final photo per assignment. The way you turn it in is to stick it in the Flickr Strobist Pool and tag it as instructed. If you turn in a photo early, and improve it on a subsequent shoot, it is easy to pull the inferior one by simply pulling the tag off. It'll stay in the pool but it will not come up when we search the assignment tags. Simple as that. It's all pretty self-explanatory. Just make sure you end up with only one photo per assignment. NOTE: If you have questions about how to do this, ask it in the Strobist discussion section on Flickr. DO NOT e-mail me with it. I cannot walk 100 people through this one at a time. I just can't. I'd eat a gun. I swear I would. Have mercy.

4) All photos are to be in color unless specified otherwise.

5) I still have feelers out for donors of (very modest) award prizes. I think we should make the bragging rights tangible in some small way. If I have to I will do it out of pocket.

6) Tags - All entries will have the following tags, exactly as stated (leave off the quotes) -- "strobistbootcamp" (that's one word) "pro" or "amateur" the exact name of the assignment, which will always be one word, and your country.


Thus, if I entered a photo for an assignment called "doubletruck," my tags would be:

strobistbootcamp pro doubletruck USA

Note that these are all separate tags. You can have additional tags. Just make sure you include these among them.

Here's the syllabus. There will be six assignments, progressing from easy (deceptively simple, actually) to challenging. You will follow the path of an up-and-coming freelancer, Phil Phlashen, (heh, heh) working his or her way through a publication like a hot knife through butter. Whether your photos merit this kind of fast track will be up to you.

You will get your assignments in a similar way that a working pro would get them. Sparse detail, and maddeningly vague. But I will also provide some of the subtext that pro's know how to decipher in the hope of tuning your thinking a little bit. So, first the assignment - then the "reading between the lines" part. The names of your subjects are made up, and are purposefully androgynous. Choose a male or female as your subject. You may choose the same person more than once, but that will take some of the challenge and fun out of it.

At the end of SBC, I will choose an overall winner in the pro and amateur categories. Preference will be given to the people who complete all six assignments. There will also be a Best Overall Photo chosen. I will also point out some notables in some categories that you may or may not want to be chosen in, if you get my drift. :)

And one last thing: Deadlines are deadlines.

That said, let's get started.


Strobist Boot Camp Assignment One: Headshot

What you would get:

To: Phil Phlashen
Need mug of Pat Harwood for next issue of magazine.
Might run w/some size.
Deadline June 28, 23:59 GMT
Ph: (000) 000-0000
Please call to schedule


What they don't say:

You want deceptively simple? Doesn't get much more deceptively simple than a headshot, or "mug," as it is known in the industry. Get the term mug out of your mind quickly, and replace it forever with "headshot." You'll make better mugs that way.

Here's an analogy. A person in a singles bar will make a judgement about you very quickly, based on near instantaneous first impressions. Fair? Nope. Exploitable information if you know it? Yep.

Likewise, a publication can learn a lot about your skill level, professionalism and attention to detail by assigning you a simple, safe (for them) "mug" shot. If you screw it up, they'll run it tiny (if at all) and never think about you again. No big loss. To them, anyway. Bye bye to you.

Conversely, if you can take a simple mug assignment and turn it into a headshot that is clean, well-lit, engaging, could-easily-run-as-a-lead-photo (and possibly a cover shot in a pinch) then they get a very different message. The impression of you is one of a photographer who does not blow off any assignment - no matter how seemingly insignificant. Someone who pays attention to detail. Someone whose minimum quality standards - on any assignment - are always met.

Guess which photographer you want to try to be?

You find some helpful info in the umbrella section of Lighting 101. Also, there is a simple headshot tutorial. That's a quick and dirty approach, mind you. Please do not take it as the end-all for this assignment.

You are to use at least one off-camera flash for this assignment. Use more if you like. But this assignment can be done perfectly well with a simple Starving Student Off-Camera Light Kit. So, do not think fancy. Think quality. Think elegant. Think engaged with the viewer.

NOTE: To avoid any confusion, the tag for this should be "headshot," along with "strobistbootcamp," "pro" (or "amateur,") and "USA" (or whatever country you shot it in.)

That's it for the first one. You have two weeks. Let's have some fun, and let's see whatcha got. And if you are a DIGG'er, click here to spread the word.

Lighting Boot Camp Archive Page

Here is where you will find, in order of appearance, all of the Boot Camp-related posts.

As they will pretty quickly move off of the front page, this archive page will be linked near the top of the sidebar. If you have any Boot Camp-related comments, please post them in the Flickr thread related to the particular assignment.

Links to the thread are in the original assignment posts.


1. Guidelines and "Headshot" Assignment
a. "Headshot" Deadline: One Week from Today
b. Ask Not for Whom the Bell Tolls
c. "Headshot" Assignment: Discussion
2. "Background" Assignment
a. "Background" Assignments Coming In
b. "Background" Assignment: Discussion
3. "Look Smart" Assignment
a. "Look Smart" Assignment: Discussion
4. "Water" Assignment
a. "Water" Assignment: Discussion
5. "View with a Room" Assignment
a. "Room" Assignment: Discussion
6. "CD" Assignment
a. "CD" Assignment: Discussion

Monday, June 12, 2006

On Assignment: Shoot Your Kid

I've said it before, and I'll say it again: Family members, and especially kids, offer a fantastic opportunity to practice your lighting techniques. Kids work cheap. They love the hyper-attention of a "professional photo shoot." And the photos you get from these sessions will mean more to you than anything else you could be shooting as you improve your lighting skill level.

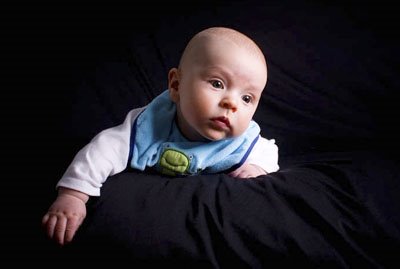
If you are a photog looking for a great, quick Father's Day gift for a spouse or grandfather, you have a week to play. Maybe you'll even get a photo like the one above that Portland-based photographer Robert McNary posted of his son, Owen, in the Flickr Strobist Group. I thought it brought up so many conversation points that I would bump it up to an On Assignment feature.

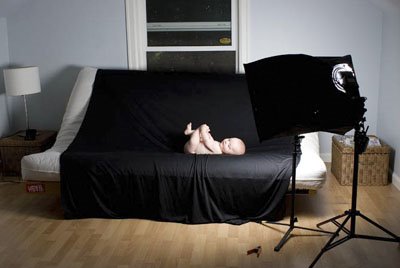
Rob set up some black cloth on his couch and photographed Owen with a Canon EOS 20D and a 28mm 1.8 EF lens at f5.6, 1/125 at ASA 100. His flash was a Canon speedlight, on manual at 1/2 power. He jury-rigged it to fit (rather awkwardly he adds) into a small softbox. He felt it would have been too much of a production to set up (and tear down) his bigger monobloc-style lights while keeping an eye on the kid. I totally agree. An umbrella would have worked fine as a light softener in this situation, too.

"I placed the softbox to my right and about 30 inches from the edge of the futon," Rob said. "I also set up a second light with an umbrella on another stand and positioned it behind me and to the left."


"The image above shows the result of that setup," Rob adds. "It's lit well, but is flat and boring. It would probably work well as a high-key shot with a white backround but I knew that I wanted to go for something with more shadows and depth. I wanted to really bring out the shape of his face and his baby fat wrinkles, so I just turned off the second light."


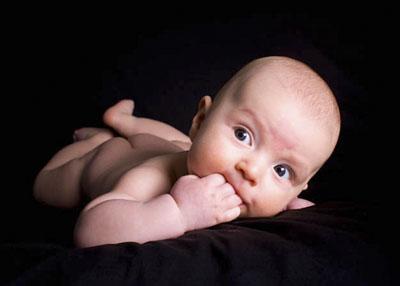
Rob experimented a little more with the second light, but ended up nixing it for the nice, rounded shadows of the single soft light source from his right. Satisfied with his light, he started working with Owen to get a better photo.


In yet another example of a slick photographer using a camera to coax a young, naive model out of their clothes, Rob soon had Owen buck nekkid on the black cloth. Happily, Owen lasted for the full (15-minute) shoot without testing the waterproof material under the black cloth.


Any time you can get all the way through a studio shoot without your model peeing all over the set, well, that's a good day in my book.

"These images were all shot in the middle of the day," Rob said. "I just used my shutter speed to control the ambient light. It might be good to remind people that they don't have to do this kind of "studio" photography in some dark room dedicated to that purpose."

I totally agree. Studios are just big rooms with no windows. No magical quality to them. And not much environment to creatively include in your photo, either. Don't think "studio light." Think "light."

Note Rob's angle of attack when shooting these photos, too. When photographing your own little rug rat, (or someone else's) get your camera down to their eye level or below it. When you get down there, you enter their world. Your photos will be much more engaging, and avoid that condescending visual feel of the kid looking up at the adult with the camera.

Crawl on your belly if you have to. I almost always do when shooting kids. You'll get better involvement from them, too.


All Photos ©Robert McNary

Next: Developing an Idea, Part One

Saturday, June 10, 2006

Don't Fry Your Camera

You get a few thousand photogs hanging out in the same place, and occasionally someone is gonna come up with a cool tidbit.

Such is the case here. I'd like to give credit for this one, but it was posted by "Anonymous," deep in the site's comments section. (Folks, please leave a name and fill in the website field, so we can see who ya are, K?)

Anyway, he (or she) posted a link to a cool website that lists the synch voltages of many, many strobes.

Why is this important? Well, as we talked about before, recently designed cameras handle the synching functions through the main circuit board. They used to do this with a mechanical contact point, which did not care about the synching voltage of the flash.

But they care now. Long and short of it is, some old flashes have synching voltages that will fry your new camera if hooked up directly, either on the hot-shoe or with a PC cord. They were simply made before anyone knew synch voltages would be an issue.

If you are using any kind of wireless setup, like the eBay thingies or Pocket Wizards, you are already safe.

The site gives good general info about camera synch voltages, and names names. Many modern cameras are similarly designed. So even if yours is not listed, this info should give you a pretty good ball-park estimate on whether or not your proposed flash/camera combo is safe.

The not-so-good news is that the site is apparently up and down occasionally. If it is on a bandwidth-limited free server, I am sure you guys will exceed the limit by a few orders of magnitude. So it may be tough to log on to it.

So, in case it is not up, I can tell you that the older flashes I have recommended here (Nikon SB-24, -25, -26, -28, -28dx, -50, 80, 800, etc.,) are well within the safe range.

But if you are using something else, be sure to check your flash to see if it is one of the naughty ones.

Thanks for the great tip, whoever you are!

Thursday, June 8, 2006

General Theory: Strive for Layers of Interest

I could stare at the photographs of Henri Cartier-Bresson for hours on end. I love them. The more you look at them, the more interesting they get.

You might be wondering what the work of a genius like Cartier-Bresson has to do with lighting. After all, he was the consummate hunter, armed with black-and-white film, a Leica and available light.

Oh, and maybe the best sense of dynamic composition ever to grace a human being.

His photos ooze multiple layers to draw you in and hold your gaze. Compositional layers. Layers of light. Front-to-back layers. Top to bottom. Right to left. And then there's that sense of timing.

I bring up Cartier-Bresson to remind you of one of the pitfalls of creating cool light. One of my biggest weaknesses as a photographer is to be satisfied with well-executed lighting. Nothing wrong with good light, but good light does not a strong picture make.

Light - like timing, composition, content depth, etc., is a layer of interest - not a complete photo. As someone learning about artificial light, it is easy to get caught up in the idea that a picture is hot because the light is hot. That's a big mistake. Light can take a mediocre photo and elevate it, but it can't make something out of nothing.

Let me back up for a second.

When we all started out making photos, we were pretty much taking snapshots. Just point the camera at something interesting and press the button. Good aim meant getting the subject dead in the center.

Later we graduated to the Rule of Thirds. And then, the idea of Breaking the Rule of Thirds in an Interesting Way.

Tom Kennedy is a long-time compass point of mine. Kennedy has run the photo department at the Philadelphia Inquirer, run photo at the National Geographic and, most recently, runs an outstanding online photography division at the Washington Post.

He has also counseled about a bazillion young photographers - myself included - after suffering through their college portfolios. I jokingly say "suffering through" because looking back, I think our stuff must have pretty much looked all the same. College PJ programs tend to produce a lot of similar photos from similar shooters. See if any of these ring a bell:

1. Tight, clean football action shot.
2. Abortion (or, anti-abortion) protest.
3. Candlelight vigil for some very sad event.
4. Frisbee freestyle feature (maybe even a silhouette!)
5. Feature story on a homeless guy.

Kennedy was an early member of the "don't get a 300/2.8 too soon" camp. He said they tend to produce what he called "eye candy."

He's right.

"Eye candy" is a photo that looks cool and clean and has exactly one layer of interest. They look great for about half a second and then there is no reason for your eye to linger any longer.

It's a shame, really. Because shooters who get to that level have usually broken past the "ugly, cluttered, too much crap in your photo" level. But if you are a thinking photographer, you soon realize that you need to break free from the "eye candy" genre and head back toward busy photos. Only the busy photos have to work as busy photos.

Chris Usher, a long-time friend and mentor, introduced me to the idea of consciously rating my photos based on the number of interesting layers that I could identify. Try it. It works. When you start to get it, learn to think that way while you are shooting.

"Top to bottom, left to right, front to back," The Washington Post's Mike Williamson told me once. That's the standard. Fill the frame. Make it work. Make someone want to stay there a while.

Usually, the more layers of interest I can pull off in a photo - and still have it "work" - the happier I am. (Click on the photo for a larger pic.)

Some people never get there.

Others - like my friend and former staff colleague Stefanie Boyar - were disgustingly good at using a wide-angle lens to produce complex, layered, interesting photos right out of college. It was seemingly effortless for her. And on top of that, she's really nice. Which made it impossible to hate her for being so good at such a young age. Oh, well.

Good composition can fill a photo with layers. Getting your static compositional elements lined up and waiting for a dynamic (timed) element can make a photo sing. People like Cartier-Bresson dealt in multiple static and dynamic layers at once. He called it "the decisive moment." But in reality, it could frequently be several decisive moments coming together at once. The guy really was a genius. If you have not studied him, you should.

Light is an element. A single layer. Something to be combined with other layers in a photo to make the photo that much better. If you are taking a portrait, the subject's engagement with the camera (and, thus, the viewer) is another layer. Once nice thing about creating good artificial light is that it frees you up to look for (and snag) those compositional and subject interaction moments.

Don't be satisfied with just "good light." Think of good light as setting the stage for the possibility of a great photo. If you are going to take the trouble to light a scene, take those extra steps to build on your photo's good foundation.

The work you put in at that point will make a world of difference.

Is the next Henri Cartier-Bresson out there stalking the world with a Leica? Probably not. He (or she) is probably figuring out how to use their Nikon D200 (or Canon 30D) just like the rest of us.

Heck, he might be reading this column right now.

Click here to DIGG this post.

Tuesday, June 6, 2006

Double-Fold Umbrella Blues

The super-handy, 43" Westcott double-fold umbrellas appear to be missing in action at Adorama. If anyone knows where we can get them, please leave a link in the comment section and I will update the umbrella links throughout the site.

I sure hope they are not gone for good. I will ping Adorama to see what's up.

UPDATE: Well, from asking around (and from the very helpful comments) it appears as though the site could have possibly caused a, uh, wee bit of a run on a few products which normally do not move in great numbers. For those of you who do not read the comments sections, we have found out the following:

1) The umbrellas are not discontinued.
2) You can get them - catch as catch can - in several other locations, including:

Samy's
Roberts Imaging
Penn Camera

I will post a note (or anyone feel free to chime in) when I see them back in stock at Adorama, too.

On Assignment: Soccer Preview Shot

First of all, I would like to note how unfair it is that some people get to have the Eiffel Tower as a backdrop in their dusk shots and I have to settle for nondescript Lake Elkhorn in sleepy little Columbia, MD.

That said, many of you saw this when it was posted in the Flickr Strobist group pool by London-based photographer Ant Upton. Ant was kind enough to answer my e-mail and send me some detail and outtakes on his Paris shoot.

Before you get into the article, here are some important points to remember.

• Notice how Ant tests his ideas and nails down whatever variables he can before the actual shoot.

• And just as important, see how he sticks with his pre-tested idea during the shoot until he gets what he wants.

The difference between a good shooter and a mediocre one - especially when it comes to pulling off a lighting concept - is testing and persistence. You want to be ready and willing to do both in the quest for a cool shot. Give water enough time, and it will always find a path downhill. You want to be water, and your ideal picture is at the bottom of the hill.

Beyond that, extra credit goes to shooters who, having reached the "bottom of the hill," keep working the job with low-odds, high-payoff picture attempts. You already have your shot. It's not like they are going to take it away from you. You can even see it on your TFT screen. Now is not the time to walk away. It is the time to aim high for a truly killer shot. There's no risk - "good enough" is already in the bank.

Enough of my drivel. Here's Ant. For clarity, his (paraphrased) stuff is in "block quotes," which are the inset paragraphs. Mine paragraphs are not inset. Also, the italicized notes within Ant's inset graphs are mine.

The photos were taken in preparation of the UEFA Champions League final to be held in Paris and my client needed photos to help publicise their involvement with the tournament through a competition. Preparation and Planning prevent piss-poor performance. With this in mind we did a map recce ( reconnaissance) of Paris to work out where to do the photography from to place the sunrise behind the Eiffel Tower, which was one of the landmarks chosen to place the footballer in Paris.

Having worked out the azimuth and done the map recce, I decided a couple of bridges over the Seine would provide the clearest view of the Tower with the sunrise behind it. With no buildings in the way to mess up the skyline, Bir Hakeim Bridge proved to be the most suitable once we had reviewed the test shot. We had one of the clients jumping up on a plinth in place of the competition winner who would be actually kicking the ball.

After a fitful night's sleep, my two alarms (smart guy) went off at 4am in the hotel room. The client and I made our way to the Bridge. We wished to be in place at least half an hour before the estimated time of the sunrise. This would allow us plenty of time to set up the lights, practice the ball kicking and generally not have to rush. It is always better to get the things you can control right (before you start shooting) so that you are able to react to the things you can't control, either by changing your plans to minimise the impact or sometimes changing you photo direction totally to take advantage of a new set of opportunities.


(Well, now we know how Ant pulled this off in Paris without having to wade through layers of bureaucracy. That's a pre-sunrise shot. You get up at 4:00am, and you can get away with darn near anything.)

On the bridge I started setting up the lighting and working out my position. (Questions: Should I use a wide angle lens and have the footballer big in the frame using perspective? Or have a more realistic rendition using a more normal focal length?)

I used a 580 EX Canon flash. I had decided was going to be triggered by the ST2E, which fires the remote flash gun by infrared signal. This would also give me control of the flash's power level from my camera position without having to run back and forth adjusting the flash power to balance with the ambient as the sun rose. It soon became obvious that whilst the range of the ST2E indoors is pretty good, outdoors it often just didn't fire due to the distance I wanted to stand at from the flash head.

So out came the trusty Pocket Wizards, which always work. But I did lose the ability to control the flash from the camera position. A quick explanation to the client who was going to be the 'walking light stand' about how to change the power of the flash and we were ready to go.


There goes Ant, stealing a future "On Assignment" from me. I use "carbon-based light stands" all the time. I usually only take two light stands with me, assuming I can offer some bystander/client/assistant a total immersion experience in the world of location-lit photography without charging them a dime... :)

Here's an example of what Ant is talking about, from another location in the same shoot. If you aren't making use of people this way, you really have to ask yourself why not.

After a safety briefing to the winner ("Don't fall in to the river!") and a few practice kicks, the footballer was helped up onto the plinth which formed part of the wall of the bridge. We started shooting with the client acting as a mobile light stand holding the 580 EX flash.

The main problems we encountered were shadows cast either by the ball onto the footballer or the flash being pointed in the wrong direction.

The latter is one of trade-offs of using a human light stand. It is easy to move the position of the light. But the flash may just not be pointed in the right direction. The other was loosing two of our three footballs into the river, however I was starting to see some images I was pleased with.


Here's an idea. Rubberband a straw or small cardboard tube to the top of your flash, so your "human light stand" can use it as a scope to aim the flash at the subject's face. This works 100% of the time - even when the subject is moving around.

After about half an hour of shooting, adjusting the exposure of both the flash and the camera to take account of the changing light as the sun rose, we felt we had covered the job as per the brief. After the client gave a quick check on the back of the camera, we moved onto the daylight shots. On the whole were pretty simple. Although we did still use off-camera fill in flash to give the subject better modeling rather than straight on camera fill in flash.

(Note: See the "person-holding flash" shot, above, for this location.)


All photos ©Ant Upton

Next: Robert McNary: Shoot Your Kid

Share

Twitter Delicious Facebook Digg Stumbleupon Favorites More