Monday, June 30, 2008

New SB-900 Has All the Angles

UPDATE: SB-900 full review now posted.

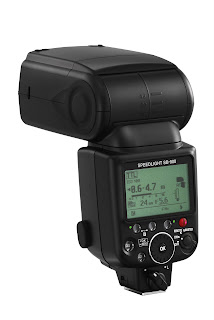
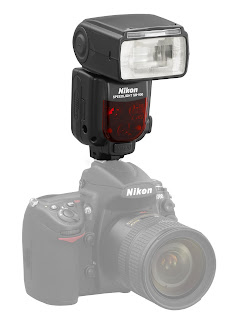
Nikon has just announced a new flash: The Nikon SB-900 speedlight. From what I can see, it is quite a departure from the Nikon SB-800, and the feature list is as long as the price tag is big. Much more, after the jump.


Highlights:

• Rotates 180 degrees right or left. Sweet.
• Flash tube overheat protection, great for hi-power battery users
• More power More GN, but this appears to be only because of the 200mm tele setting: Up to GN 48/157 max
• Faster recycling - 4 secs w/Alkaline, 2.3 secs w/NiMH batts
• Tighter beam spread - up to 200mm throw
• Beam shaping - custom light patterns within the beam
• Faster CLS adjustments - physical dials.
• Upgradable firmware - sweet.
• One-second recycle w/new SD-9 Battery pack.
• Flash duration times: 1/880 (@full power) to 1/38,500 (@ 1/128 power)
• Has SU-4 setting, which presumably still means a great manual slave.
• It's a real honker. Ryan Brenizer has an animated .gif swapping out with the SB-800 here.

and...

It's five hundred smackers.

______________
I will probably get one, but I will definitely still be based on SB-800's for a while.

In fact, this may well drive down the price of SB-800s. Not so much at retail -- Nikon has their price points distributed pretty well for the '600, '800 and '900. But there will be a lot of people who will unload '800's into the market when they get their new '900. (I mean, who needs more than one flash, right?)

And yes, this is probably the only photo site that cares more about the new strobe than the new D-700. If anyone gets hands-on time, please report in via the comments. Thanks!

More info at Nikon site.

_______________


Full Press Release Text


NEW NIKON SB-900 SPEEDLIGHT ADVANCES FLASH TECHNOLOGY AT THE SPEED OF LIGHT WITH EXPANSIVE ZOOM AND INTELLIGENT FEATURES

Nikon’s Newest Flagship Speedlight Offers a Powerful Addition to the Versatile 
Nikon Creative Lighting System (CLS)


MELVILLE, N.Y. (July 1, 2008) – Nikon, Inc. today introduced the SB-900 Speedlight to provide Nikon digital SLR photographers with a flash capable of a wide zoom range, increased versatility, faster recycling time, and a wealth of intelligent features to enhance the already vast functionality of the Nikon Creative Lighting System (CLS). Building on the success of the popular SB-800 Speedlight, the SB-900 provides users with extensive creative lighting possibilities with a simplified interface and the ability to stay up to date with future technologies through user-applied firmware updates.*

The SB-900 offers unprecedented zoom range coverage from 17 to 200mm, to increase flexibility in a variety of shooting conditions, while automatically adapting itself to Nikon’s FX or DX-format cameras. Additionally, light output has been increased to a maximum guide number of 48/157.5 (ISO 200, meters/feet at 35mm FX-format and Standard). Photographers can now also select from three light patterns; “Center-weighted” provides the highest guide number and is suitable for images such as portraits, where light falloff at the image edges is of less importance. “Standard” provides a familiar pattern, similar to the SB-800, and is ideal for general photography and “Even” which delivers the most consistent edge-to-edge coverage, making it ideal for situations such as group photography. Additionally, Nikon’s newest flagship Speedlight provides photographers with advanced wireless i-TTL capabilities allowing the utilization of multiple Speedlights with ease and confidence on location or in the studio.

“Nikon is proud that its innovative leadership in flash technologies has been praised by photographers who have realized the versatility and power that the Nikon Creative Lighting System contributes to their photography,” said Edward Fasano, general manager for marketing, SLR System Products at Nikon, Inc. “The SB-900 Speedlight now provides photographers with a new level of portable lighting functionality, with performance and intelligent features that adapt to an even wider scope of lighting challenges.”

The SB-900 Speedlight is engineered to address the creative lighting challenges faced by today’s photographers including a need for fast, on-demand performance, and the ability to adapt seamlessly to nearly any lighting scenario. The SB-900’s innovative design has the 
Xenon flash tube and reflector system moving independently – allowing for a wider zoom range from an extreme wide angle of 17mm (FX) to the telephoto setting which reaches 200mm without the aid of accessories or as wide as 12mm in DX mode with the built-in wide-angle panel engaged.

The SB-900 offers a quick recycle time of 4.0 seconds (at full power) with four Alkaline AA batteries which drops to a mere 2.3 seconds (at full power) while using four rechargeable NiMH batteries—about 25 percent faster than the SB-800 with its fifth battery attachment.
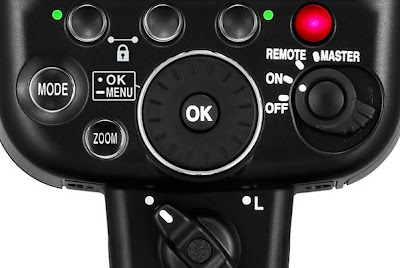


While ease of use has always been a defining hallmark of the Nikon CLS System, the user interface has been even further refined to simplify control and offer faster operation. Controls for setting the wireless Master and Remote have been relocated to the outside of the unit for easier access and frequently used functions are easily adjusted with a new Rotary Select Dial. A larger LCD screen is easy to read, even in direct sunlight, and photographers can assign “My Menu” hotkeys for quicker access to commonly used functions. A new thermal cut-out protection system monitors conditions when the flash might overheat due to excessive rapid bursts. Helpful operating temperature information is provided to the photographer with an innovative temperature gauge displayed on the LCD screen.

For the first time, Nikon SB-900 Speedlight users will have the ability to take advantage of future performance advancements, by way of user-uploadable firmware. The user will be able to download the firmware onto a flash media card and upload it to the flash through select digital SLR cameras.*

The SB-900 Speedlight is Nikon’s most intelligent Speedlight ever, created in response to the needs of today’s digital photographic professionals. When using the included fluorescent or incandescent filters and adaptor, the flash automatically recognizes what filter is being used and automatically adjusts white balance accordingly on the latest Nikon D-SLRs.* Additionally, the SB-900 aids auto focus with a broader AF assist beam that covers a wide 20-105mm that is matched to all of the D3, D700 and D300’s 51 focus points. The bounce and swivel capability of the SB-900 has been expanded to include: tilt up to 90 degrees, down minus 11 degrees, and a full 180-degree swivel left or right, allowing more creativity for on or off camera use, or as a remote Speedlight.

The SB-900 serves as the new core for the Nikon Creative Lighting System when used in combination with Nikon SLRs, and supports Advanced Wireless Lighting as a master or a remote Speedlight, inviting photographers to discover endless creative possibilities. While using one or more Nikon Speedlights wirelessly, photographers can artistically use shadows, highlight details, and light complicated angles with ease. Along with the SB-900, the Nikon Creative Lighting System features a comprehensive assortment of personal lighting tools that include the agile SB-600 and SB-400, and the remarkable R1 and R1C1 Wireless Close-up Speedlight systems.


Available accessories
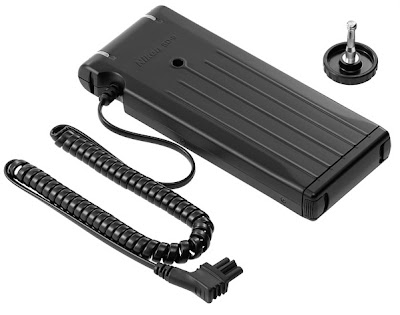


The SD9 Battery Pack boosts flash recycle time to a mere one second (at full power). For faster recycling or all-day shooting it accepts up to eight AA batteries. To enhance the weatherproof ability of Nikon D-SLRs, optional Water Guards will be available for select cameras to protect the connection between the flash and camera, allowing users to utilize the flash when weather conditions are less than ideal.

Price and availability

The new Nikon SB-900 Speedlight is scheduled to be available in August 2008, and will have an estimated selling price of $499.95.** The SB-900 will come packaged with the Speedlight Stand, Bounce Adapter, Color Filter Holder, Intelligent Color Filter Kit, Diffuser Dome and the Soft Case. The SD9 Battery Pack is also scheduled to be available in August 2008 with an estimated selling price of $230.00.

About Nikon

Nikon, At the Heart of the Image™. Nikon Inc. is the world leader in digital imaging, precision optics and photo imaging technology and is globally recognized for setting new standards in product design and performance for its award-winning consumer and professional photographic equipment. Nikon Inc. distributes consumer and professional digital SLR cameras, NIKKOR optics, Speedlights and system accessories; Nikon COOLPIX® compact digital cameras; COOLSCAN® digital film scanners; 35mm film SLR cameras; Nikon software products and Nikon sports and recreational optics. Nikon D Series digital SLR cameras are recognized as “Highest in Customer Satisfaction with digital SLR cameras,” according to the latest J.D. Power and Associates 2007 digital Camera Satisfaction Study. Nikon Corporation, the parent company of Nikon Inc., recently celebrated its 90th anniversary and announced the production of over 40 million NIKKOR SLR interchangeable lenses. For more information, dial (800) NIKON-UX or visit http://www.nikonusa.com, which links all levels of photographers to the Web's most comprehensive photo learning and sharing communities. 

# # #

For J.D. Power and Associates award information go to jdpower.com
* With D3 and D700 Cameras only
** Estimated selling price listed is only an estimate. Actual prices are set by dealers and are subject to change at any time.

On Assignment: Night Chopper, Pt. 1

In this two-part On Assignment, we'll be walking through a night shoot of a Bell 407 helicopter, photographed for the Howard County Police Department earlier this month.

Just like the CFL On Assignments, we'll break this one up into two parts: Planning and problem solving first, then the shoot itself. Keep reading to learn more about the prep, to be followed next week by a walk-through of the night shoot.
___________


Visualizing the Photos

Normally, when I shot aerials for The Sun, we would fly in a dinky little Toys R Us Robinson R-22 helicopter with the door removed. You say a little prayer, try not to put your full weight down and knock off your shot list with an 80-200mm. If you keep your camera on a shutter speed higher than a 1/500th of a sec everything is usually hunky dory.

What I wanted for this shot was ground-to-air shooting, at dusk, with the chopper's interior lit by a group of SB-800s. I explained the idea to pilot (and, fortunately, former Sun shooter) Perry Thorsvik, and he was up for it.

If it worked, it would be pretty cool, and would hopefully produce some neat photos. But there were several problems that would have to be solved first.


First Problem: Flash Sync

Apologies in advance for the Pocket Wizard geek-out session here, but I was going for as much range as possible.

I knew I would be using PWs, but it would be a stretch even for them. To complicate matters, mine were the old "Plus" models which were only rated to 800 feet.

The new Plus II's are rated to 1600 feet. But even if I dug into the wallet for a set, that 1600 feet does not account for things like the metal fuselage of the helicopter and RF interference from the avionics. So the first order of business would be figuring out a way to improve the reliability and range of what were already the best remotes going.

So I sprung for two new Plus II's. Not cheap, but fortunately they are compatible with with my Plusses -- and every previous model PW has produced. So I could be assured of at least one 1600-foot capable signal between the camera and one of the flashes in the helicopter.

I decided to try to improve my odds by putting one of my older Wizards on every flash in the aircraft, and to set the SB-800's into slave mode.

A quick test showed the flashes would sync in both modes simultaneously -- way cool. This meant that if even a single PW'd flash picked up a radio signal to fire, all of my flashes would go off. This worked brilliantly, and gave me both more range and more reliability than a single PW.

Again, those SB-800s aren't cheap. But having both a PC jack and a super slave built in makes them fantastic little speedlights.

I also considered using a second PW Plus II transmitter, in relay mode, (explained here) to broadcast a simultaneous second sync signal on a different channel. The I could put at least one PW receiver on that second channel to get another layer of signal diversity.

But that would have involved buying a third Plus II to daisy chain the relaying PWs together, so the kids would have had to eat cat food for an extra week. Ummm, no.


Second Problem: Light Design


I did some research on the Bell 407. This gave me an idea of what to expect when I went to the airport to scout the actual helicopter I would be shooting in the air later.

Next step was to pop over to the airport to see if I could light it realistically with a few flashes.

Think of the chopper's interior as a tiny, two-room suite with big windows, small pass-throughs around the headrests and transparent floors in the front. Not an easy place to hide lights -- especially when you also are trying to mimic the ambient that would exist in the cabin.

BTW, that last idea is also known as "motivated" lighting. It is old-school, classic MoLaD stuff. There should be a logic to the light, or it just looks unreal.

You wanna stick an up-lighting SB in a toilet, knock yourself out. But just because it looks cool, doesn't mean it is going to register as logical to the viewer's brain. So the idea is to imitate -- but shape and amplify -- the light that might normally be there.

So I decided to go with gelled, diffused SB's in the front and back. I wanted the light to be omnidirectional, like the cabin's ambient light fixtures. Same principal as with the motorhome in Lighting 101.

A 1/2 CTO on the back cabin lights and a 1/2 CTB on the front would give me two options: First would be cool, instrument panel pilot lights and warm cabin lights. Or, I could lasso and easily color shift the whole cabin warmer in Photoshop, to give me daylight pilot lights and full CTO back cabin lights. I liked the idea of having that choice after the fact.

No real good place to mount motivated lights, either. Especially the one(s) that will ape the lights coming from the instrument panels. All of the glass will mean I can see the cabin. But I will also be able to see many places I would like to stick a flash.

Ugh. Not good.

I need at least one bare-bulb light coming from relatively high in the back, and a light coming from low front. I considered a Lumiquest Soft Box II, on top of the instrument panel but even that was too big -- and not omnidirectional enough. Not to mention too high.

Besides, there was no good real estate on the panel in which to mount the flash. I decided to file that little problem away for later. (Procrastinators: The leaders of tomorrow...)


I always like to test as much as possible, and this shoot was certainly not gonna be an exception to that rule. So, my stand-in chopper a few evenings before the shoot was our Toyota Highlander, parked in an empty lot at dusk. Not exactly an Apache Longbow, but it'll do for testing purposes.

This gave me a little more confidence in both the lighting design and the sync range. Although the former would have to be adjusted when we saw the results in the helicopter later. And the lights would be subject to additional problems with the high visibility and RF noise in the cabin while flying. Still, this kind of exercise helps me to not worry as much before the shoot.


Third Problem: Flash / Ambient Balance

This was the one I was saving until last. (Well, before I put off figuring out the front light position, anyway.)

I have pretty much figured out how to do the ambient/flash balance thing by now. It's all about shutter speed manipulation. But what if your ambient will be quickly dropping, and the rotors only look right on the fast-moving chopper at speeds of 1/100th or below.

I could decide to shoot through my ambient light window, and then try to get someone to quickly adjust all of the lights down two stops when it got too dark. Then I open my aperture (or bump the ISO) to get some ambient shutter speed back.

But since I could not count on an SB-savvy passenger in the chopper, I would have to live with the window and try to stretch it as much as possible. I would start shooting at 1/125 -- but do so when the sky was one stop too hot at my shooting aperture. Then I would let the sky settle into the right exposure. That would buy me a little time.

As the sky further dropped, I would open my shutter until I got to my bottom limit (say, 1/50th). As it dropped still more, I would keep my shutter speed constant and underexpose the sky as the ambient fell more. That would stretch my window even more, and I could fix it some in Adobe Camera Raw if need be.

So, there was everything that I could control before the shoot. The biggest wild card turned out to be the weather, which rained us out at least three times. But we finally got out to the fairgrounds on a nice night.

In Part 2, we'll look at the shoot, and those last couple of pesky problems.

__________

NEXT: Night Chopper, Pt. 2

WIRED Interviews the Flash Gun Guy

UPDATE: WIRED blogger (and Strobist reader) Charlie Sorrel tracked down and interviewed Julius von Bismarck, the guy who uses a slaved flash projector to superimpose words into other people's photos.

-30-

Saturday, June 28, 2008

One More CTO Assignment Pic

For some reason this photo did not show up in my CTO assignment results search. But thankfully, a reader pointed it out in the comments.

Big hat tip to The Light Whisperer for this neat cross-gelling, light-bouncing image.

Says TLW:

"F8 - ½ second. Camera white balance set to tungsten. Two flashes, one outside window (left) without any gel for a (daylight environment to simulate moonlight) , a second in a hall outside the room (right) with strong orange gel. Additional light from a oil lamp allowed to burn in for ½ second. "

Wow, cool. And warm, too...

Click the pic to see it bigger. He also posted a setup diagram and more notes here.

Friday, June 27, 2008

Lighting 102: CTO Assignment | Discussion

Report from June 3rd, in which you were asked to use a CTO filter to do something other than correct for incandescent light. The CTO is maybe the most useful CC filter in the whole pack, as several readers demonstrate in their photos, after the jump.
___________


Greg Cee shot on tungsten white balance and gelled his flash with a CTO -- but went with an additional 1/2 CTO (full CTO plus a 1/2 CTO) gel on the thin sliver of light coming from camera right.

This is important, as it puts the light past normal and into a warm color, which is nice when you are making it try to stand out against the blue you have gotten by shooting on incandescent WB.

Fill was from an umbrella, no gel, and pointing up to feather the light off of the bottom of the frame.

Takeaway: If you are trying to do that cool-light shift thing, with a CTO on your light, go past full CTO to either (2) CTO or (1.5) CTO to get that warm-on-cool light that usually looks better than white on cool.


What's the one day a year when you can cover your kid in spaghetti and not catch trouble?

Father's Day, of course. Especially your very first Father's Day, which is when Brad Herman chose to reproduce a photo he had seen done long ago, this time using his kid as the model.

Brad used a palette of warm-to-neutral light: Full CTO on the spaghetti monster, half CTO shooting through the tree in the background, and a no-CTO rim.

That last one is assuming he was on incandescent WB, but looking at it now I am not totally sure. Reason is, the full CTO front flash looks pretty warm for a straight CTO in tungsten WB mode. And the rim light does not look quite full CTB.

I am guessing he either walked the WB around a little in between, or shifted the color a little bit in post. Maybe Brad will clue us in via the photo's caption.

Either way, this is the kind of photo that will make someone pick up the phone and call someone at a kid's modeling agency. Or social services. We trust the bath followed shortly thereafter.


Also going for the 1+1/2 CTO thing on tungsten WB was jgentsch, which allowed him not only to deepen the sky's blue tone, but to contrast it nicely with warm light (even after the WB conversion) on the flowers and window.

Thanks much for the setup shot, too. Those are always helpful for people to see. Although there is a bit of a setup shot in the original photo, in the camera left window...


Shutter-Think skipped the incandescent WB shift and decided to go warm and warmer in his photograph of a woman practicing yoga.

He went the other way, balancing to shade. The half blue gel on the main light brought it back closer to daylight.

But it caught a lot of warm bounce fill and warmed up from a backlight gelled full CTO, made even warmer by the camera's shade WB setting.

Remember, with the combination of full and partial CTOs and CTBs, you have quite a range of options to dial your photo warmer or cooler. And you can do it for the whole photo, or vary the shift with each light.


And finally, this self portrait by nikonbhoy works all around the warm/cool scale, using a full CTO front light, a blue backlight, and daylight ambient fill.

It was shot on tungsten WB, which shifted everything toward blue.
__________


As a group, these photos do a great job of showing some of the different looks that are possible using a couple of sheets of orange-ish acetate, once you realize that stuff is far more useful than just correcting for tungsten light.

Really nice work, guys. You can see the original assignment here, and all of the entries here.
___________

UPDATE: From the comments, a little confusion as to which Rosco filters are what, WRT CTO's, CTB's, etc. Also from the comments, a heads-up about an excellent Rosco publication containing such info. (Check out page nine.)


NEXT: Lighting 102: 7.0 -- Time-Based Variables

Wednesday, June 25, 2008

And Now, a Few Words From the Tourist Standing Next to You

Off-camera flash as High Art: Julius von Bismark, an artist in Berlin, is playing with snap-happy tourists by injecting words into their photos.

He cut a hole in the back of an old film camera and stuck a slaved flash into it. By writing words onto transparent plastic and sliding the sheet into a slot near the film plane, the whole rig now works backwards and becomes a projector. By leaving the shutter open and slaving the rear flash, he can now project those words onto the subject of someone else's photo when their flash trips his flash.

His slave setup is a little clunky (kinda Steam Punk-ish, actually). But a standalone SB-800 also would work great -- without the camera-topping project box slave.

He's in it for the social commentary, but I can't help thinking how much fun this would be for sophomoric jokes, too. You know, if you were that kind of person...


(Thanks to everyone who sent this in -- www.JuliusvonBismark.com, via Gizmodo.)

-30-

Tuesday, June 24, 2008

Remotely On Topic: How to PW a Second Camera

Sports photographer Max Simbron has posted a nice little video tutorial on how to use Pocket Wizards to remote a second camera at, say, a basketball game. Being able to shoot with remote cameras is a nice perk of owning PWs.

(Heck, if you are gonna spring for them, you may as well put them to work for you as much as possible.)


If you want to learn more about getting double duty out of your wireless remotes, check out his original post for other cool tips and tidbits.

-30-

Sunday, June 22, 2008

DINFOS Pt. 3 - Thinking Inside the Box

For the final DINFOS post we have flexibility artist Shelly Guy, who was brave enough to venture down into the bowels of the DINFOS photo studio for a series of photos shot by Joe McNally, the 2008 Advanced Lighting Team and myself.

As you probably know by now, I generally don't care much for shooting in a studio. Which is why we decided to do a quick change-up on our environment and stuff Shelly in a nearby locker.

But that's no problem -- Shelly can get in there easily. It's getting the light way back in there that can be a bit of a challenge...
___________

So, here's the deal. We do not have a lot of time to shoot in the studio, as the building closes at 9:00 p.m. So Joe and I decided to bounce Shelly back and forth between photographers, with one person setting up with the other one shot.

Shelly was a total trouper, and put up with this sort of thing way better than she should have. (Hey, she has to be flexible. She's a contortionist.)

While Joe was shooting down at the other end of the studio, I was looking for a neat place in which to pose Shelly. How can you turn down a half-sized locker?

Next step is how to light it. I need to get the light all the way to the back. But the last thing I want to do is just blast a bunch of light right in from straight on -- there would be no depth or shape to the photo. You need to light from of axis for shape.

But I have to get in there some way, so I tried to have it both ways on my lighting direction. I decided to light it with an umbrella from camera left, and fill with a ring flash.

By varying my lighting ratio between the two SB-800's (we were totally nuking the ambient away) I could decide exactly how bright the back of the locker (and the parts of Shelly that were in shadow) would be.

My other problem would be that the umbrella needed to be close to provide a nice wrap light. But that would mean that it would reflect off of the locker door on the left and create a big, distracting, umbrella-shaped hot spot.

Problem two was easy to solve. We stuck the black cover on the camera left half of the umbrella. This gobo'd the umbrella from reflecting in the door (save a nice, thin sliver) and still let it light Shelly nice and close.

With the gobo, there is a nice, vertical highlight that defines the texture of the locker door. If the gobo was gone, there would be a big, honker of a circular highlight there.


So, specular reflection solved, we now needed to push some light into the locker.

The Ray Flash ring flash adapter fit the bill perfectly, allowing light that was exactly on axis. This meant that we could not only push as much (or little) light as we wanted back there, but also create a specular highlight in the back of the locker to further brighten that area.

The only thing left to decide is the ratio, really. And this is easy enough, in manual power, without needing a $300 flashmeter.

But first, we needed a stand-in. Fortunately the room contained a mannequin. (Mascot? Late-night companion? Honestly, I don't wanna know...) So naturally, we tried to shove him in there. But the dummy wouldn't fit, so we were S.O.L.

Then I hear, "I can get in there," coming from A.L.T. member Luke Pinneo. (Yeah, right, dude, I thought.) But sure enough, he crammed himself in. No, it was not as elegant as later when Shelly did it, but still...


So Luke wedges himself into the locker. (All the while, McNally is shooting glamour photos of Shelly, who has no idea what we have in mind for her...)

I start without the Ray Flash -- just a shoe-mount flash set at 1/64th and aimed up at the ceiling to trip the other flash optically. I bring the umbrella'd SB-800 in from camera left, set on 1/8 power. It's set on slave mode, so the shoe flash will fire it.

A couple of quick pop-n-chimps and we have dialed in the aperture that looks best for the main light. Just doing it by eyeball and histogram on the back screen. Nothing fancy.

Now it is time for the fill light. I slip on the Ray Flash adapter and start out with the flash dialed down to 1/32 power. It's real close to where we want to be, and a couple of quick power adjustments has us ready to go. Again, just turning the volume up or down until it looks best.

Normally, you could also use a flash in an umbrella right behind your camera as on-axis fill. But a light that big would have given you reflection problems on the other door.

I am finding I am going to the ring as fill pretty often these days, and I really like the result. I have a shot like Peter Yang's "Fallon" portrait, with some ring in there, and it looks sweet.

To be honest, I am not a very big fan of ring list as a main light. I think the photos all look the same. But as fill, it can add a neat layer to many different kinds of key lighting.

So we got Shelly through our portion of the shoot quickly, and back to Joe well before we were to be kicked out. Which left a couple of us a few minutes with nothing to do in the DINFOS studio.

If anyone happens to ask you how this DINFOS studio mascot ended up naked from the waist down and left in a very compromising position at a computer work station, we don't know anything about that.

___________

Related:

:: Shelly Guy, Flexibility Artist ::
:: Ray Flash ring flash adapter ::
:: SB-800 Slave Mode How-To ::
:: McNally's Pix ::

SOLD OUT: July 19 NYC Lighting Seminar

UPDATE: The July 19th NYC lighting seminar is sold out. If you are attending, hit the jump for more details, and a link to the discussion thread.
__________________________

Seminar Info and Registration Details


LOCATION:

The class is to be held at the ShootDigital Studios. The address is 23 East 4th Street, in New York City. You can find a Google map here if the one just below is not working in your browser.


View Larger Map


WHAT WE'RE ABOUT:

With the lighting seminars, my goal is threefold: To present an organic approach to creating light, to fill you with as many ideas as possible in a day's time and to have fun doing it. We'll start with a roadmap for the day, which I will do my best to keep us on. But each session will take on somewhat of a life of its own, which is a good thing.


Our Anticipated Schedule

NOTE: Due to time limitations at ShootDigital Studio, the Seminar will run from 10:00 a.m. to 4:00 p.m.

Morning check-in/setup: 9:30 a.m. - 10:00 a.m.

Please plan to arrive between these times, as we will still be setting up before then and still waiting for the morning caffeine to kick in.


Morning session: 10:00 a.m. until approximately 12:30 p.m.

We'll talk about gear (I'll have a selection of gear there for a petting zoo) and take an extended look at lighting, from a more integrated approach than a blog allows. The focus will be on taking all of the things we talk about on the site in a day-to-day sense and combining them to gain more of a holistic approach to lighting. Everything really is interrelated.


Lunch Break

On your own, approximately 45 minutes, and we'll be looking for your suggestions for nearby good eats in the Flickr discussion thread related to this seminar. Link to a discussion thread will be posted shortly.


Afternoon Session:

~1:15 p.m. - 4:00 p.m.

Assuming we have finished the theory stuff, we'll move into the practical/demo session. (Sometimes we go into a little overtime on the theory.) We'll get into some real-world lighting exercises photographing some models I will have cleverly hidden around the room disguised as ordinary attendees. No one is safe.

This is basically a lighting version of "Whose Line is it, Anyway?" with a focus on improvisational lighting based on available gear, the room, found objects, lighting mods, etc. We will be in an actual studio, which for me will be a little strange. Normally, I am used to hotel conference rooms with built-in bad lighting and a half-dead ficus plant.

I never know what ideas we will come up with, which is what keeps me equal parts interested in (and petrified of) the afternoon session. It's a good thing.

Shortly after each shoot, we will view each setup and discuss the results onscreen. This instant feedback in a group environment is a wonderfully efficient way to drive home the thought and technique process. We can read and write all we want. But for photographers there is nothing better than "monkey see, money do."

The goal will be to incorporate lighting theory, room environment, assignment constraints and our available gear to create a photo that seeks to produce an photograph that is an appropriate response to our situation.

Working within that framework will allow us to concentrate on better freeing ourselves in the other areas: Creativity and subject/photographer interaction.

The entire day will be a non-stop flow of ideas and techniques, punctuated by spur-of-the-moment Q-and-A. I want you to bring lots of questions, and to feel free to voice the ones that pop into your head throughout the day. In fact, if you do not ask me enough questions, I will start throwing some questions at you.

You might want to bring a notebook and pen. (I will have a URL to download the presentation, so you can skip the copy-everything-on-the-screen thing.) And bring a camera if you want to shoot the setups as a visual reference. And dress is optional extremely casual, so you won't feel out of place if I show up in shorts. Hey, it has happened before.

As with my philosophy for the website there will be no secrets and no posturing. This stuff is not rocket science. It's light. And the first step in learning to light is to realize that anyone can get very good at it.

We will plan to wrap up at about 4:00. I have to tear down and be out of there by 5:00, or they will shoot me, stuff me and use me as a prop for future shoots. But there is no reason we could not head someplace nearby and keep the conversation going. I have heard they have beer in NYC, too. We could find out.

If, for some reason, you require a cancellation after booking, refunds will be granted up until July 9th. After that time, you would be responsible for transferring your seat to another attendee.

Very Important: If, through events beyond my control, I am unable to present this seminar, refunds will be limited to the ticket price. I have already booked the hotel room in advance, so I do not anticipate this happening. But I just wanted to cover all of the bases, in case I get run over by a bus tomorrow, one of those Big Macs finally catches up to me or Missus Strobist finds out about the new D3 and kills me.

Bases covered, I have to say that I am very much looking forward to this trip and especially to meeting many of you. As I do more of these seminars, I find that each session develops a vibe of its own. You put a few dozen photographers who are all eager to learn in a room, and what starts out as a simple stack of talking points turns into a rich, organic discussion that ends with everyone - including me - having a head swimming with new ideas.


How to Go for FREE:

Wanna go for free, and go out shooting the day before? One seat has already been reserved.

All you need is access to something that might make a good shoot in NYC on July 18th. I am in town and looking for something fun to light and shoot. Whoever ends up coming up with the best shoot idea for Friday will also attend on Saturday for free.

NOTE: You must have both access and permission for us to shoot.

Scroll down in this post for details on how to suggest a Stone Soup shoot and a link to the Flickr thread for the suggestions.

NOTE: If you successfully register for Saturday and you come up with the top suggestion for Friday, your payment for Saturday will be refunded.


Feedback from Previous Seminars

London:
Post-seminar thread | Extended report

Seattle:
Post-seminar thread | Extended report

Paris:
Post-seminar thread | Extended report

Silicon Valley:

Extended report I | Extended report II

__________________________


Registration Details

The cost for the seminar is $159.00. To register (with any major credit card) please click on the link at the bottom of the post, which will take you to PayPal. A PayPal account is not required to register.

IMPORTANT: If you are in the process of registering and the seminar sells out, your fee will be refunded by the end of the day -- usually within the hour.

Please leave your name and phone number (and a working email if different from the PayPal address) in the info box on the PayPal page, in case I should need to contact you.

I look forward to seeing you there. The discussion thread for this seminar is here.


(The 7/19/08 NYC Lighting Seminar is sold out.)

Thursday, June 19, 2008

High-Speed + High Power = External Battery

UPDATE: Someone dropped a pretty good test of various relative battery recycle performance times into the comments of this post.
_________

I prefer using Ni-MH batteries in my speedlights. Especially the "pre-charged" ones, because they hold their charge for much longer between uses.

They do a full-power recharge in less than four seconds in most flashes, which means that at, say, 1/4 power, you can shoot away with almost no regard for recycle time. As long as you are averaging about one shot a second, you are fine for moderate bursts.

But what if you want to shoot fast at 1/2 -- or full -- power?

I am a big fan of the Lumedyne rechargeable, high-voltage battery packs. They are not cheap, but they give you the ability to shoot quickly when you need to on higher power settings.

They can charge your flash in as little as 0.7(!) seconds for a full-manual power shot. If you are shooting in fluid situations, and your paycheck depends on those flashes being ready, they are worth their weight in gold.

But you have to be careful -- these batts can deliver enough manual flashes, quickly, to overheat your flash. So work in bursts -- don't just turn on the garden hose or you will pay the price.

The Lumy's I have used (since back when the earth was still cooling) are big and clunky compared to the sleek little ones they have out now. Lumedyne has started a video channel on YouTube, and one of the videos gives a basic run-through on their new, smaller "cyclers".


To use these (or any other hi-voltage batt packs) your flash needs to have a high-voltage socket. I do not use them very often (not shooting to much hoops these days). But when you need them, they are golden.

Related:

:: Lumedyne YouTube Channel ::
:: Lumedyne Cyclers Info ::


-30-

Tuesday, June 17, 2008

DINFOS Pt. 2: Flash in the Pan

Peer pressure can a dangerous thing.

Normally, I am a manual flash kind of guy. But you hang out long enough with McNally and a bunch of CLS'ing DINFOS shooters, you start to feel the itch to experiment a little...

So, here we were earlier this month in the woods learning all this lighting stuff from McNally. All of the DINFOS folks are firing away like Joe with their lights on full CLS auto, and I am sticking with my manual techniques.

The time seemed as good as any to experiment, so I grabbed one of the Combat Camera folks who was dressed for he occasion, and asked if I could do a shot while moving through the woods.

CLS takes a lot of the head-scratching out of this kind of shot and really makes it pretty easy. All you really need to remember is to choose your shutter speed based on the amount of pan you want while walking through the woods.

For this look, I chose 1/15th of a second simply because it looked best on the chimp screen after a few quick test shots. Set at ISO 200, that shutter speed gave me an aperture of f/16 for saturated color in the woods.

I set the on-camera flash (an SB-800) to act as a Master, and pointed it towards the remote flash. That flash would be moving along with Robert, my subject, as it was being held by a voice-activated light stand named Matt.

The flash's exposure worked fine on straight TTL, but it would also have been very easy to do on manual. You just choose a flash-to-subject distance, and dial in a power setting that gives you f/16 at ISO 200. As long as you do not vary that distance too much, you'll be fine.


The trick to positioning is to move that flash around a little past a straight profile shot -- slightly rim-lit. Looks a lot better that way. I have exaggerated the diagram a bit to make the point.

Everything moves together -- subject, photographer and light. You just follow along and shoot, with the strobe helping to add both light and a sharp anchor to your pan. I chose this one because a tree trunk was behind his head which made him pop even more. You do not even have to look through the camera with a wide-angle lens. Just zone focus, and aim from the hip. That way, you can keep yourself form running into a tree.

Here is a setup shot -- basically a one-light studio on wheels:


The cool thing this is is just how quick and easy it was to set up. We did just one trip down and one trip back. Just 30 yards or so each way. Soup to nuts, it was about two minutes -- and we had several good shots to choose from.


Honestly, it's so much easier than it might look at first that it is almost criminal. This is a technique I have been tumbling around in my mind for quite a while now. As you can see at left, there's no reason your VAL would have to actually hold a flash, either.

This way their concentration could lay elsewhere. Like not running into a tree.


You could even work up a two-light setup for road bikers or runners, too. If you were shooting manual, you'd just want to keep those distances relatively constant.

Using the added light helps to shape and define your subject in a moving situation. And as you can see, it will also make the critical parts of your pan shot are tack sharp.

Just remember your flash balancing basics: Shooting into the brightest part of the ambient helps to avoid ghosting, and gives the most control over your range of ambient-to-flash ratios.

Announcing: Shoot! The Day, New York Lighting Seminar and Strobist Stone Soup

Lotta stuff in this one, but it is all tied together. You'll especially wanna make the jump if you live near NYC. But there is also lots for the other folks, as well.
________


Shoot! The Day and School of Stock

The PhotoShelter guys have been whipping up something really cool, and I am very happy to be involved with it.

Basically, they have spent the last several months researching what, exactly, photo buyers are looking for right now. Then they have distilled this info (and much more) down into an online resource called School of Stock.

If you are even remotely interested in shooting for stock (RF, RM or micro) this is fantastic stuff. There are tutorials both from the perspectives of buyers and successful shooters. I read through them all last night, and it's really good info.

Having identified under-served areas in the stock libraries ('cause, you know, that's where the money is) and created a how-to-shoot-better-stock school, they are orchestrating a mass, one-day shooting event. It's called Shoot! The Day, and it is happening on July 20th.

In S!TD, people from around the world will be shooting in teams to create exactly the types and genres of photos that thousands of buyers are looking for. No one has ever done anything like this before on such a scale. And for those of you looking to get into shooting stock there could not be a better opportunity.

Groups are forming up based in various cities around the world. All you have to do is register for the PhotoShelter Collection (free) and the Ning-powered forums (fora? - also free) where the groups are organizing. There will already be geographically-based groups signed up. If you see one form your area, join up. If not, start one.

There are prizes involved for the really kickin' groups, too. And I would suspect you guys will be well-represented.

If you are local to NYC, there are some cool events happening there, too. I will be teaching, along with several other photogs. You have to apply to be selected (by portfolio) to participate in one of the free classes, which are structured around various themes. I am teaching a still life class, likely because Grover has seen my craptastic follow-focusing skilz.


New York Strobist Lighting Seminar: Sat, July 19th

Seeing as I will be in NYC for the S!TD, time for another lighting seminar.

We'll be at ShootDigital on Saturday July 19th. It will be a similar format as the previous seminars (although hopefully not as hot as in Dubai).

Registration will open on this site at 10:00 a.m. (Eastern Time) on Sunday, June 22nd. Please do not call Shoot Digital for more info - it will all be right here. This one will probably sell out pretty quickly, so I'd be on it ASAP if you want to attend. Dress is ridiculously casual.


School of Rock: Strobist Stone Soup

I am almost mad at myself that I did not think of this idea sooner. I am heading up to NYC on the 17th, in advance of the seminar and S!TD. Therefore, I have one free day in NYC. (Don't tell Missus Strobist, please...)

Stone Soup is a play on the old folk tale, wherein someone comes to town and facilitates something of value happening by cobbling together something from nothing.

I am looking to shoot something while in NYC on Friday, July 18th. And reading this post, I presume, are some people with some cool connections in NYC.

Hmm... what could we do?

Here is what I offer: A one-on-one shoot in which you assist, and we make some cool photos in an environment in which you have access. I provide the shoot, you provide the idea/access, and your contact/connection/etc., provides the subject matter.

Are you a firefighter? Are you in an acting troupe? Is your roommate a mime? Or have a pet albino tiger? I dunno -- you tell me.

Let see what comes in, and I will choose a shoot for Friday, July 18th - time is variable. Figure a couple of hours at the most appropriate time for all involved. We get to shoot and learn, and the subject gets use of the hi-res photos for whatever means they wish, except for third party commercial use.

Use it for the wall? Fine. Publicity? No prob. Website? Cool. Annual report? Yep. Give to Nike for an ad campaign? Um, have them call me on that one.

Who knows - we might get something interesting. Only way to tell is to try. And I hope that this will be a model for others doing this kind of thing, ad hoc, as a way to bring photographers and subjects together.

If it works, I will be doing a write-up on it and putting days aside for repeating this idea on future trips. If not, we'll just pretend it never happened. If you have an idea to throw out, do it here.

Let's see what comes in.

And please, don't stick the stone soup suggestions in the comments of this post. Using Flickr makes it open, and gives me a way to contact you. It is fast (and free) to sign up.

Monday, June 16, 2008

Coming Soon: New AlienBees Wireless Triggers

This snuck up on me from left field: Paul C. Buff is about to cut the cord.

He is redesigning his wireless remotes with some added features, including a receiver that is battery powered. The current version has a batt-powered xmitter and an AC receiver. He's calling it the CyberSync.

Lotsa cool features, for notta lotta dough. Specs, links and another photo, after the jump.
_________


Shown at top is the transmitter, with the receiver shown at left. At first glance, these look like a very good mid-range entry to sit between the Pocket Wizards and the Ebay remotes.

They do not have the range of the industry-standard Pocket Wizards, but they only cost about a third as much for the set. And yes, they are more expensive than the Ebay remotes. But you also have to take into account the cost of ammo in the event they fail you on an important shoot and make you want to eat a gun...


Highlights From the Specs Page

• 2.4 GHz band, with a "high degree of error security" for more reliable tripping.

One year(!) battery life for the transmitter.

• Usable range of up to 400 feet, depending on terrain.

• Receiver operates on AA's, with 200-hour battery life, which is further extended by an "auto shutoff" function.

• Receivers ship with the following cords: 3.5mm-to-3.5mm, 3.5mm-to-1/4" adapter and 3.5MM to PC (which will connect it directly to an Nikon SB speedlight with a PC jack.)

• Best yet, the price: $59.95 for the transmitter and $69.95 for the receiver.


Paul Buff has a decades-long reputation for building quality gear at very good prices. I imagine the CyberSyncs will be no exception. Transmitters and AC receivers are shipping now, with battery-powered receivers anticipated later this month.

More info is available at the AlienBees website.

(Thanks to the anonymous tipster in the comments!)

Saturday, June 14, 2008

A Father's Day Reminder: Shoot Your Kids

Long-time viewers of this site will likely be familiar with San Francisco-based reader Jason Lee's long-term project photographing his two daughters, Kristin and Kayla.

If you're not, you are in for a treat. Hit the jump for some of his work, links to more and some thoughts on his project.
________


One of the best things about running this site is seeing all of the wonderfully creative family photos that come upstream. But I'd be hard pressed to find an example better than Jason's. He is embracing the concept of fatherhood with his camera, and I admire him for it.

He has spent the last few years documenting his kids with photos that are beautiful, funny, whimsical and poignant. Dinnertime, sick days, water fights, Christmas -- anything is fair game for one of Jason's photos. Or a little after-the-fact fun with Photoshop to whip up an illustration.


He shoots them, throws them up onto Flickr, and frequently adds a pithy title. (At left: "Kay-Wi").

Having a long-term project is the best possible engine for an endless series of ideas and opportunities to make photos and grow as a photographer. And what better project than your kids?

Forgetting for a moment that they are always around and are supposed to do whatever you order them to do, how valuable would a shoe box full of these kinds of photos be to you in twenty years?

And a few years later, how cool for their kids to curl up on the couch and look at photos of mom we she was little?

But the benefits don't stop there. As a shooter, the experience you gain from shooting regularly just makes you that much better. Little secret: Much of what separates the pro photos from those of amateurs is simply the built-in advantage we have from getting to shoot nearly every day.

Not only does Jason get to play with his cameras and lights all the time, but he doesn't even catch (too much) flack from mom for it. How could she, with a family album like this?

Jason shoots for other people, too. The photos on his portfolio site are beautiful. But he also points people to his two blogs -- one devoted to his work and the other to photographs of his daughters.

My guess is, the personal blog gets him as many wedding gigs as the wedding shots do. I'd sure hire him.

I caught up with Jason via an email Q and A this week and he was good enough to share some thoughts on his photo project.

_____________


Have you always been a small-flash lighting photographer, or is this something you have moved into more recently?

I guess I've always been a small flash photographer. It started with seeing the amazing work coming from Dave Black and what he was able to achieve with his SB's. I picked up my first speedlite (Canon 550EX) and an off camera shoe cord in 2003 and I've never looked at flash the same way again. My bank account never looked the same again as well.

I've experimented with mono-lights in the past but I always found myself coming back to small and portable speedlites. I haven't had the requirement for the big lights yet, so I'm still sticking with the speedlites for now. OK, who am I kidding.........my wife won't let me spend money on profoto equipment and my kids need to eat so the big lights have been put on the back burner. 


When did you get the idea to make your daughters an ongoing, themed project, and what is your goal with the photos?

I started the project of documenting my children for a very special person in my life, my mother. She was diagnosed with non Hodgkin's lymphoma in 2006 and I wanted her to be able to 'see' the kids without the risk of the little germ buckets getting her sick. If I can get her to smile or laugh at one of my images, I've reached my goal. If I can get a smile or laugh from some random viewer, that's just icing on the cake. This project has also made me re-evaluate my photography goals, and I'm hoping in the near future I can bring a smile or some laughter to other peoples lives through photos of their children. 


How do they react to being photographed in such a sophisticated way?

Well, it really depends on the shoot. I try to set up everything beforehand so the actual shooting only takes a few minutes. At their ages, that's all you can really hold their attention for. Also, I try to incorporate something that they find fun or interesting, so they are always involved in the shoot. Cheerios and Goldfish crackers help too. 


You shoot weddings -- and very well, I might add. Has the experience of shooting your daughters on an ongoing basis changed the way you shoot your other assignments?

Most definitely. This project has really taught me to look at light, both natural and artificial in a whole new 'light'. Although my current wedding work is not exactly flash intensive, I am starting to incorporate more and more off camera lighting.

Also, seeing folks like Ed Pingol and Matt Adcock rocking the small lights at weddings has really changed my perspective.


How does their mom feel about the photos? What do their friends' parents think? Do you get requests to do those kinds of photos for other people?

My wife looks at some of my images and shakes her head and says, "Did you really do that? I hope that was Photoshop!" In all seriousness, she has been really supportive of my project and even helps out sometimes, but Cheerios and Goldfish don't work as well with her. So far, I've received very positive feedback on my work and I believe there is a definite market out there for this niche. 

I've had requests for these types of stylized shots in the past but turned them down for various reasons. In the recent months, more requests have been coming through and I've been revisiting this as something I'd like to offer, so we'll see. 


What advice would you offer photographers who want to start long-term projects of their kids?

Start shooting them as young as possible. Get them involved in the whole photography process. Make it fun for them as well as for you. Stay fresh, and have an open mind for ideas.

Oh, and stock up on Cheerios and Goldfish. 

__________

Related Links:

:: Jason's Website ::
:: Jason's Flick Stream ::
:: Photo Set: Kristin ::
:: Photo Set: Kayla ::
:: Photo Set: Sisters ::
:: Dave Black: Workshop at The Ranch ::

Friday, June 13, 2008

Golf Digest: Behind the Scenes Shoot

Thanks to a tip in the Flickr threads I was able to catch this behind-the-scenes video done by Golf Digest during a recent shoot of Annika Sorenstam. I love these kinds of things, as there are always tidbits to be learned from watching other photographers work.

A little Googling (with a helpful assist from Golf Digest DoP Christian Iooss) hooked me up with one of the shooters, who was kind enough to expand a little on the lighting techniques. Links (heh) and details after the jump.
____________


The movie is not coded for embedding, so click here (or on any thumbnail image) to pull it up in a separate window.

The shooters are Stephen Szurlej and J.D. Cuban, and they have their work cut out for them. Here's the deal: You only get access to people like Sorenstam for brief amounts of time. And the magazine runs tips from her on a regular basis, so they need photos for each of those installments.

"Quick and simple is what we're trying to achieve," Stephen told me in a recent email. "When you've got Tiger or Annika for a couple of hours and the goal is to shoot every instruction tip or story for a years worth of issues, you've got to be fast.  If you can get it done in a bit less than the allotted, time the players are pleased, and it goes that much easier the next time."

Eighteen shoots in 2 hours. Do the math: That's an average of six minutes and forty seconds per shoot, including lighting setup and moving to the next location. And you thought Annie and The Queen had it rough. (Annie got an average of 7.5 minutes...)


Looking at the tape, the second thing you might notice after the torrid pace is that they are using two battery powered studio-level strobes - one in a soft box and one with a large, gridded reflector. The soft box is feathered way up, which gets soft light to the subject without blowing out the grass in the foreground.

For most of the shoots, the soft box is at camera right, with the other light at back camera left as a separation light. And the sun is coming from directly behind the shooter, making it essentially and on-camera light. But that does not tell us what the photos will look like, merely because you can get drastically different looks from the same lighting setups by varying the ratios between the lights and the ambient.


One Setup, Several Looks

Take a moment to visualize a couple of different looks that would be possible from this lighting scheme. Say you are exposing for the ambient light. In that case you might drop the flashes down in intensity and use them as a crosslighting/fill setup. This would lessen your shadows and bring the tonal range of the scene into the range the camera's chip can easily handle.

Or, you might drop that ambient a stop or two to bring it down to the level of fill light. Then pump the scene back up with the feathered soft box and create a stark rim light with the gridded reflector. Two very different looks, just by altering power levels (and/or aperture and shutter speed.)

So, which did Stephen and J.D. do? Neither, as it turns out.

"We're using the main light as a fill to eliminate the shadows, trying for a pretty flat lighting," Stephen says. "If anything, we do underexpose the ambient -- just a bit, 1/3 to 1/2 of a stop. But the flash/daylight is pretty balanced."

What? All this setup just to make flat lighting? Why go to all of the trouble?

Simple. For a series like this, the most important thing is to make sure you get easily readable detail everywhere. This is not the cover, where you would want to create drama and a look to sell magazines on the racks. This is teaching. And more important than the feel of the photos is that they be extremely legible for those would actually like to learn what Ms. Sorenstam is trying to teach them.

Besides, when you are working so quickly, you are only gonna take a few frames of each setup. You need legibility on every frame, to further ensure that all 18 shoots will work.

"We have two lighting setups in the ready position," Stephen continues. "So as I finish, Annika walks over to JD's set up and the shooting is nearly continuous. Meanwhile, I relocate to the next location and set up while JD is shooting his tip or instruction story. I'm ready to go again when he finishes. Kind of aerobic leap frogging photography."

About a third of the way into the video, Stephen nails a bunker shot on the first attempt. He credits this kind of thing to a mixture of luck and experience. But then, he's been shooting golf since back when they made the balls out of wood.

So he's got that going for him, which is nice.

"Timing with digital cameras is still harder than film cameras," Stephen said. "I look back at images I shot on film, no chimping, and the ball is on the club more often with fewer takes. I definitely have a lower percentage on the club with digital. Of course, the fact that I'm shooting at 1/320th of a sec hurts maybe even more than the digital shutter lag. Back in the film days we most often used reflectors, not strobe."


Cover: Same Lights, Different Look

On less hectic days, they are able to work the light to get more of a look. "If we're doing just one location," Stephen says, "we have the luxury of using a 12X12 silk for a better look. But we just can't do that in this type of shoot. For a cover, yes."

Having enough watt seconds to own full daylight gives you options, no doubt about it.

This week, Stephen is busy humping long glass at Torrey Pines in San Diego, the site of this year's U.S. Open. So while you get to sit in the living room watching Tiger pick up his trophy on Sunday, you can feel sorry for Stephen -- all that walking around, inside the ropes...
___________

Further reading:

Golf Digest cover shoot: Slideshow

More Bounce to the Ounce

Pop Quiz: Where is lighting control gear manufacturer California Sunbounce located?

Germany, of course.

Geographic inconsistencies aside, please join me in welcoming them as a new sponsor. (NOTE: Some of the videos on their site might not be work safe for many.)

-30-

Tuesday, June 10, 2008

Speedlinks, June 11, 2008

It's been forever since we did one of these, and I had a bunch of cool stuff pop up this week. So here goes:


• What? You haven't pimped your McNally yet? Me, neither. But I think I'm gonna. (Note to Annie: Please actually read the post before jumping to any naughty conclusions...)

• Live near Denver? Now you can get your small-flash learn on in person with Dave Tejada.

• Scott Kelby takes you on a tour of photo permit purgatory.

• Lighten up, Frances: Check out Zack "OneLight" Arias' excellent series of white background tutorials. Dude gets the Apple reflection look with a $10.97 Home Depot panel -- gotta love that. Great series, Zack.

• Is your dad hideous? Give him a Father's Day makeover with lighting tricks...

-30-

Monday, June 9, 2008

DINFOS: Pt. 1

Last week I was helping out at DINFOS, (Defense Information School) where they were holding the Worldwide Military Photography Workshop. Joe McNally has been involved in it for quite a while. (I am a fnugy, with this being only my second year.)

I'll defer to his description of the event and it various characters. He also posted several shots from the week and a rogues' gallery of many of the teachers, so I won't dupe that.

What I'll be doing over the next coupla weeks is to throw up a few photos, with OA-style walk-throughs, lighting diagrams and/or setup shots. Mine are all pretty simple setups, using just one or two speedlights.

Joe, of course, did most of his with 472 Nikon SB-800s, running his SU-800 CLS controller through one of the signal amplifiers at the nearby NSA (also known as "No Such Agency") for a little boost. That guy has some serious contacts.

This week's picture and walk-through, after the jump.
__________


The first photo is from a day in which we went out into the woods with some of the folks from Combat Camera , who graciously agreed were ordered to show up in full gear.

Hanging out in the woods near the firing range and obstacle course were the members of this year's Advanced Lighting Team. Being on the ALT means you spend a week learning about small-flash, location lighting from industry leaders like Joe McNally, and posers like me. Week-long class size: Six people.

It's really a fantastic deal, all the more so when you realize there is no tuition involved. On behalf of Ray, Bobby, Matt, Larry, Trav and Luke, I would like to offer a hearty "thank you" to those readers who are also US taxpayers from the 2008 ALT. (That's them lighting themselves at the top of the post, in a hastily produced group shot in the hallway outside of our classroom.)

As everybody was unpacking gear and talking about how to best handle the ugly, splotchy, midday sun-through-woods light we had, I threw a couple of SB-800s onto stands. I set them on 1/4 power and turned on their built-in slaves, which is a pretty standard preset for me when working against bright sunlight.

Within a few minutes, the Combat Camera folks were getting their camo paint applied, and most of us were making photos of that. Basically, think Strobist meetup, with Joe and I joining in, and a bunch of cool subjects in the woods.

Most of the ALT members worked mobile, using a single, hand-held SB-800 in CLS wireless TTL mode. So I just stuck my stands behind them, and eyeballed the subjects from the flash positions. That shows me what the flashes will see -- and light. I wanted profile lighting from front and back, but a little behind the subjects to make interesting shadows. in the foreground.


So, here's a diagram of the setup. In direct mode at ASA 200, my SB's are gonna give me plenty of aperture to work with at a ~6-foot light-to-subject range. You can expect about f/16, depending on the zoom setting of the flash. If you are not familiar with what your flashes will do in a situation like this, you may want to look at the posts on guide number and/or making a cheat sheet.

So, the light coming through the trees is of the ugly, early afternoon variety. But that's good, as it will be at a high enough angle to not screw me up when I am lighting their faces. To help matters more, I shoot from the direction that will keep the sunlight in a high-backlight mode. If it pops out, it's just another rim light to me. If not, that's fine, too.

For sync, I am going straight optical and manual -- using the SB's built-in slaves. I point the receiver windows of the flashes toward each other, and point a show-mount flash (low, manual power) towards whichever flash is closest. The other flash will see it and fire every time, easy.

As far as camera settings, the actual aperture and shutter settings are variable in a situation like this, depending on the ambient and the flash distance. And to be honest, I neither remember them now, nor considered them very important then. More important is the thought process -- it is more repeatable for a wider variety of situations.

Let's say for the sake of argument that the flash is giving me f/16 at that distance. That's a constant at ISO 200. If I need more, I will need to power up the flash, or move it forward towards the subject. And vice versa if I need less. I like being at 1/4 power, as it give me nice, fast recycles and the ability to double-tap. (See? That military stuff is wearing off on me already.)

So, at f/16, I am going to have an easy time with my shutter in open shade. Good thing, because that is the next step. I plug f/16 into my camera and chimp a couple frames until I find a nice, slightly underexposed ambient level. Maybe a stop down, maybe a little more. The shadows are way below that, which gives me good dark areas to light against. For the sake of argument that we are now at 1/160th of a sec.

The shutter speed and aperture are not what is important. The amount that we are underexposing the ambient is what is important, as that is what will determine the depth of the shadows. I used the back, camera right strobe (not visible on my foreground subject) to make sure I could separate any subject from my ambient background on both sides. This allows me to drop those shadows further if I want.


In-Camera Tweaking

Now that we have the settings in the ballpark, start shooting. Take a frame or two and quickly chimp for any final adjustments.

• Flash too bright or dark? Vary the aperture to fix it. Then adjust the shutter in the opposite direction to bring the background back to where you were.

• Background too bright or dark? Adjust that with the shutter speed.

• Entire photo too bright or dark? Adjust it all at once with the aperture.

This might sound a little daunting if you have not tried it. But trust me, it is quick and easy once you have a little experience. And most of you can probably run through you aperture and shutter settings without taking your eye off the viewfinder. Not so, those CLS buttons. For me, at least.

BTW, for those of you who are into TTL/CLS, Joe just posted a new training video at Kelby Training. It is quite good (I actually watched it twice) and more on the advanced side than the first two classes he put up. And make sure you catch his post on the DINFOS stuff, to see what was done in the woods with five Combat Camera subjects, a mess of SB's and only ten minutes to do the photo.

Next up from DINFOS will l be going mobile -- shooting flash blur on the run (okay, fast walk) using a moving VAL.
________


Related Reading:

:: McNally's Post ::
:: SB-800 - Built-In Slave mode ::
:: 55th Combat Camera Company ::
:: Guide Number, Your Free Flashmeter ::
:: Make a Cheat Sheet for your Flash ::
:: Kelby Training: Joe McNally ::

Friday, June 6, 2008

Podcasting on Benadryl


Bill and Ed have just posted an interview we did last week for LightSource.

Bear in mind that this is allergy season for me. So no, that is not what I normally sound like. Also bear in mind that I had a pretty good shot of Benadryl in my system. So I'll be surprised if any of it is coherent. Props to both of them for putting up with me.

If you can get through that, you can listen to the interview here. And don't stop there -- they have a whole mess of lighting talk to fill up your iPod with over at LightSource.

I am listening to episode 64, with Tim Tadder, right now. Good stuff.

(NOTE TO SELF: Next time you do a podcast in May, just put a clothespin on your nose and be done with it.)

-30-

Share

Twitter Delicious Facebook Digg Stumbleupon Favorites More