Saturday, June 17, 2006

Mo' Bounce to da Ounce

That "Cabbage Patch Doll" of the lighting umbrella world, the Westcott 43" Double-Fold Soft Silver, is starting to show up as back in stock at various retailers. Whether that situation lasts is, of course, a different matter.

I say we just mount a hostile takeover of the company (how big can they be?) and start running the production lines 24/7. Double-fold umbrellas for everybody.

Who's with me?

Friday, June 16, 2006

Monsterpod With a Strobist Mod

I am apparently asleep at the wheel. The "Monsterpod" is making the rounds on the photo websites and I only saw it thanks to a heads-up from an Alert Reader.

It basically a big, $30 glop of something red and (apparently) very high tech. I won't tell you what it reminded by 5-year-old boy of. But suffice to say I hope it is not made of, uh, anything that rhymes with "sugar." It sticks to darn near anything well enough to hold a small digital camera (thanks to the integrated 1/4 x 20 screw head.)

Why would I care about a red-gloppy-digicam-sort-of-tripod? Because if it'll hold a small camera, I'm thinking it'll hold a Nikon SB-800 speedlight.

You start to see the possibilities here?

Head on over to the Monsterpod website if you want to know more.

(Thanks, Mark!)

UPDATE: Click here to see a very interesting production report from China, along with photos of the new, ready-for-prime time version of the Monsterpod. They have also apparently upped the weight limit to well above that of a typical shoe-mount speedlight, and are going to offer a slaved hot shoe adapter, to boot. Schwing.

SECOND UPDATE: Good news/Bad news:

Good news: These are now available at retail.

Bad news: Rob Galbraith did some tests and found they are not very reliable for holding flashes, in that they tend to drop them.

Thursday, June 15, 2006

Developing an Idea, Part One

Even though you guys are off shooting your Boot Camp headshots, I am going to try to shoehorn something else into your brain as an exercise in learning to be a thinking photographer. After all, you have loads of free time on your hands, right?

With the On Assignment post on Ant Upton's Paris soccer shot, I included a lot of color about the process he went through to fine tune and then nail his photo. Today, I want to take that concept a little further.

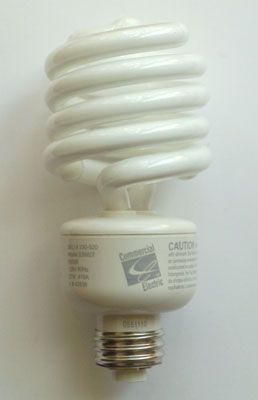
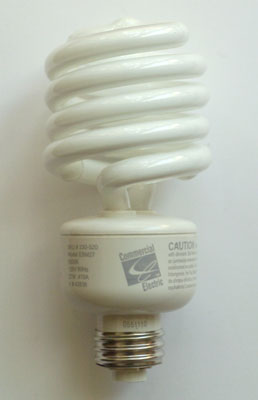
If you will remember back when we made the DIY macro strip lights, I said that I was planning what was (for me) a relatively difficult close-up shot. As it turns out, the photo was to be of a compact fluorescent bulb, or CFL, as seen above. Note that this is not the final photo. (Hey, give me a little more credit than that...)

I am throwing this up today to try to introduce you to the idea of the long-range fermenting process that can yield a high-impact photo. The idea it to let it pickle in your brain until you are ready to shoot it. Long-range thinking is quite different than a 20-minute brainstorming session. For me, it is the only way to get around some of the engineering "curve balls" a more complex photo can present.

But, before that, this:

Incandescent light bulbs are positively neanderthal in their energy consumption. A 60-watt light bulb is denoted as such because it uses, continuously, 60 watts of electricity to produce light. The light itself is measured in lumens, not watts.

A typical CFL will put out the same number of lumens as a 60-watt incandescent bulb, but only use about 14 watts. Given that about 30% of the average household electric bill (and energy usage) comes from lighting - if you use incandescents - you can see what a difference reducing that portion of your consumption by 77% can make.

Want to know more? Look here, here and here. Some countries are even considering dumping all of the incandescents. Not a terrible idea, IMO.

We are all going there eventually. It makes too much sense not to. And after that, LED array bulbs are on the horizon (already available but still very expensive) that can light your whole house for less than then energy consumed by a 60-watt old-style bulb. Sweet.

That's the good news. The bad news is that, for us photogs, the day of the "30cc-green," standard fluorescent are going away. These CFLs are all over the map, color-wise. You'll have to white-balance and pray. Or gel your flash with a CTO and go with the tungsten setting for white balance, which will get you pretty close on color.

And speaking of color, some of the new CFL's are flippin' gorgeous. You just have to try them out until you find one you like. In the USA, try Home Depot's "Consumer Electric" bulbs. They are only $10 for 6 bulbs in a multi-pack. I have changed over my whole house, and do not miss the tungstens one bit. And, as you might imagine, I am pretty picky when it comes to the quality of light.

OK, the sermon's over. You can wake up now. Back to the long-range, percolating idea thing.

In presenting the story on the benefits of CFL's, I wanted to make a stopper of a photo. The money/energy savings are stunning, so I wanted the picture to grab the reader to make him/her soak in the numbers.
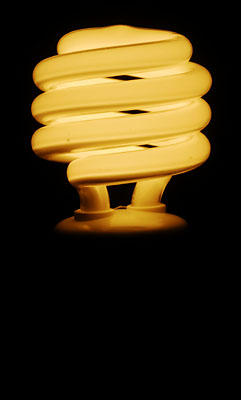
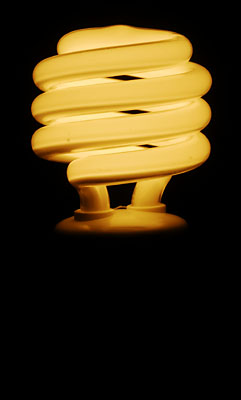
Here is a shot, stopped way down, of a lit bulb in a fixture. You can see that (a) they really are getting pretty close to tungsten, and (b) this CFL really takes on a lovely, neon-sculpture look when exposed as an internally-lit object instead of used as a light source.

This little grab shot in my basement laundry room got me thinking. Given that you can use fill flash to compress the tonal range of a sunny day (filling in dark shadows) could you use flash to compress the tonal range of the lit and unlit portions of the light bulb?

Sure you could.

But look at the light again (up top.) It's white, shiny, filled with complex, convex curves. It is gonna pick up any strobe fired near it. And the strobe-lit, white bulb parts will then be contaminated with frontal strobe light, which will ruin the internally lit color intensity that drew me to the shot in the first place.

Then, we will of course want the bulb turned on for the photo. So choosing the lamp will be important, too. Or not, as the case may be.

Over the course of a few weeks I let the shot turn over in the back of my mind. One by one, I came up with solutions for the problems. Some solutions worked right away. And some ideas needed to be revised when I actually tried them. But by stretching out the problem-solving process, one complex problem morphed into a series of very solvable smaller problems. It is a very organic and satisfying experience, and a process I highly recommend trying.

It is important to note that I had the time to think because the proposal was mine. I did not even present it to an editor until I had my shot worked out. That's a good way to control your timetable if you are typically rushed with the illustrative ideas at your own publication. When I presented the idea in its final form, it was an easy sell.

So, if you are up for some mental gymnastics, take three or four days to mull the hurdles over in your mind and figure out how you might shoot it. As a reality check, I ended up using about $5 worth of items bought (all at a hardware store) specifically for the shoot. I also used three small Nikon speedlights (2 SB-26's and an SB-800) to light it. Nothing fancy, and all done in my living room.

In the end I was particularly pleased with the result, which I will post in a few days. At that point, I'll go through how the problems were solved and go into detail on the light.

Feel free to think out loud in the comments section in the interim.
__________

Next: Pt. 2: Final Shot and Setup Photos

Tuesday, June 13, 2006

Strobist Boot Camp: Rules, Guidelines and First Assignment

Editor's note: Lots of questions and answers already popping up in the comments section. Click "comments" at the bottom of the post, or pull up the permalink here and scroll down.

Welcome to Strobist's first-ever Boot Camp! It starts now. This is where you make the transition from "talking the talk" to "walking the walk."

The main point of SBC is to nudge those photographers out there who have not made the transition to actually trying this lighting stuff out to make the jump. Secondarily, we will hopefully all get a chance to see what many different photogs - from all around the world - do with the exact same assignments. You'll also be able to ask "how'd you do that?" questions to your fellow photographers. Using Flickr, we will effectively become a virtual classroom.

I'm not sure this has ever been done before. In fact, I am pretty sure that it hasn't. Heck, this blog has broken just about every blogging rule there is - "brevity" comes to mind - so we'll find out what happens together.

If you are one of those people hoping to make the transition from advanced amateur to pro, this will give you a little bit of valuable experience and some inside knowledge you otherwise would have to find out by trial and error. Mostly the latter.

If you are a straight amateur, this might be the closest thing you'll ever get to a pro experience.

There will be the normal other stuff going on here, too. Just because you are learning to light does not mean that the rest of the world stops. So when this post falls off of the front page, I will put a link up on the sidebar so you can get to it.

Here are the rules:

1) You will declare yourself as a Pro or an Amateur. I don't want a bunch of amateurs to be intimidated by the work of some hotshot without knowing that he/she is a professional. And if you are a pro, you should expect to answer a few questions about your photos from the rookies. For our purposes, if you earn more than 5% of your income from shooting photos in any way, consider yourself a pro. We are on the honor system here. But if you call yourself an amateur and look suspiciously good, I will Google your butt to check you out.

2) You will have to be a member of Flickr and the Flickr Strobist Group to turn in your photos. So if you haven't done that, get on it. It's free. If you need directions, check here.

3) You may turn in only one final photo per assignment. The way you turn it in is to stick it in the Flickr Strobist Pool and tag it as instructed. If you turn in a photo early, and improve it on a subsequent shoot, it is easy to pull the inferior one by simply pulling the tag off. It'll stay in the pool but it will not come up when we search the assignment tags. Simple as that. It's all pretty self-explanatory. Just make sure you end up with only one photo per assignment. NOTE: If you have questions about how to do this, ask it in the Strobist discussion section on Flickr. DO NOT e-mail me with it. I cannot walk 100 people through this one at a time. I just can't. I'd eat a gun. I swear I would. Have mercy.

4) All photos are to be in color unless specified otherwise.

5) I still have feelers out for donors of (very modest) award prizes. I think we should make the bragging rights tangible in some small way. If I have to I will do it out of pocket.

6) Tags - All entries will have the following tags, exactly as stated (leave off the quotes) -- "strobistbootcamp" (that's one word) "pro" or "amateur" the exact name of the assignment, which will always be one word, and your country.


Thus, if I entered a photo for an assignment called "doubletruck," my tags would be:

strobistbootcamp pro doubletruck USA

Note that these are all separate tags. You can have additional tags. Just make sure you include these among them.

Here's the syllabus. There will be six assignments, progressing from easy (deceptively simple, actually) to challenging. You will follow the path of an up-and-coming freelancer, Phil Phlashen, (heh, heh) working his or her way through a publication like a hot knife through butter. Whether your photos merit this kind of fast track will be up to you.

You will get your assignments in a similar way that a working pro would get them. Sparse detail, and maddeningly vague. But I will also provide some of the subtext that pro's know how to decipher in the hope of tuning your thinking a little bit. So, first the assignment - then the "reading between the lines" part. The names of your subjects are made up, and are purposefully androgynous. Choose a male or female as your subject. You may choose the same person more than once, but that will take some of the challenge and fun out of it.

At the end of SBC, I will choose an overall winner in the pro and amateur categories. Preference will be given to the people who complete all six assignments. There will also be a Best Overall Photo chosen. I will also point out some notables in some categories that you may or may not want to be chosen in, if you get my drift. :)

And one last thing: Deadlines are deadlines.

That said, let's get started.


Strobist Boot Camp Assignment One: Headshot

What you would get:

To: Phil Phlashen
Need mug of Pat Harwood for next issue of magazine.
Might run w/some size.
Deadline June 28, 23:59 GMT
Ph: (000) 000-0000
Please call to schedule


What they don't say:

You want deceptively simple? Doesn't get much more deceptively simple than a headshot, or "mug," as it is known in the industry. Get the term mug out of your mind quickly, and replace it forever with "headshot." You'll make better mugs that way.

Here's an analogy. A person in a singles bar will make a judgement about you very quickly, based on near instantaneous first impressions. Fair? Nope. Exploitable information if you know it? Yep.

Likewise, a publication can learn a lot about your skill level, professionalism and attention to detail by assigning you a simple, safe (for them) "mug" shot. If you screw it up, they'll run it tiny (if at all) and never think about you again. No big loss. To them, anyway. Bye bye to you.

Conversely, if you can take a simple mug assignment and turn it into a headshot that is clean, well-lit, engaging, could-easily-run-as-a-lead-photo (and possibly a cover shot in a pinch) then they get a very different message. The impression of you is one of a photographer who does not blow off any assignment - no matter how seemingly insignificant. Someone who pays attention to detail. Someone whose minimum quality standards - on any assignment - are always met.

Guess which photographer you want to try to be?

You find some helpful info in the umbrella section of Lighting 101. Also, there is a simple headshot tutorial. That's a quick and dirty approach, mind you. Please do not take it as the end-all for this assignment.

You are to use at least one off-camera flash for this assignment. Use more if you like. But this assignment can be done perfectly well with a simple Starving Student Off-Camera Light Kit. So, do not think fancy. Think quality. Think elegant. Think engaged with the viewer.

NOTE: To avoid any confusion, the tag for this should be "headshot," along with "strobistbootcamp," "pro" (or "amateur,") and "USA" (or whatever country you shot it in.)

That's it for the first one. You have two weeks. Let's have some fun, and let's see whatcha got. And if you are a DIGG'er, click here to spread the word.

Lighting Boot Camp Archive Page

Here is where you will find, in order of appearance, all of the Boot Camp-related posts.

As they will pretty quickly move off of the front page, this archive page will be linked near the top of the sidebar. If you have any Boot Camp-related comments, please post them in the Flickr thread related to the particular assignment.

Links to the thread are in the original assignment posts.


1. Guidelines and "Headshot" Assignment
a. "Headshot" Deadline: One Week from Today
b. Ask Not for Whom the Bell Tolls
c. "Headshot" Assignment: Discussion
2. "Background" Assignment
a. "Background" Assignments Coming In
b. "Background" Assignment: Discussion
3. "Look Smart" Assignment
a. "Look Smart" Assignment: Discussion
4. "Water" Assignment
a. "Water" Assignment: Discussion
5. "View with a Room" Assignment
a. "Room" Assignment: Discussion
6. "CD" Assignment
a. "CD" Assignment: Discussion

Monday, June 12, 2006

On Assignment: Shoot Your Kid

I've said it before, and I'll say it again: Family members, and especially kids, offer a fantastic opportunity to practice your lighting techniques. Kids work cheap. They love the hyper-attention of a "professional photo shoot." And the photos you get from these sessions will mean more to you than anything else you could be shooting as you improve your lighting skill level.

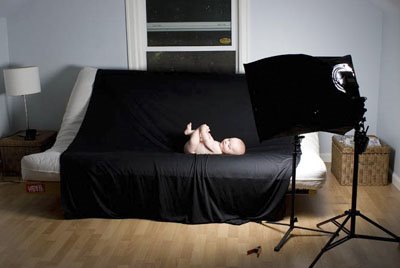
If you are a photog looking for a great, quick Father's Day gift for a spouse or grandfather, you have a week to play. Maybe you'll even get a photo like the one above that Portland-based photographer Robert McNary posted of his son, Owen, in the Flickr Strobist Group. I thought it brought up so many conversation points that I would bump it up to an On Assignment feature.

Rob set up some black cloth on his couch and photographed Owen with a Canon EOS 20D and a 28mm 1.8 EF lens at f5.6, 1/125 at ASA 100. His flash was a Canon speedlight, on manual at 1/2 power. He jury-rigged it to fit (rather awkwardly he adds) into a small softbox. He felt it would have been too much of a production to set up (and tear down) his bigger monobloc-style lights while keeping an eye on the kid. I totally agree. An umbrella would have worked fine as a light softener in this situation, too.

"I placed the softbox to my right and about 30 inches from the edge of the futon," Rob said. "I also set up a second light with an umbrella on another stand and positioned it behind me and to the left."


"The image above shows the result of that setup," Rob adds. "It's lit well, but is flat and boring. It would probably work well as a high-key shot with a white backround but I knew that I wanted to go for something with more shadows and depth. I wanted to really bring out the shape of his face and his baby fat wrinkles, so I just turned off the second light."


Rob experimented a little more with the second light, but ended up nixing it for the nice, rounded shadows of the single soft light source from his right. Satisfied with his light, he started working with Owen to get a better photo.


In yet another example of a slick photographer using a camera to coax a young, naive model out of their clothes, Rob soon had Owen buck nekkid on the black cloth. Happily, Owen lasted for the full (15-minute) shoot without testing the waterproof material under the black cloth.


Any time you can get all the way through a studio shoot without your model peeing all over the set, well, that's a good day in my book.

"These images were all shot in the middle of the day," Rob said. "I just used my shutter speed to control the ambient light. It might be good to remind people that they don't have to do this kind of "studio" photography in some dark room dedicated to that purpose."

I totally agree. Studios are just big rooms with no windows. No magical quality to them. And not much environment to creatively include in your photo, either. Don't think "studio light." Think "light."

Note Rob's angle of attack when shooting these photos, too. When photographing your own little rug rat, (or someone else's) get your camera down to their eye level or below it. When you get down there, you enter their world. Your photos will be much more engaging, and avoid that condescending visual feel of the kid looking up at the adult with the camera.

Crawl on your belly if you have to. I almost always do when shooting kids. You'll get better involvement from them, too.


All Photos ©Robert McNary

Next: Developing an Idea, Part One

Saturday, June 10, 2006

Don't Fry Your Camera

You get a few thousand photogs hanging out in the same place, and occasionally someone is gonna come up with a cool tidbit.

Such is the case here. I'd like to give credit for this one, but it was posted by "Anonymous," deep in the site's comments section. (Folks, please leave a name and fill in the website field, so we can see who ya are, K?)

Anyway, he (or she) posted a link to a cool website that lists the synch voltages of many, many strobes.

Why is this important? Well, as we talked about before, recently designed cameras handle the synching functions through the main circuit board. They used to do this with a mechanical contact point, which did not care about the synching voltage of the flash.

But they care now. Long and short of it is, some old flashes have synching voltages that will fry your new camera if hooked up directly, either on the hot-shoe or with a PC cord. They were simply made before anyone knew synch voltages would be an issue.

If you are using any kind of wireless setup, like the eBay thingies or Pocket Wizards, you are already safe.

The site gives good general info about camera synch voltages, and names names. Many modern cameras are similarly designed. So even if yours is not listed, this info should give you a pretty good ball-park estimate on whether or not your proposed flash/camera combo is safe.

The not-so-good news is that the site is apparently up and down occasionally. If it is on a bandwidth-limited free server, I am sure you guys will exceed the limit by a few orders of magnitude. So it may be tough to log on to it.

So, in case it is not up, I can tell you that the older flashes I have recommended here (Nikon SB-24, -25, -26, -28, -28dx, -50, 80, 800, etc.,) are well within the safe range.

But if you are using something else, be sure to check your flash to see if it is one of the naughty ones.

Thanks for the great tip, whoever you are!

Share

Twitter Delicious Facebook Digg Stumbleupon Favorites More