Saturday, June 24, 2006

Still on Vacation, But Watching Those Headshots Roll In...

Seeing some real nice stuff popping up for the Boot Camp headshots. Hard as it is, I am doing my best to stay away from the computer while on vacation. I'll be back in full swing come Tuesday, June 27th - just in time to drop the hammer for the June 28th headshot deadline.

That said, I got lots of "eye rolls" for reading the Raw Conversion book instead of a beach novel. But it was very good and I think I enjoyed it just as much as whatever John Grisham or Dan Brown has out for the summer. I am glad to see such a multi-lateral discussion springing up in the comments, too. Knowing this stuff is very important if you are quality minded.

While I am not posting as much, I am checking in frequently and enjoying checking out the headshots that have already been filed. I am looking forward to seeing what deadline brings.

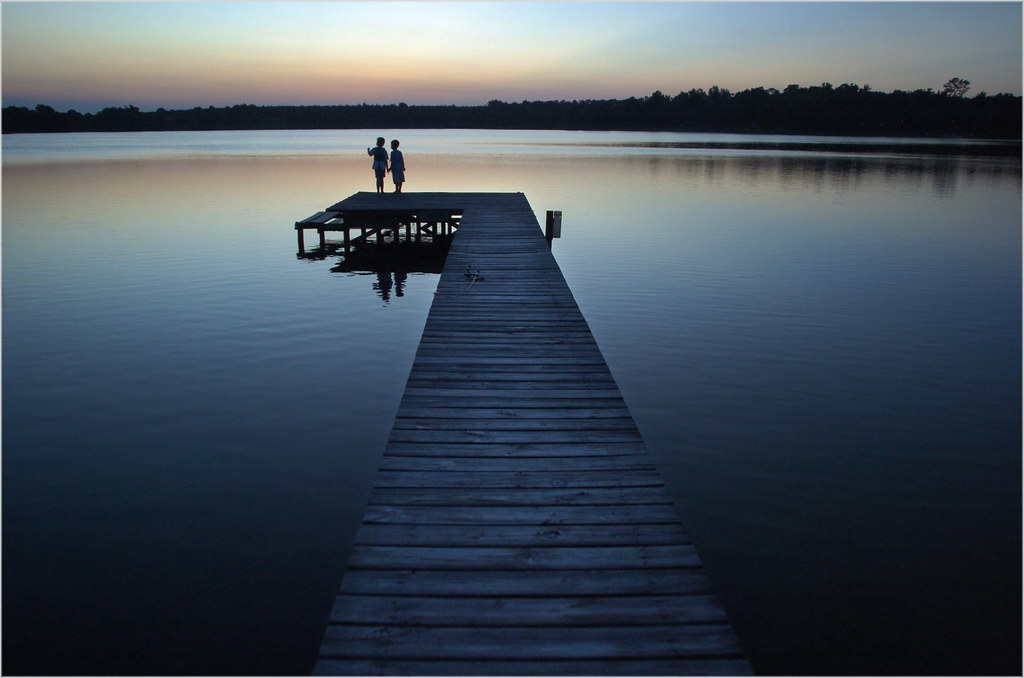
Oh, and absolutely no flash was used at all for a grab shot of my two kids on the dock at sunset last night. (To see a larger version, click the on the pic.)

Hey, I'm on vacation. I don't have to light anything.

Friday, June 23, 2006

Confessions of a Jpegger

Once in a blue moon, a product comes along that gives you so much bang for your buck that it becomes a no-brainer to snag it.

Usually, it is an inexpensive little item that leverages something you already own to make it perform much better.

Such is the case with budget, off-camera lighting. You have this $500/$1,000/$3,000 digital camera and you can make the photos that much better by (a) getting yourself some quality light, and (b) learning how to use it.

Before I get ahead of myself, let me back up a little.

In the newspaper business, we have to apply the standard of "good enough" far too often. We are always pinched for time and resources, and we can't apply the same energy to a story that they can at, say, National Geographic.

As a result, I have been shooting jpegs on my pair of Nikon D2h's since day one. Ditto my D1h's and the D1's before them. I know from conversations from many of you that I am woefully behind in the area of understanding about shooting raw. Not to mention color space.

Are jpegs "good enough" for many situations? Sure. I'll confess right now to not even using the highest quality compression on my jpegs, too.

Why? The buffer holds more pix while shooting. I get more pix on a card. Archiving takes far less time. My final product is printed on Charmin. The list goes on. Heck, on deadline (and shooting with cell phone transmission in mind) I will size my photos at 8" x 200DPI on the long side, with enough jpeg compression to get the file size down to less than 200k.

Pretty? Nope.

Fast? You betcha.

But in the back of my mind I knew that shooting raw when possible could get so much more out of my cameras. And I also knew a good understanding of what color space I was using (and why) would also kick my quality up a notch or ten.

With the arrival of the book, "The Art of Raw Conversion," by Uwe Steinmuller And Juergen Gulbins, there is now an great way to learn how to push the limits of what your digital camera is capable of producing.

If you recognize the names of the authors, it is because these guys were strong shooters before they were educators. Uwe is also the man behind Digital Outback Photo, one of the more popular hangouts for digital shooters on the web.

Simply put, the book, The Art of Raw Conversion is a $25 plug-in for your brain that will soup up your digital camera (and every future digital camera you'll ever own) and drastically increase the quality of your photos.

(The book lists for $39.95, but Amazon displayed a price of $25.17 when I looked it up. Amazon uses "dynamic pricing," so your price may be a tad different. But at $25.17, this book is a steal - and just over the price line for free US shipping. Schweet.)

The first two chapters alone are worth several times the price of the book.

In chapter one, you will learn the basic theory behind shooting raw. Long story short, your camera is producing far better files than you are seeing if you shoot jpegs. And then it is "helpfully" processing them for you - not unlike a drugstore photo finisher. This onboard jpegging process also takes away your ability to change exposure several stops after the fact, for instance. Ditto (real) white balancing, contrast and several other functions.

Yeah, I know you can do that to some degree in Photoshop. But not nearly so much as the control you get while working in raw. By the end of the first chapter (OK, maybe by the end of the second reading of the first chapter) you'll be conversant in the DSLR's abilities and advantages of shooting raw.

You think the shooters from Sports Illustrated (and the picture agencies) shoot jpegs? I can tell you that they don't. They know what you don't - that raw files are worth the extra storage space and buffer capacity than shooting faster, smaller jpegs.

The second chapter embraces an area no less important - that of understanding and choosing your color space. Shooting for monitor display, inkjet print output, newspaper, etc., all present different requirements and challenges that can be better addressed by choosing the proper color space.

Chapter three gives you a strong foundation in raw image work flow. This is important, because you will want to get the benefits of shooting raw and keep the ability to go back to square one should you come across a better conversion program - or better tune your image post-production skills.

They spend much of the rest of the book teaching you how to better use several of the most popular programs for handling raw format images. (Most DSLR cameras come with some sort of program for manipulating raw images, too.)

Their analogy of "the digital negative" is a sound one. And for people who shoot jpegs, all of the first layer of processing that are applied to every picture is done by a relatively weak program in your camera's firmware that is optimized for speed.

If your photos matter, it is far wiser to do this work yourself on your computer instead of in-camera where the choices are made for you and the "computer" is a relatively dinky one.

You will be driving instead of your camera's (well-meaning) firmware authors. You'll be working with 12-bit image depth to get exactly what you want before you bring it down to the 8-bit depth of jpegs at a time of your own choosing.

You do not have to read the whole book to get the benefit, either. The first three chapters are required reading, tho. And if you are contemplating buying Photoshop CS, or any other advanced raw processing program, this book will allow you to make a far more informed choice.

The best analogy I can think of is this: It is as if someone has invented a $25 fork that makes every bite of food taste much better, without raising the cost or caloric content of the food.

Heck, I wish I would invent a fork like that. I'd be a gazillionaire.

Get yourself a tasty bite of The Art of Raw Conversion. It's food for thought for photographers who want to inexpensively push their digital DSLRs' capabilities to the max.
Wednesday, June 21, 2006

Bootcamp Headshot Deadline: One Week From Today

One week to go, my procrastinating friends...

But as you can see by the sampling on this post, there are a few brave souls out there already posting their efforts way before deadline. Good for you guys. Still waiting to see if you guys (as a group) are actually going to take up the challenge in real numbers. Or perhaps I have attracted a passive group of recreational readers. (No pressure, though.)

On the other hand, I am amazed at the number of people who have joined the Strobist group at Flickr. (Of course, all that takes is the click of a mouse...)

If you are late to the game, there is still time to do the first assignment of Strobist Lighting Bootcamp. Just follow the link in the sidebar at right. If you aren't showing up for the headshot stuff, you are gonna have a heckuva time catching up with the assignments start to get interesting.

On a side note, I would strongly prefer limiting the pool photo posting to photos lit by off-camera flash - or extremely interesting photos with on-camera flash. That is kind of the idea of the group. One of the admins could just run through there, deleting photos willy-nilly, but it would be much better to self-police if you could. Muchas gracias.

No posts tomorrow, as the Hobby family (me and the missus, an 8-year-old and a 5-year-old) are going to be at the gates of Disney's EPCOT when they open up and go straight through until they kick us out at closing time - 14 hours later.

Crazy? Maybe. We'll see. I've been several times before, but it is the first time for the curtain climbers.

Just hope we remember the sunscreen. I'm the beet-red, burn-and-peel type.

Wish us luck.

-D

UPDATE: Silly me. I thought EPCOT stood for Experimental Prototype Community of Tomorrow. Turns out, it stands for Every Person Comes Out Tired. But it was a lot of fun. Especially with two kids soaking up just about as much knowledge as they could in a single, albeit long, day.

Tuesday, June 20, 2006

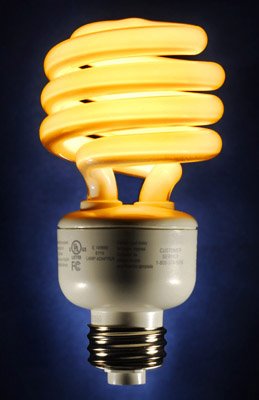
Developing an Idea, Part 2: Compact Fluorescent Bulb

In Developing an Idea: Part One, we talked about the process of coming up with an idea for a photo and then letting it sit in the back of your mind while you solved the series of problems you would encounter while producing it.

In this case the idea was to produce a photo to grab people's attention long enough to learn more about compact fluorescent light bulbs, or CFL's.

In preparing for the shot, four major "curve balls" were identified. Again, I like to think of problems as curve balls. They can be very daunting, but many people obviously learn to hit the daylights out of them. It's a good mindset.

First was the illuminated CFL light source itself, which was to drive the exposure for the photo. It would leave the remaining part of the bulb very dark. This would be solved by combining flash and available light (the CFL's light output) to compress the tonal range. No different, in theory, than using "fill flash" in the noon-day sun.

Second, the business end of the bulb is white even before it is turned on. So that part of the bulb would have to receive almost zero strobe light, which would be tricky given it is right near the base of the light, which would have to be fully lit by flash.

Third, the light would need to glow, even with the base fully visible and apparently unattached to AC.

Fourth, an offshoot of curve ball number three, is how to make the bulb appear to float.

Starting with the glowing light issue, we simply needed to design an invisible lamp. This was easy enough, but not something I would encourage unless you are comfy working with household AC current.

(No kidding, this stuff can kill you. It basically can defib your heart if you grab it wrong. Don't play with it unless you know what you are doing. Strobist is less than three months old and I do not need to be killing off readers.)

What I did was to solder a lamp cord directly to the screw threads and bottom of the CFL. By doing both wires on the same side, I could shoot the CFL and have it appear to be unconnected to power.


Second, I wanted it to float in order to reveal the entire screw thread assembly. By running (and taping) my lamp cord down the length of a dowel clamped to a light stand, I could invisibly support the light and apply electricity to it at the same time. The dowel passed through a small hole in a piece of ordinary black poster board, which hid the light stand support and gave me a sort of "studio" background look. I say "studio," because it was shot in a smallish townhouse living room.

Studios are just big, boring rooms. "Studio lighting" is very limiting. Try to learn to separate the terms, "Studio" and "lighting" in your mind. It's a strong and needless association for many people. I actually got yelled at on a very popular digicam message forum recently for just suggesting such heresy. Oh, well.

Total cost for the extras at Home Depot: Couple of bucks for the dowel and $1.24 for the extension cord. (I just cut the female end off.) Forty nine cents for the poster board and some gaffer's tape later, I was in business.


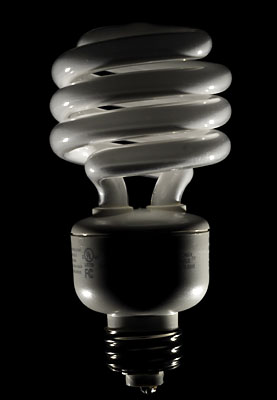
Here's the shot with a couple of Nikon Speedlights lighting the base of the lamp. There's WAY too much light spilling onto the bulb part, but the shooting angle is hiding the support just fine. So we are getting closer.

A few minutes later, having experimented with some cardboard snoots, I had most of the strobe light killed from the bulb part, as seen above.

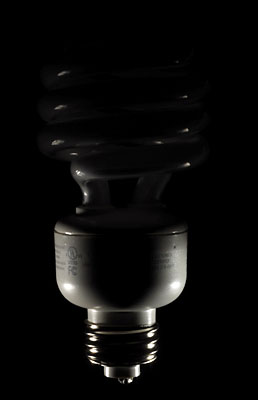
Here is a shot without flash, with the bulb plugged in, showing what will be the ambient portion of the exposure. (I held my breath the first time I plugged in the lamp.) Remembering that we have controlled the flash spill from the base, combining the two light sources is now very simple.

Here is the combination shot. If I wanted to change the light level on the base, I did so by changing the camera's aperture. If I wanted to change the exposure on the bulb, changing the shutter speed made it a piece of cake.

Only thing left is adding some tone and color interest to the background. This was done with a third Nikon SB-800 speedlight with a blue gel on it propped up on some books.

All of the flashes are on manual for full control. The back flash was powered way up because the black poster board ate light like crazy. The front flashes were almost too bright at 1/64th power.

And there is the pull-back, which shows the whole setup for the final shot. What amazes me is how spartan the set is, and how produced the final photo looks. It looks better than the original version, which was shot in my brain about a month ago. This is almost never the case for me. But I will gladly take it when it happens.

Photoshop-wise, this is almost a straight, in-camera photo. There was a dollop of solder on the bottom that I cloned out. You can see it in the interim photos. It was a tradeoff between safety (I wanted a very good solder joint) and invisibility. Safety won.

Much of the credit for how good this final image looks goes to Nikon. The D200 (loaner) digital camera I was using when I made this shot makes some amazing files. I want one. Or two.

All of my cameras are purchased by The Sun - and I am not complaining, mind you. But that also means that I am not in control of when I can upgrade, and what I will upgrade to. If it were up to me, I would gladly trade in my two (Sun) Nikon D2h's for one Nikon D200. The camera is far ahead of the D2h.

If I got this assignment with one day's lead time, it would not have happened. But being on your own time frame - and having a chunk of time to learn to hit your curve balls - can let you find the path to the photo your mind can easily snap the instant you get the idea.

Oh, and switch to compact fluorescent bulbs. You'll save money every month on your electric bills.

And if you don't need to save money because you already have too much, do it anyway. You can use the money to buy me one of those D200's for my birthday.


Next: 5-Minute Test Shot

Monday, June 19, 2006

Flickr's "Strobist" Group Hits 500 Members

Having started less than a month and a half ago, there are now 500 of you in the Flickr Strobist Group, sharing your off-camera flash photos and ideas on a daily basis.

This is way cool. If you haven't checked it out, you really should. It's free, easy and lots of fun.

Sunday, June 18, 2006

Pro Tip: How to Quick-Change an SLR lens

Professional photographers see you amateurs out there, frequently shooting right along side of us while we are on assignment.

You're right there at events like festivals, fireworks displays and high school football games. A few of you even seem to know how to BS your way onto the sidelines next to us a pro football games. (How do you do that, anyway?)

We see you watching us. What you might not know is that we are also watching you. While we sometimes get P.O.'d when you crowd our shooting angles, we are frequently jealous of how well you are equipped.

A couple of things we might not be so jealous of: Your shooting and equipment skills.

Which is why we think it is particularly entertaining to watch you do something like try to change lenses quickly when a fleeting moment is slipping by and you are caught with the wrong glass on your camera.

That said, here is how to quickly swap a lens and not look like Barney Fife going ballistic as he tries to wrestle his gun out of his holster on The Andy Griffith Show.

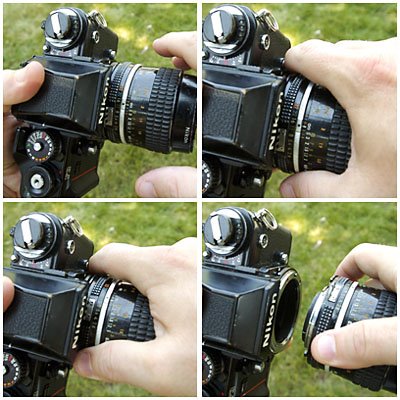
The following steps should (eventually) be performed in one smooth, fast motion. I am using Nikon as an example, but everything is the same for Canon. The twist direction is simply reversed.

1) Hold your camera in your left hand as shown in the upper left part of the top photo. Approach the lens as shown with your right hand open and the right forefinger extended a little.

2) As seen in upper right, when you close your hand around the lens, depress the lens release button with the left side of your right forefinger.

3) Moving onto lower left, rotate the lens clockwise (for Nikon, reverse for Canon) and let the forefinger slide along the still-depressed release button.

4) Finally, as seen at lower right, the lens slides smoothly off of the camera and leaves with your right hand.

Mounting the lens is the reverse action - just as smooth - except the lens itself depresses the lens release as it is pushed onto the camera before rotating into final position.

With about a minute of practice, you should able to go from not touching the lens to having the lens off in your hand in about a quarter of a second.

Don't believe me? Try it.

Learn it like they do in the Army Rangers - start slow and smooth at first and get the muscle memory down.

Like the mantra goes: "Slow is smooth and smooth is fast."

You'll soon be able to perform this maneuver while keeping your eyes on your subject instead of watching yourself fiddle with your camera. And that's important when your are seeing a good moment come together.

Try it - you'll be surprised at how easy it is.

Hey, Where'd the Montage Go?

I am very pleased to welcome the folks at Adorama to the leaderboard position. Please do give them a visit and have a look around their vast online store. They offer darn near anything photographic, and I am proud to be associated with them.

If your company is interested in advertising on Strobist, please click here for more info.

Share

Twitter Delicious Facebook Digg Stumbleupon Favorites More