Thursday, October 2, 2008

Speedlinks, 10/3/2008

First things first: I really need to do a sig photo for the speedlinks. I'm thinkin' tastily lit macro shot of two sausage links sizzling on the griddle. Got any other ideas? Comment 'em to me below.

Until then, your latest batch of artless speedlinks, after the jump:
__________


• Robert Benson blogs about an insane man named Mark J. Rebilas, who will PW-remote his cameras just about anywhere. Holy crap, would you strap your DSLR to one of those airborne BMX bikes? Company body -- yeah, maybe. Personal body -- uh, no.

• Elinchrom has debuted a new 400WS battery flash: The Ranger Quanta. (Specs here, first Photokina video grope here.)

• If you haven't seen the Rangefinder Magazine article on small-flash corporate shooter David Tejada, you can now read it via PDF.

• Would you like to see dramatic portraiture up close and personal? Are you willing to work for free (grub included) to do it? Michael Grecco is looking for an intern.

• Martin Prihoda just finished his first gazillion watt-second lighting workshop, so you have to figure there was a YouTube video coming...

Wednesday, October 1, 2008

And Now, Your Moment (It Clicks) of Zen

Photo © 2008 Carlton SooHoo

Ever wonder what it's like to go to a Joe McNally seminar? This is what it's like.

But honestly, a small still photo doesn't really replicate the full Joe McNally geargasm experience. No, sir. For that you need to see the 360-VR stitched panorama.

(Server crash in 3, 2, 1...)
___________

Thanks to Carlton SooHoo for the pic, and to Joe McNally for the constant inspiration.

-30-

Tuesday, September 30, 2008

Lighting 101: Strobe/Ambient Balance — A Shorthand Way of Thinking


Okay, so by now you should have a decent understanding of how you can balance flash flash with ambient light. In this segment, we'll give that process a little shorthand language to help you understand other photographers when they talk about the way the lit a photo.

Here, I want to accomplish two things:

1. To set you up with a way of quickly understanding and/or communicating how a given photo was balanced, and

2. To not have to repeat full, detailed number-by-number walk-throughs on this process every time we mix flash and ambient. Which is just about every lit photo we shoot.
__________


First, a little confession. Lots of times when I am explaining to someone how a photo was lit, they will want to know everything -- shutter speed, ISO, aperture, flash power settings, etc.

I have to be honest with you -- most of the time I have no idea what those numbers were. It is not that I forgot them. It's just that I didn't care enough about them when I was making the photo to remember them, so they never registered.

No kidding, if you ask a professional PJ, "What's your favorite F/stop?" He or she will know you are talking about the amateurs that sidle up to us at a football game. We are really not that numbers oriented.

Truth be told, I don't think in terms of absolute F/stops and shutter speeds. They are not what is important. It's the relationship between the different light levels that is important.

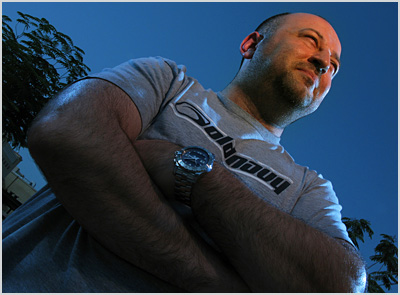
Take the photo of my friend Shadi, above. It was shot on a hazy, colorless afternoon in Dubai. Here was the process to make this photo:


1. Find the exposure for the ambient. (That's easy - just grab a shot on auto or zero out a manual exposure.)

2. On manual mode, set the camera to underexpose the scene by two stops.

3. Set the camera to tungsten WB, to shift everything from dark grey to dark blue.

4. Light Shadi from the front with a flash with a CTO gel (plus an additional 1/4 CTO gel for extra warmth.)

5. Rim light him (from behind, low) with two ungelled flashes, at about two stops down compared to the main flash. That is the actual relative exposure level hitting Shadi, already accounting for the fact that that the flashes were ungelled. (The gel eats light from the key flash. So the rims might have actually been set 3 to 3 1/2 stops down in terms of absolute power settings.)
__________


If I were talking to another pro about this photo, I would likely just say this:

"We dropped the ambient two stops, shot on tungsten, CTO'd the key light (plus an extra quarter cut) and left the rim lights ungelled, about two stops below the main."

That sentence tells me everything I need to know, because it starts with an assumed reference: They properly exposed key light.

What were the exposure settings? Can't remember, and don't care. It's just not that important.

What is important is the relationship between the flash exposure and the ambient exposure: About two stops. And, just to make things more complex, the fact that we did the tungsten-ambient shift, overgelled the key and left the rims straight.

Understanding this shorthand way of thinking drills into your head that it is the relationships between the lights that matter -- not the absolute settings.

There are two power ratios to think about here: The relationship between the key light and the ambient, and the relationship between the key light and the fill (and/or background) flashes.

Given that our first example was a little complex, lets walk through some familiar photos, thinking and talking in shorthand about the balance.


"Sodium vapor ambient. Shot on daylight, underexposed the wind tunnel by 1 2/3 stops, bare flash behind the fan blades about a stop hot."

So, this tells us that the reference point for the exposure was actually between the exposures for the flash and the ambient. This photo is underexposed by 1 2/3 stops for the ambient, and the flashed area is one stop overexposed.

My ambient is 1 2/3 stops down -- on the wrong color balance -- and my flash is a stop overexposed. This photo should really suck, right?

Honestly, if one area of the frame were "correctly" exposed, it would not be as interesting. The important thing is that I chose these relative brightness levels, without being chained to my camera's ambient meter or the "proper value" of some incident flash meter.

(You can read more about this photo, including those unimportant f/stops and shutter speeds, here.)
__________


Let's try it again:
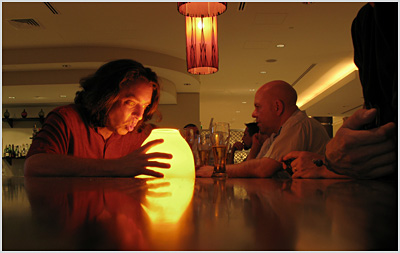


"Shot on daylight setting in a tungsten room. Exposed for the flash under the orange bowl on Chris' face and dropped the room by a stop and a half."

What's my reference point? The flash's exposure on Chris's face. I put the flash under the bowl on low power, shot a couple of frames until I got the aperture right. (Easier than adjusting that flash.) And then dialed in the shutter to set the ambient to a stop-and-a-half down.

Technically, I supposed I should have shot in tungsten, but why get rid of all of that surreal color? Besides, have you seen Chris Hurtt's natural skin tone at midnight in a bar in a Dubai hotel?

I'm just sayin'.

Thinking about your flash and ambient in terms of their relative (as opposed to absolute) values not only makes you quicker at reverse engineering photos, but makes you quicker at pre-visualizing and creating them, too.
__________


Sometimes you are working so far above the ambient that it is not a component of the exposure at all. Yes, you need to communicate that. But given that you are far enough above the ambient for it not to be an issue it really doesn't matter if you are five stops over, or twelve:
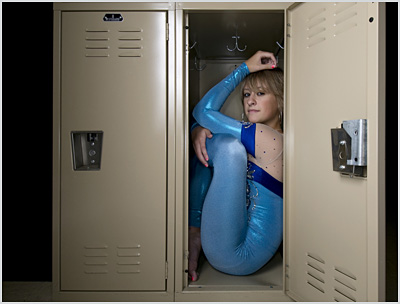


"We killed the ambient; umbrella at camera left, gobo'd to control the reflection on the locker; ring light fill about two stops down."

What was the ISO? The f/stop? The shutter speed? The flash's power settings?

Don't remember, don't care. Because all you need to know to reproduce that look is in the short description above. And if you start thinking about your photos this way, you'll find that the lighting design comes easier and easier.

(More on this assignment here.)
__________


Okay, one more:
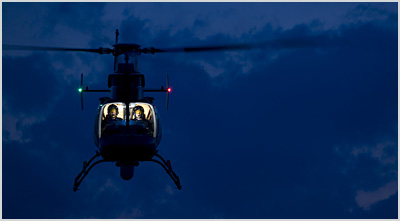


"Exposed for flashes in chopper -- one in front cabin, two in back -- and dropped the ambient by three stops."

That is all there is to it, and tells you everything you need to know about lighting and exposing photo.

Again, the absolute settings do not really matter, from a reverse-engineering point of view. They are yours to choose based on what depth of field (or rotor-stopping shutter speed) you want.

(More on this assignment here.)
__________


So, does this stuff make sense? It had better, because you are going to be seeing a lot more of this lingo in the future around here.

Don't worry, it is not like the posts are going to be three sentences long from here on out. (You wish...) There is still a lot of stuff to think about when you are creating and lighting a photo. It's just that we do not really need to re-invent that wheel any more.

Instead, I'll just give you the info in a way that helps you to think on your feet better and link to this page for the newbs.

I realize that the vast majority of the people who read this site are amateurs. But as many times as we'll be going through this process, we should start talking and thinking like pros. And if you just dropped in and this is all Greek to you, definitely give the Balancing Flash and Ambient posts another read...


Next: Reverse Engineering Other Shooters' Light

LA, LA, LA...

If you are going to one of the L.A. lighting seminars this weekend, make sure you check in on the L.A. seminar discussion thread for the latest info.

Also, there is one seat that just became available, info here. (Filled.)

-30-

Sunday, September 28, 2008

Lighting 102 - 7.3: Time in a Bottle Discussion

Here we are, on the very last of the Lighting 102 assignments. This series has been more than a year in the making, and it is almost time to put this one in the books.

But first, we take a look at your "Time in a Bottle" assignment shots from earlier this month. As I recall, you were to shoot a photo using flash and some kind of time-controlled variable. There was also a set of DVDs in play, just to make it interesting.

Your photos, inside.

Leading off is this shot of a tunnel, by Noah Bennett. It was lit during a time exposure by "~270 flash pops," which not only showed up in the frame but also lit the length of the tunnel.

Not sure how he controlled the flare in this one, but apparently he figured that problem out.


Next is Michael Foy's shot of a scratching post, which was done over time with lots and lots of flash pops from just about everywhere.

The final effect is sort of a subtle, surreal ring light look -- except for Molly the ghost cat, who apparently caught one of the pops.


This foosball table's starting lineup was shot by thatmushroom, using a single, tightly snooted 285HV. He lit the players individually during a series of exposures and combined them in Photoshop using the lighten mode in layers.

Picking one shot for the DVDs was not easy. All the more so because the first winning photo I picked turned out to have been shot over a week before the assignment was made. (Grrr... had the whole post written, too.) Sorry, but no brownie points for being psychic.


And The DVDs Go To:

I am not sure exactly what message Cesar T. Sanchez (aka The Light Whisperer) was trying to send with this photo.

Was it, "Don't drink and drive?"

Or maybe, "If you are going to drink and drive, drive a Ford?"

Who knows. But that focus-shift effect is pretty cool. He used the time component to allow himself to shift focus from the macro, flash-lit keys to the booze three feet away for the ambient burn-in period. He details the process further, here.

Congrats, Cesar. If you will Flickrmail me your snail-mail address, I will get the DVDs out ASAP. Just follow the link on my comment under your photo.
_____________


In addition to Cesar, congrats also to all of the people who contributed such good stuff throughout all of the Lighting 102 assignments. You all put a lot of work into them, and it shows. The entire Lighting 102 series has been archived with internal link chains. You can take a look at the entire long and winding road by starting here.

Thus closes Lighting 102. This may be the last post in this series, but there is more participatory stuff coming. Stay tuned for more on that soon.

Act Fast: Best Buy Liquidating Nikon SB-800s

If we were looking for a sign that the Best Li'l Speedlight ever made has been put out to pasture, this is probably it.

Sadly, it looks like Nikon is clearing SB-800s off of the shelves to make space for the newer, bigger, faster, more 'spensiver SB-900.

Hit the jump for just how cheap they are, and your best game plan to get one.

Normally, I am not a huge fan of Best Buy. But this is one instance where it may be worth it to put up with them. From the Strobist Flickr threads varying reports of deep discounted SB-800s available at Best Buys across the country.

Best Buy Online for $399.95 (puh-lease -- they are $319.95 everywhere else) is "sold out" but the bricks-and-mortar stores are cutting them loose (new and demos) for way less. I have see everything down to $159.95. That's a steal.

Call your local Best Buy and see if they have any in stock. They can also look up other local stores, check stock and quote prices. Different stores will have different prices. Example: Gatihersburg, MD had two for $279.95, but nearby Pentagon City (Washington, D.C.) had two in stock for $199.95.

Word to the wise: These will not last long. Better that we get them than those Photo.net guys.

And if you hear of other national chains doing the same, please hit us in the comments. As soon as you finish skimming your local stores, of course.


RELATED:

:: Why the SB-800 Rocks ::

Thursday, September 25, 2008

Lighting Q and A, 09-26-08

Christine, in Virginia (USA), asks:

"Is it possible for a specular highlight to be anything other than blown out? If so, how do you meter and control its intensity?"

Yes it is, Christine.

Keep reading for how to control specular intensity -- and for your second question, which I liked even better...

Christine's question went into more detail, and was asking about the process of using one light as both a key light and as a background element via the light's specular reflection.

The short answer is yes, the specular can be just about any tone you choose. It depends on two things: The reflective efficiency of the object creating the reflection and the intensity of the light source, on a per-square-inch basis.

The more efficiently your object reflects, the brighter your specular will be. But you might not have much control over the object, so you can also control the specular intensity by increasing the size of the light source.

Let's say you have two lights, each set to illuminate your subject to, say, f/5.6. One is a hard light, and the other is a big, soft shoot-through umbrella.

They will both correctly expose the subject at f/5.6. But in addition to creating very different qualities of light on the subject, they also will create very different specular highlights whatever is reflecting the specular -- your subject and/or your background.

The specular of the hard light will be tiny and very bright -- and almost certainly blown out. This is because the light is very small -- and very intense over those few square inches of light size.

The specular of the big, soft light will be large and manageable. The size of the light source is a determining factor in the intensity of the specular. And that highlight could be a variety of tones based on how close the light is to is to the subject and background.

This is because, while both light sources are putting out the same amount of light, they look very different when you measure them on an intensity-per-square-inch basis. And since a specular is basically a reflection of the light source, the intensity of each of those square inches is the main factor in the brightness of the specular.

As for metering those highlights, you can use a flashmeter in reflective mode to check how bright a specular is (vs. your shooting aperture.) Or simply zoom into only the specular highlight and shoot a photo. Then look at your image and histogram on the back. The spike will tell you the tone where the specular is, as compared to medium grey.


Now, Christine is Thinking:

She goes on to describe a second setup:

"Possible Scenario 2: The specular is caused by a light placed for the sole purpose of adding a specular--i.e. a rim light on the edge of someone's face or a background light on a shiny wall--and changing the power and position of that light will not affect the overall exposure."

Absolutely, but I would do it in a slightly different way. Why not position the light so that it is very easy to line up the specular highlight? And yes, you could squeeze some double-duty out of it, too.

And that is exactly what we did in the photo at left. This was one of a recent series of photos for a software company. My assistant Patrick Smith and I were working very quickly in a hotel conference room to do eight full-page portraits in just two hours.

My main light is coming from camera left, a few feet out of the frame and pretty close to my subject. It is warmed up with a 1/4 CTO and is lighting his face with soft light via a shoot-through Westcott double-fold.

The second flash is also firing through an umbrella, but that flash is directly behind me and a tad high.

That is basically a "buy one, get one free" flash, as it not only provides the perfect angle to create a soft specular on the dark wood background, but also serves as soft, on-axis fill for my subject.

As mentioned in the SB-III post, on-axis fill is something I am using more and more, and in several different ways. More to come on that soon.
______________


:: Read More: Using Specular Highlights ::

Share

Twitter Delicious Facebook Digg Stumbleupon Favorites More